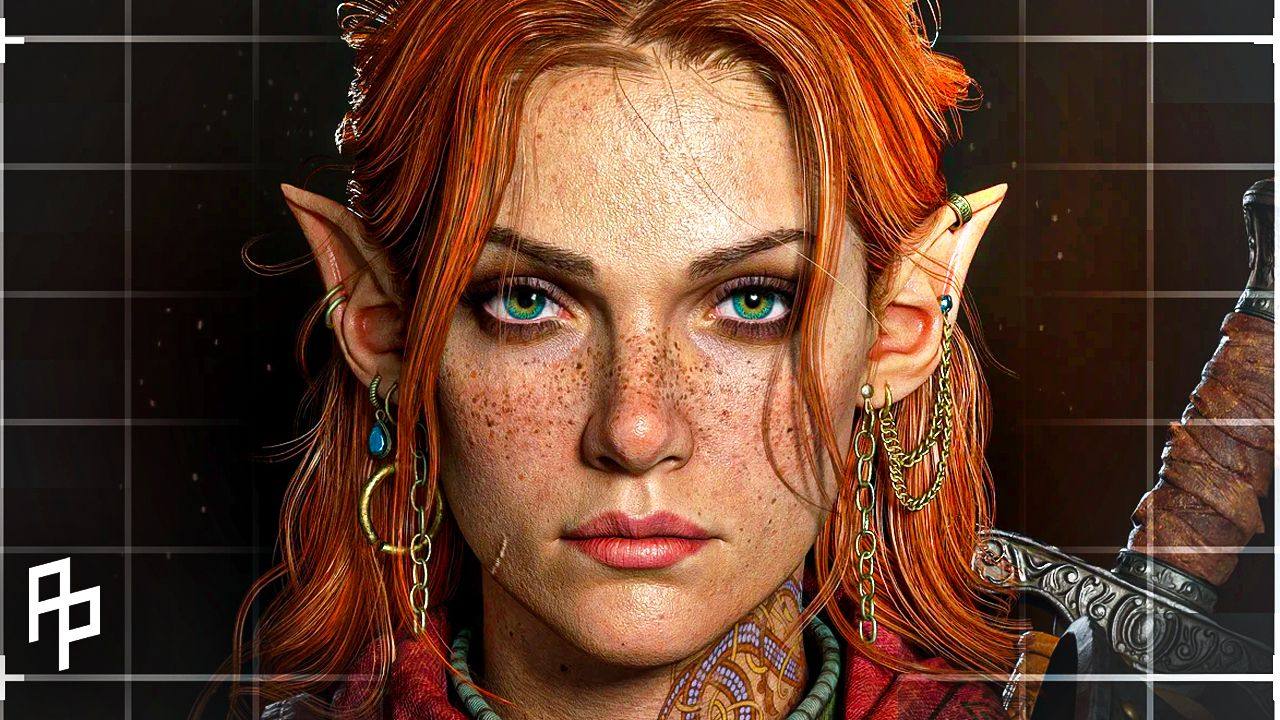
This Character Notes email is a deep, start-to-finish breakdown of a single personal project by Adaline.
Not a highlight reel. Not a surface-level walkthrough. A real look at how a character comes together when you commit to seeing one through.
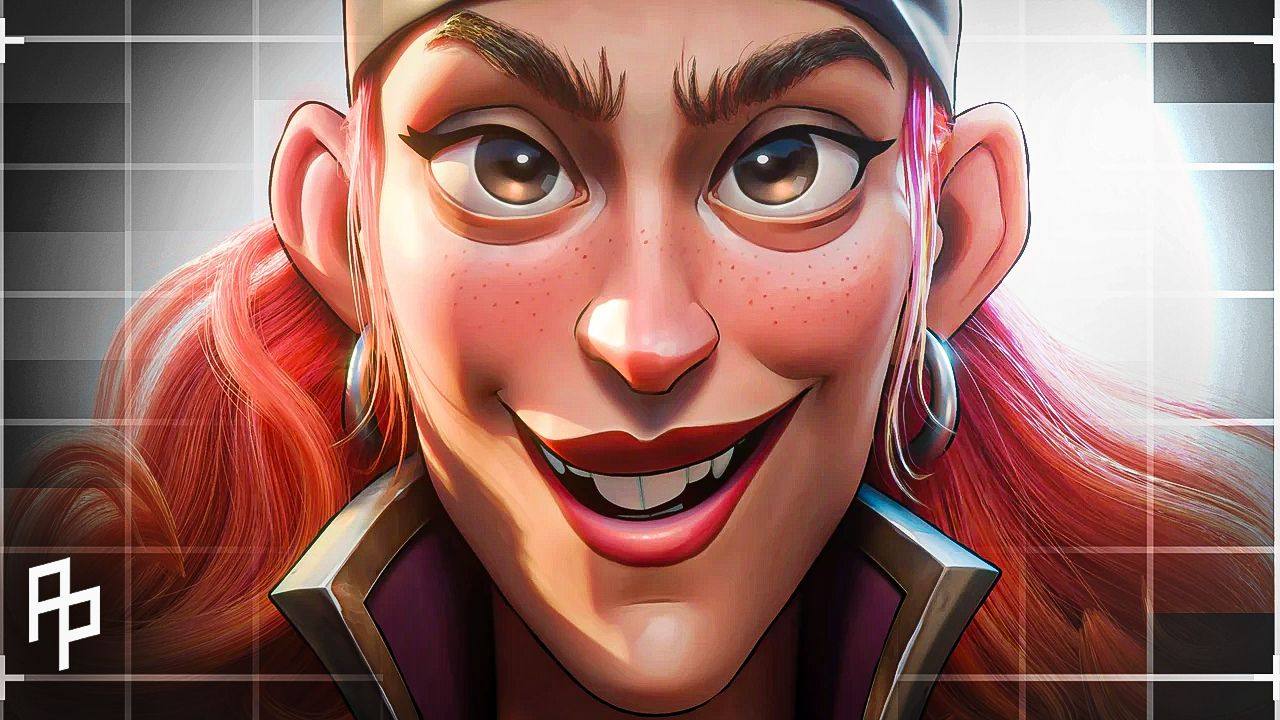
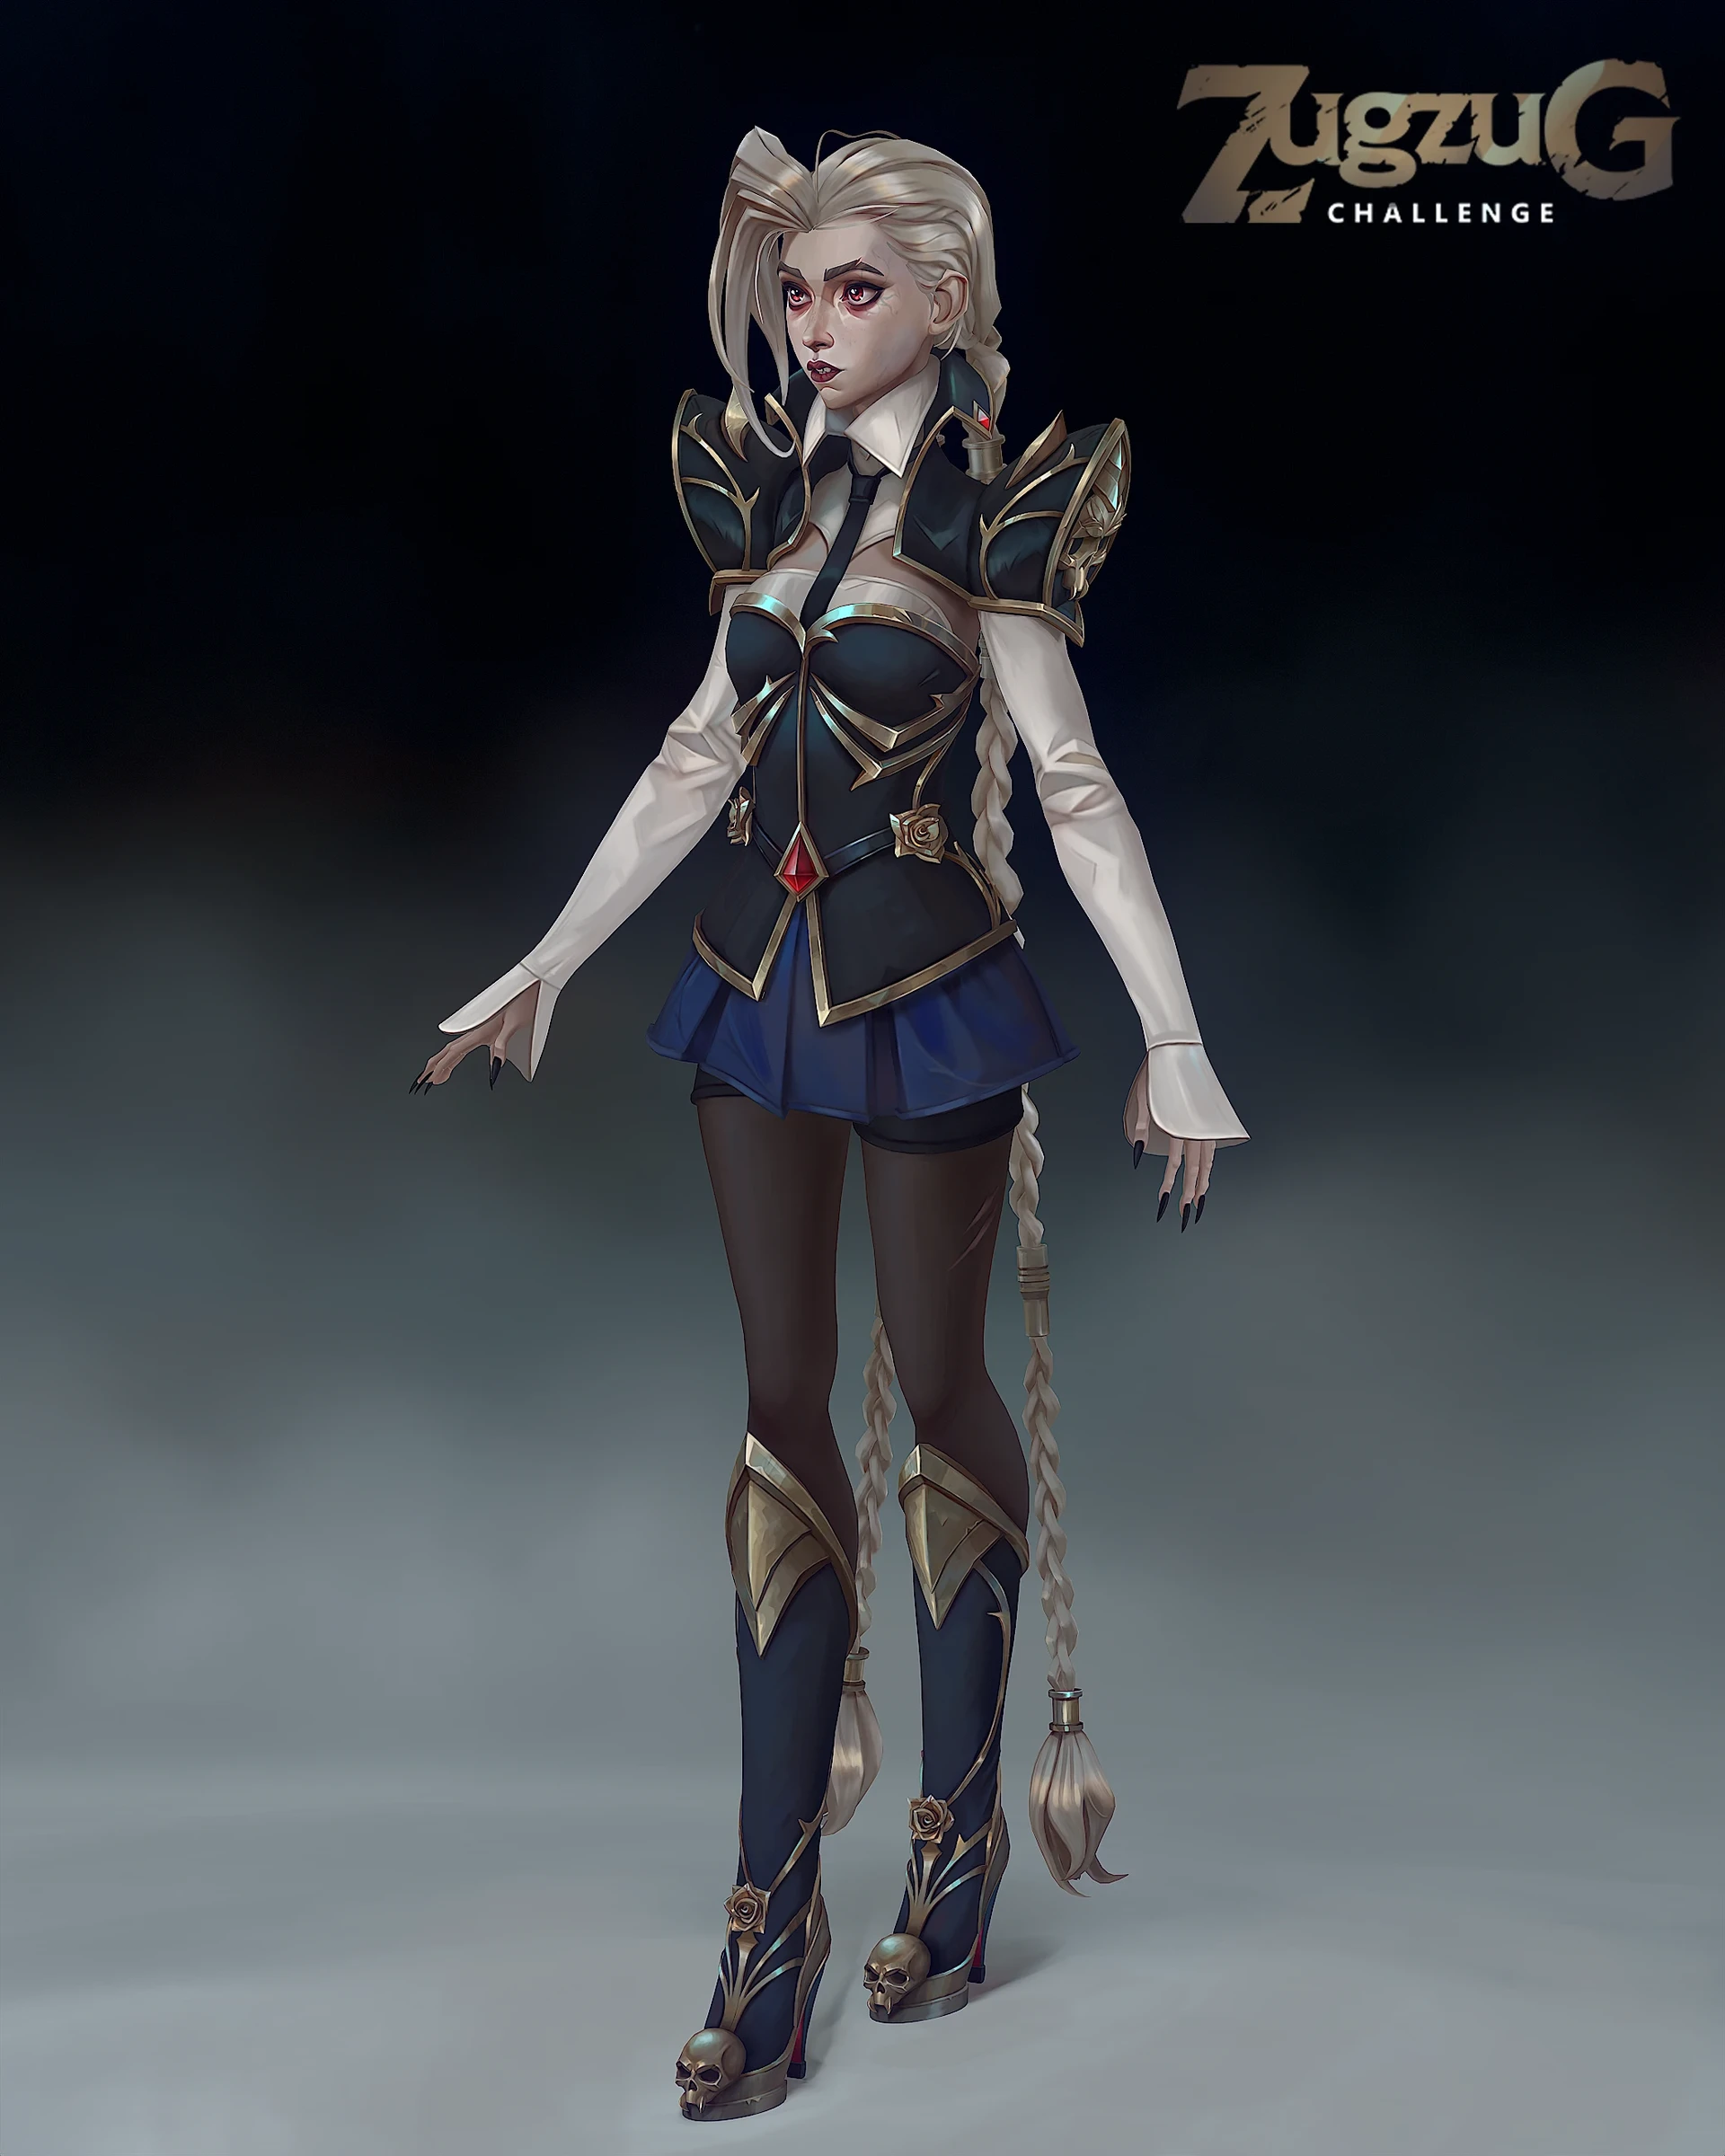
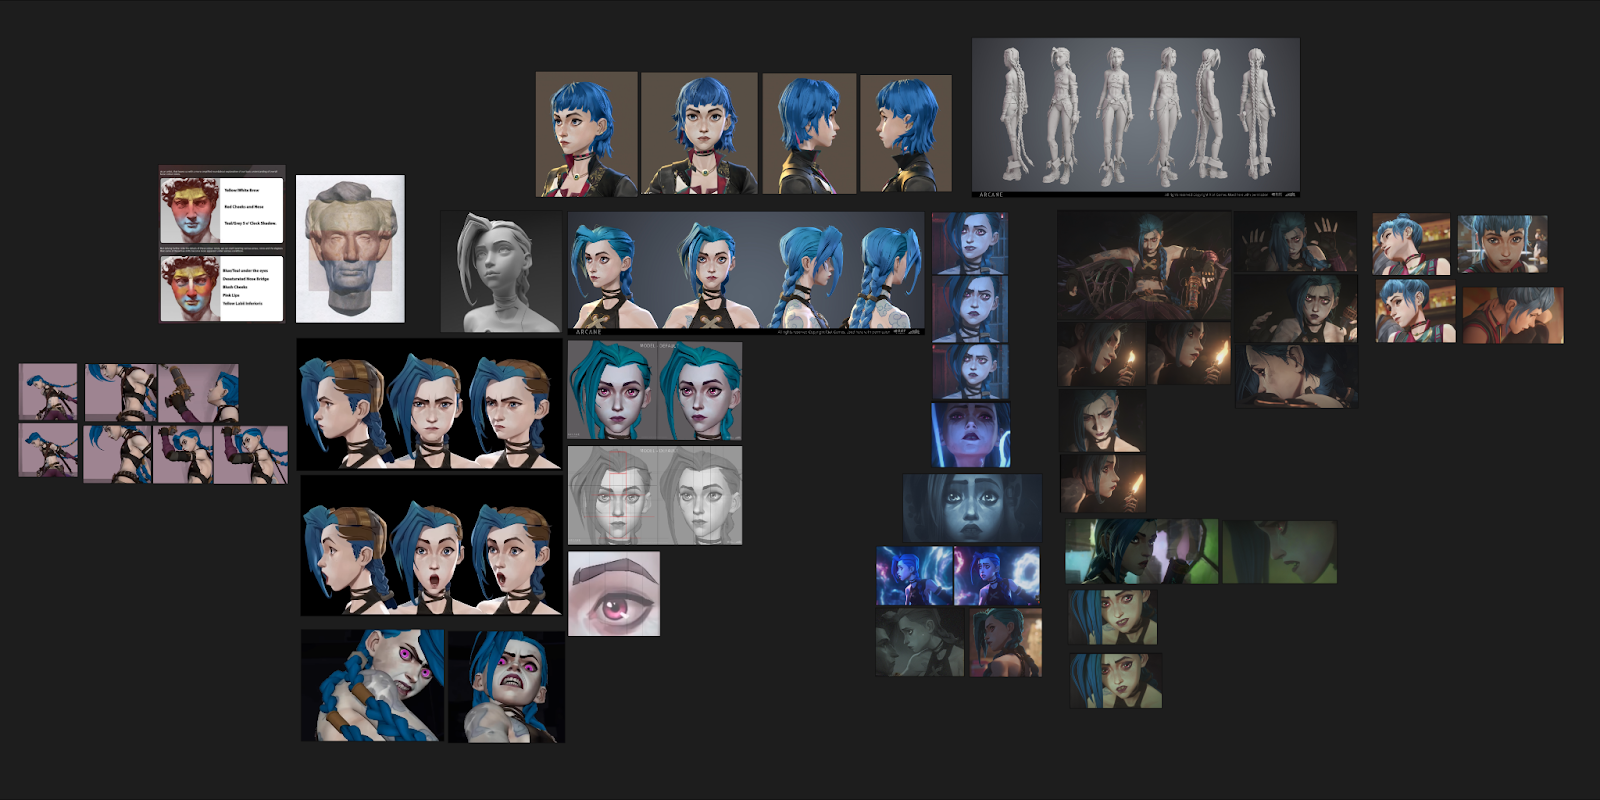
Alina breaks down her Arcane-inspired Jinx project from the very beginning. Starting with nothing but a sphere, no locked concept, and a clear goal to learn by doing. She walks through motivation, challenges, design exploration, anatomy, sculpting decisions, stylization, hard-surface work, hair, topology, and painterly texturing, all the way to the final result.
Why this matters is simple.
There is a specific place in the learning journey for projects like this.
You still need studies. You still need repetitions. You still need shorter exercises and focused practice. But at some point, you also need a project that asks you to hold everything together at once.
A project that forces you to deal with real problems as they appear. Likeness that almost works but not quite. Armor that reads wrong. Materials that feel flat. Hair that refuses to behave. Design decisions you have to revisit after you thought you were done.
This breakdown shows that process clearly.
If you are working on stylized characters, exploring painterly textures, or trying to bridge 2D thinking with 3D execution, there is a lot of practical insight in here. Beyond the technical details, this is valuable because it shows what disciplined, curiosity-driven personal work looks like when you give it the time and attention it needs.
Projects like this are not about speed or output. They are about integration. About taking everything you have been learning and seeing how it actually holds up when you build something complete.
Enjoy!
Project Origins
• What motivated you to start this project?
A big motivation to start this project was to create my first full character in the Arcane style. I was really inspired by the creative side. I wanted to try hand-painting and combine 2D and 3D techniques. This project started as a challenge, but I decided to keep working on it to improve the artistic and technical parts. My goal was to grow and learn along with the project
• You mentioned the ZugZug Arcane Style Challenge — what made you want to take part in that?
I’ve always loved taking part in challenges. They give you a boost of positive, creative energy that’s hard to find when you work alone in silence. I really liked the theme of this contest and wanted to try my hand at a skin concept for Jinx. My goal was to discipline myself and learn through the process. I wasn’t sure if I could finish the character in two months, or if I’d need more time. Either way, it was an amazing push just to get started.
• Why did you choose this particular design or take on Jinx?
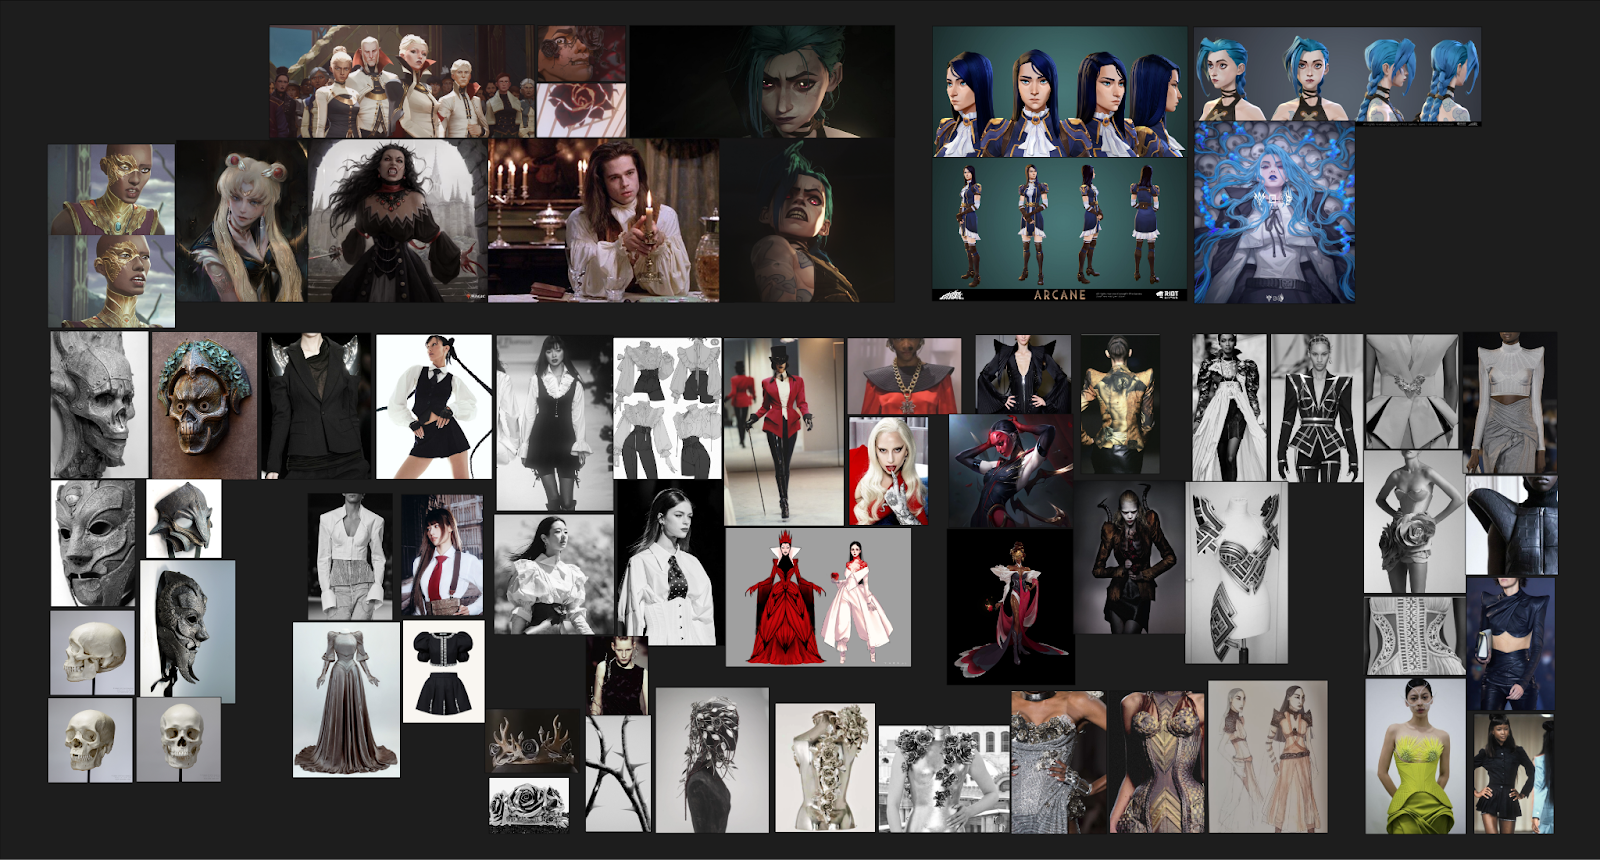
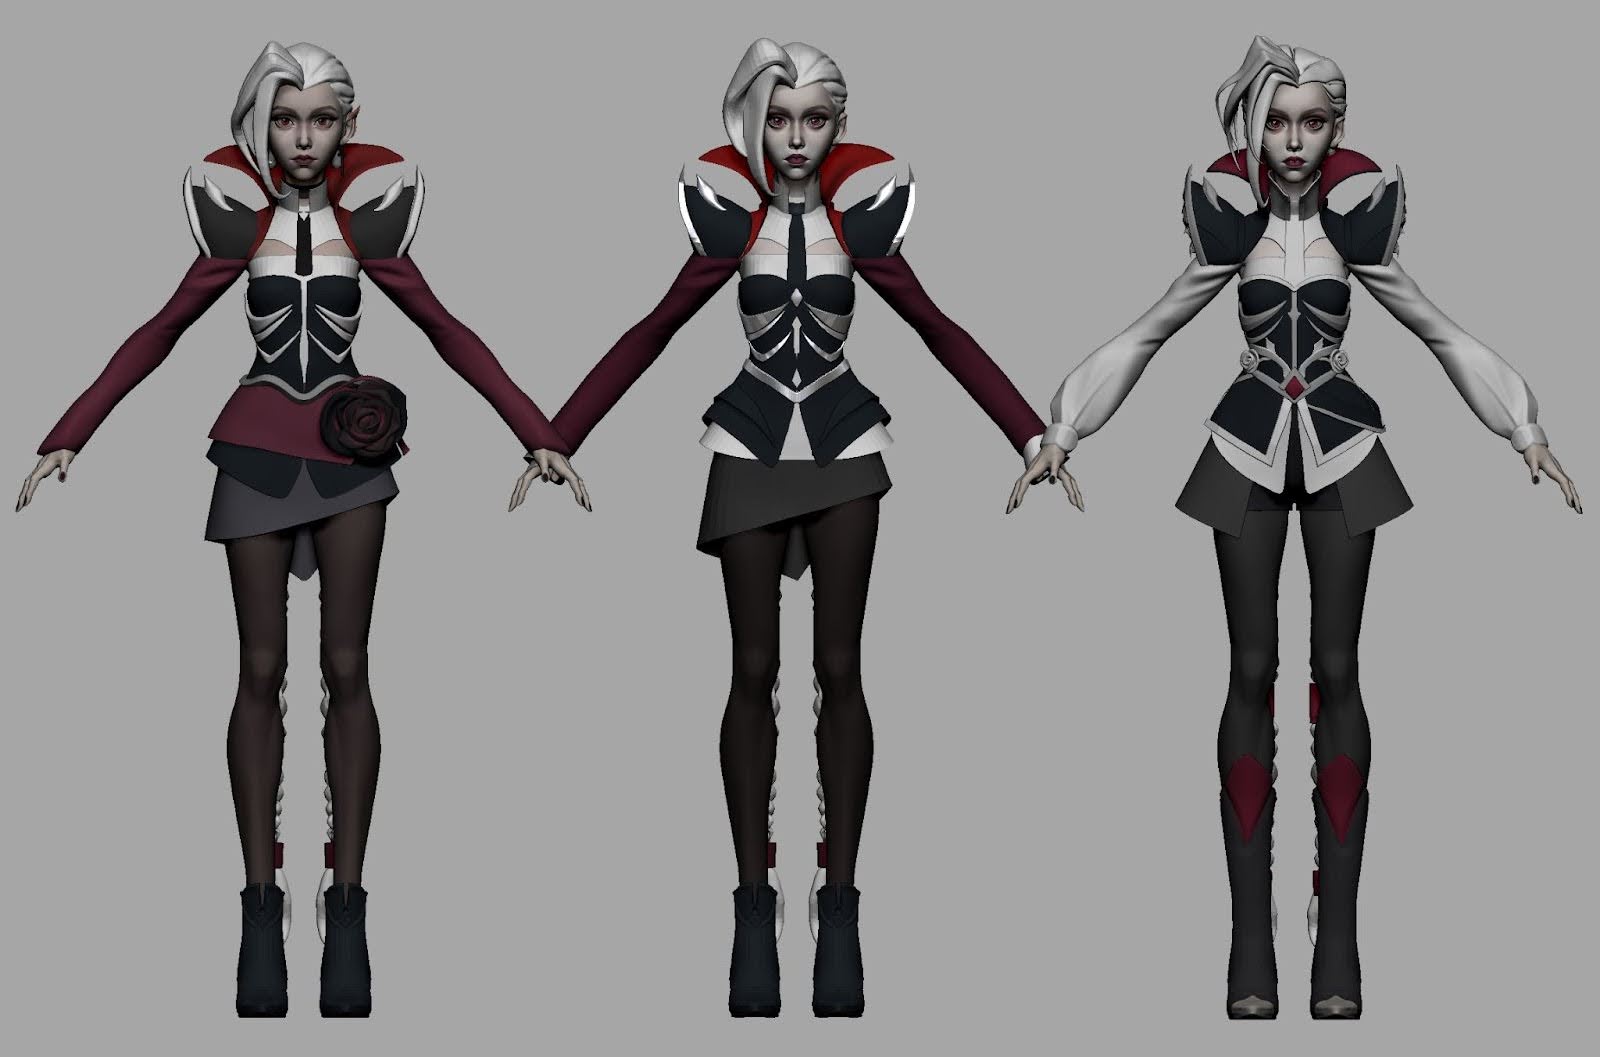
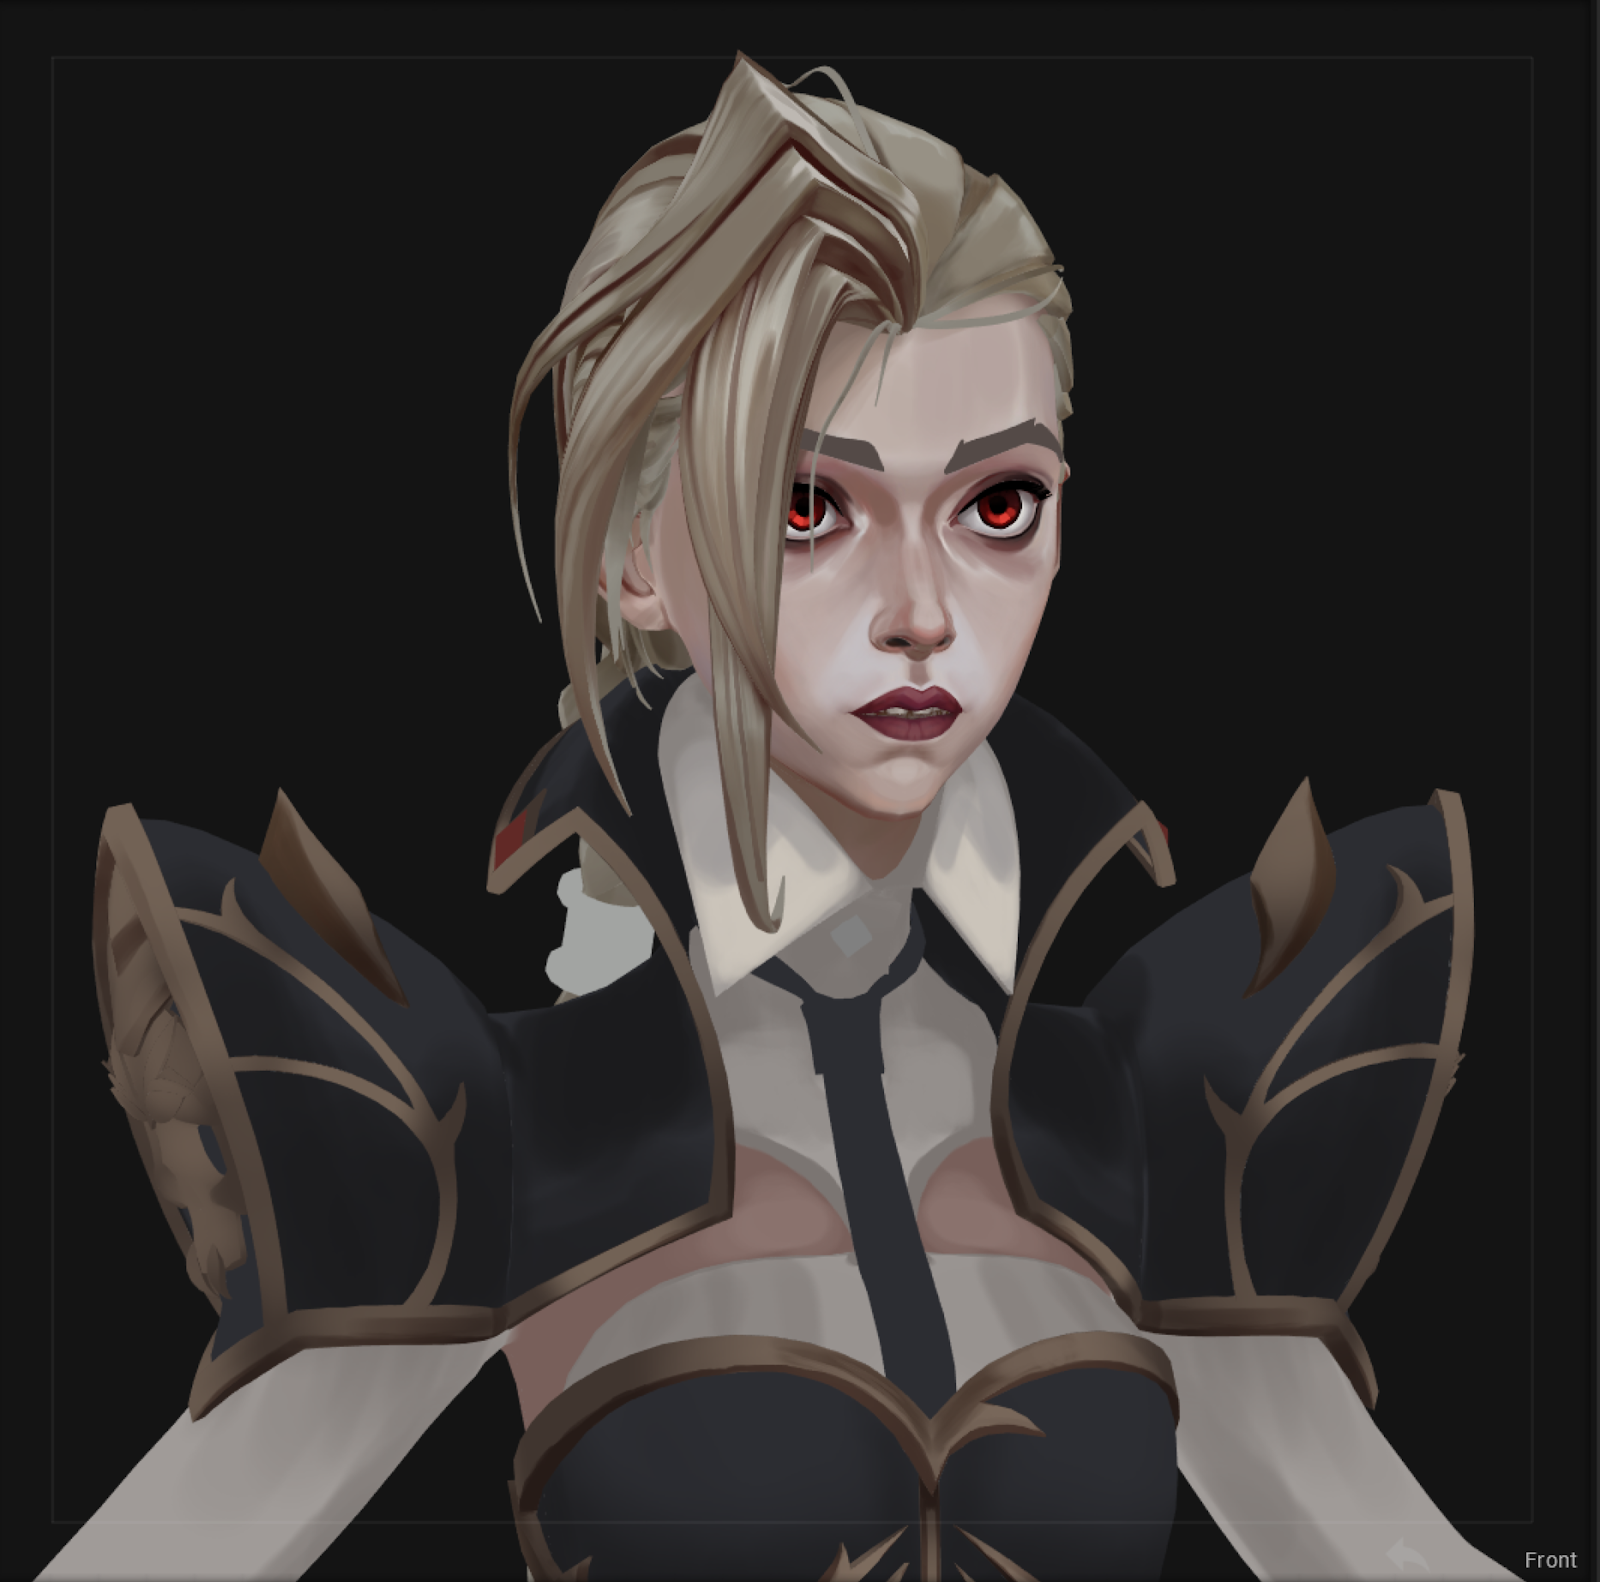
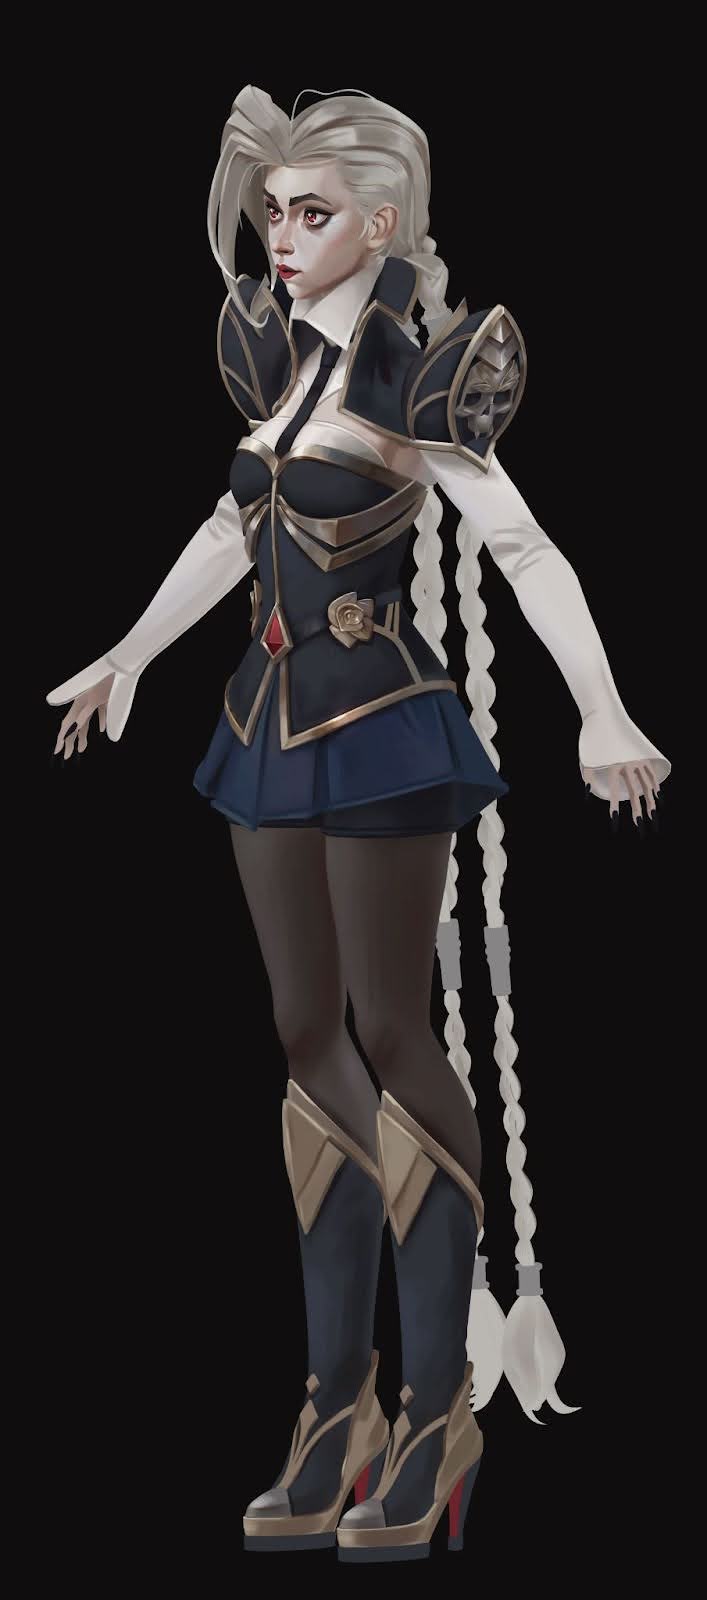
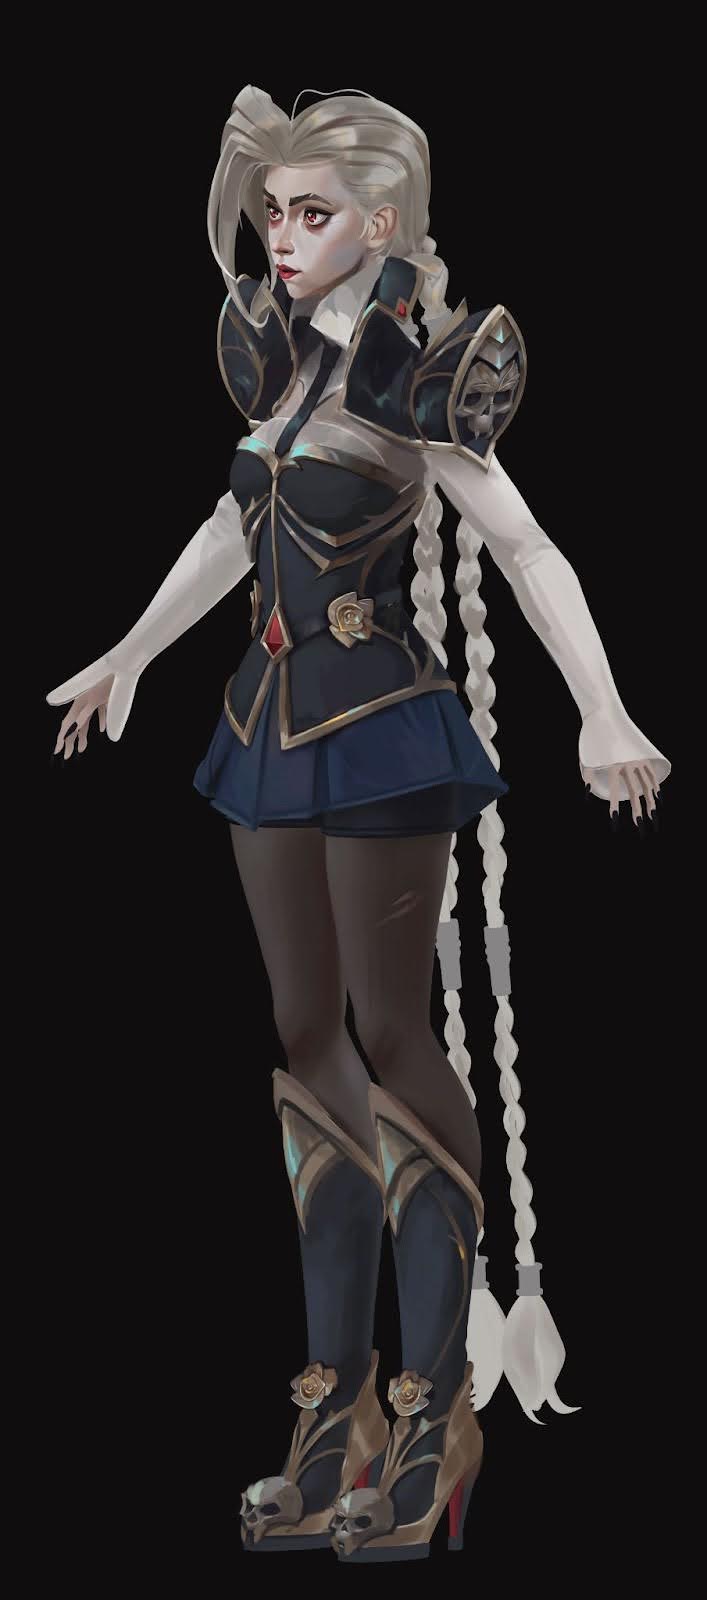
When I started this project, I didn’t have a final visual concept, only an idea: to reimagine Jinx as a vampire. She’s my favorite character, and I wanted to create a new skin that would fit her personality. She has pale skin, visible veins, and bright pink eyes. I thought the vampire look would just amplify what’s already there and make her a bit darker. I was very inspired by Piltover’s aesthetic and the character costumes: high collars, corsets, shirts, elegant silhouettes, and gold trims. I wanted to create something similar for Jinx but with gothic elements. I used Caitlyn’s refined look as a base—it was a real inspiration. I gathered references that helped me set the mood I wanted to convey in the piece.
• When you began in ZBrush, did you start from a base mesh or from scratch?
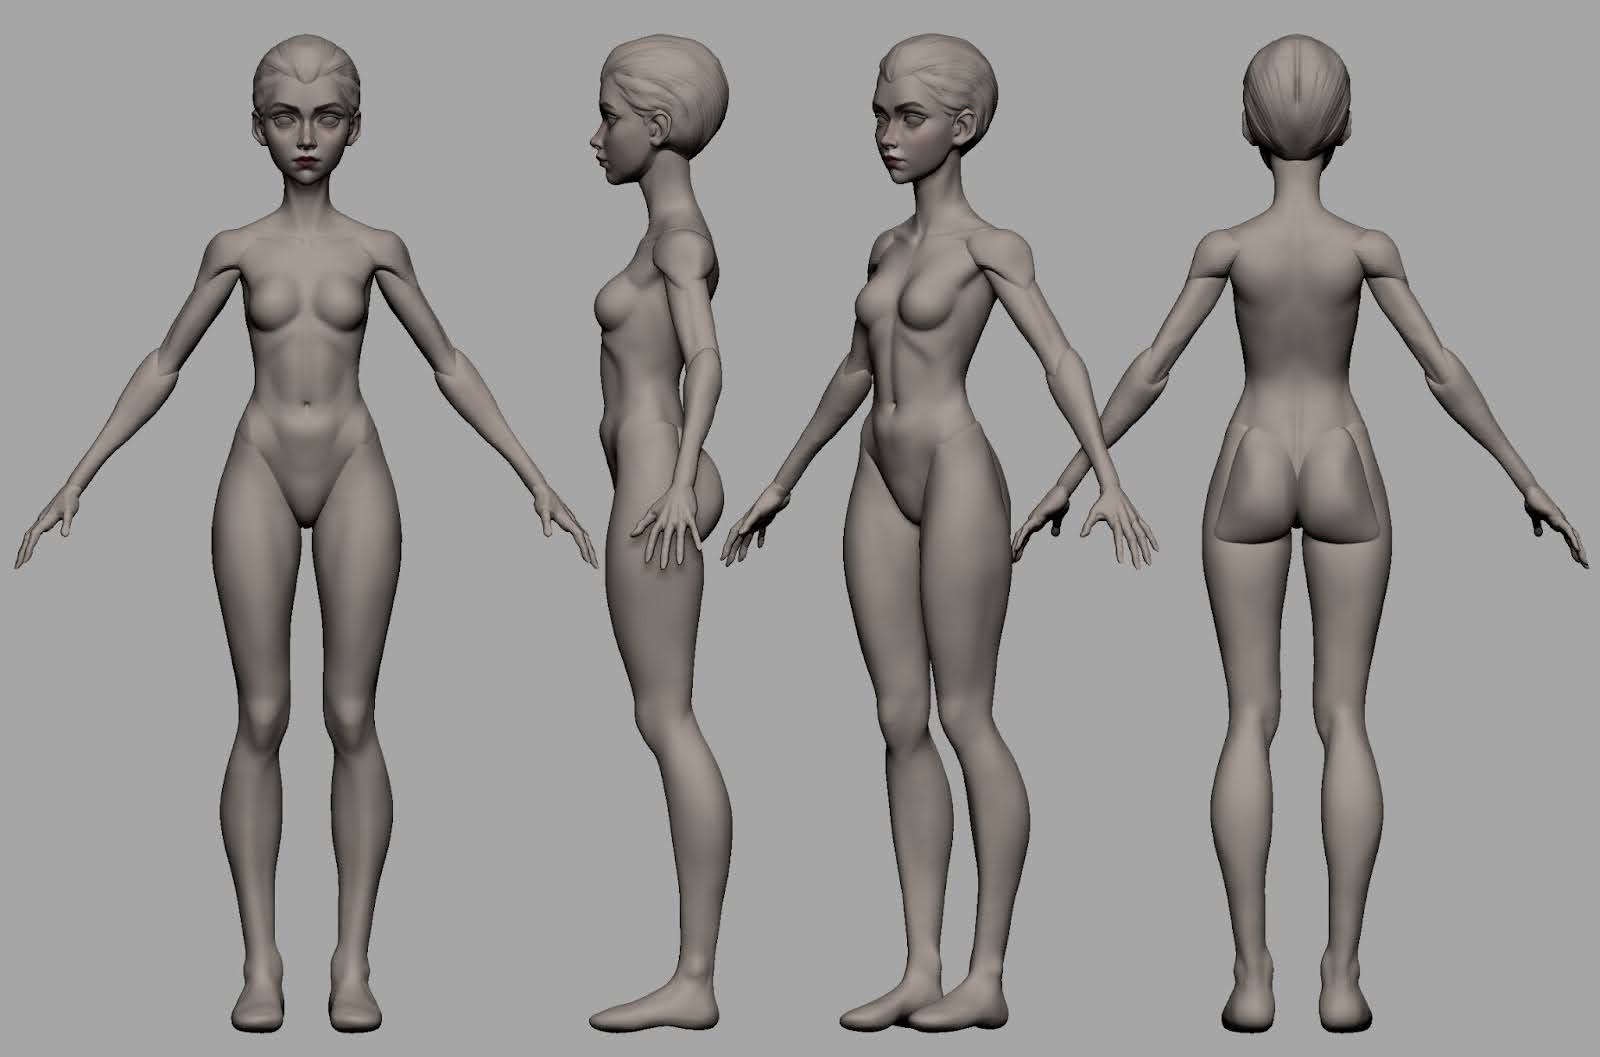
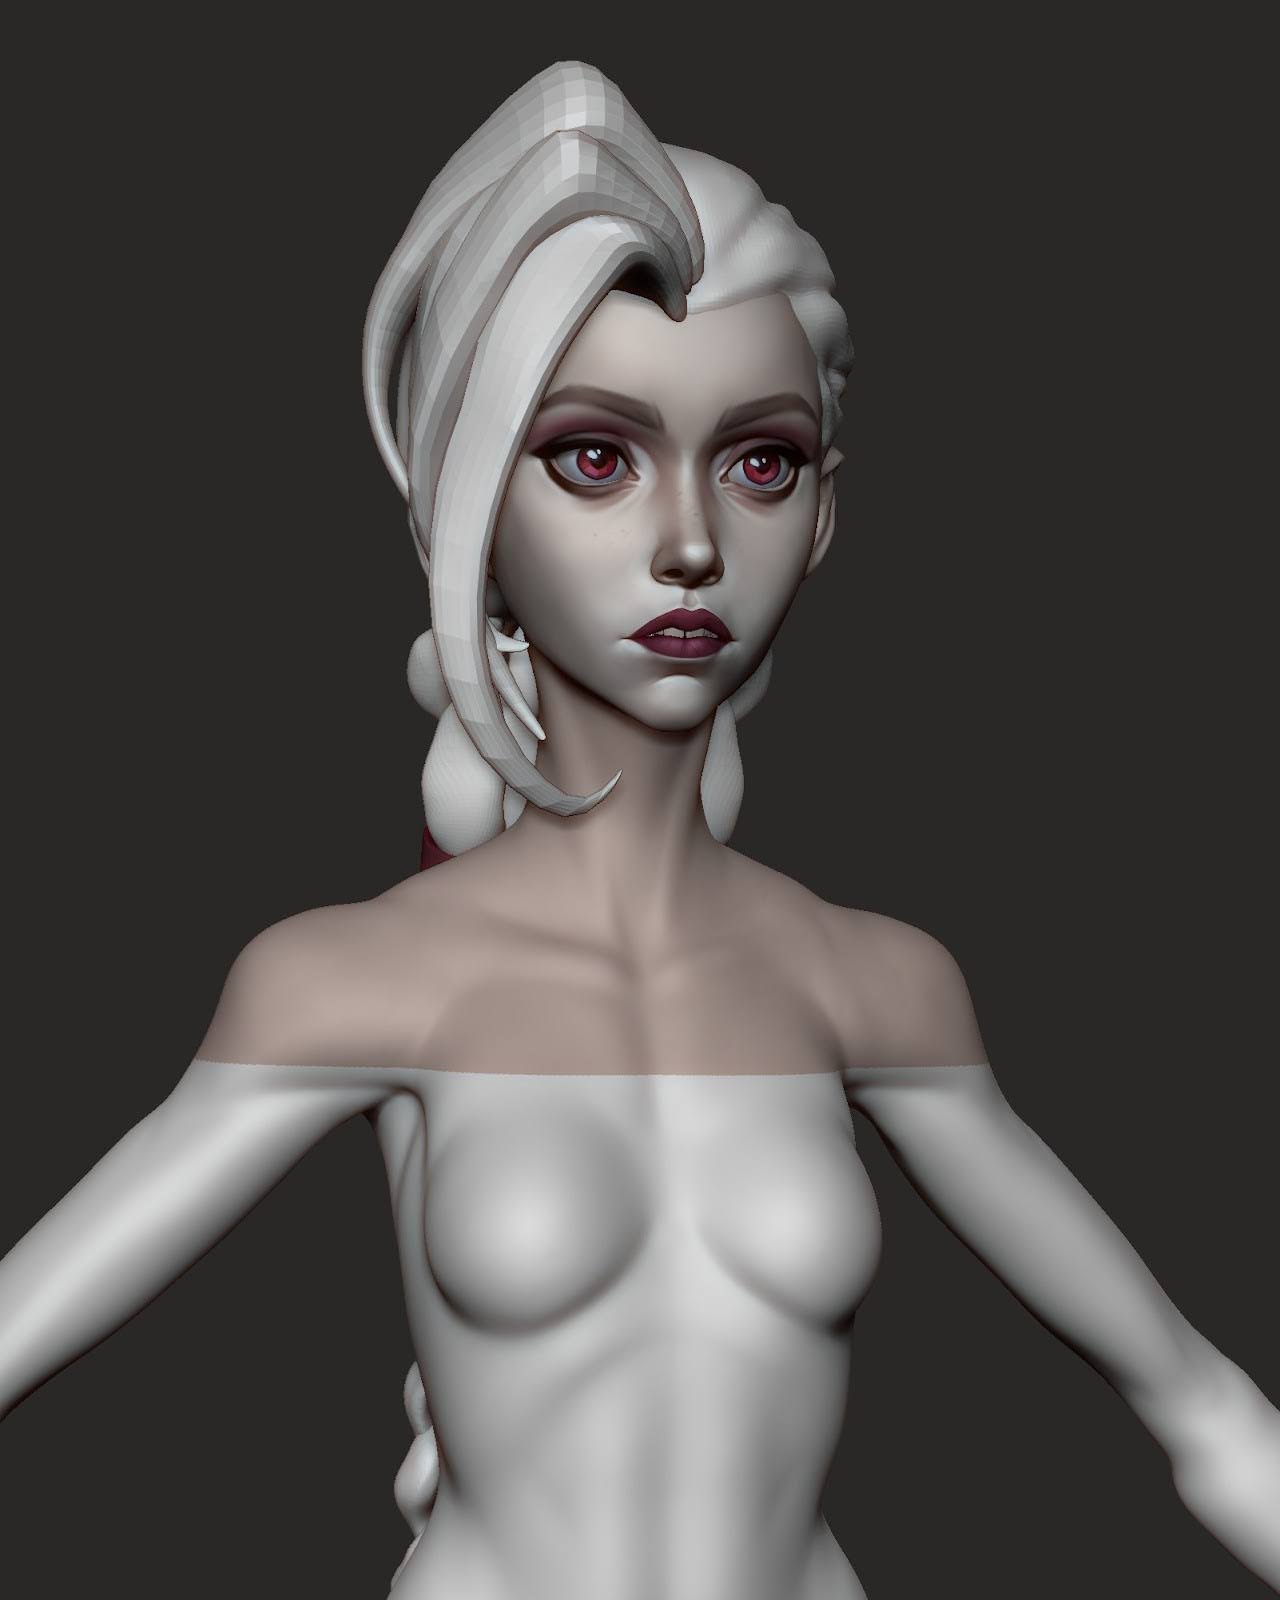
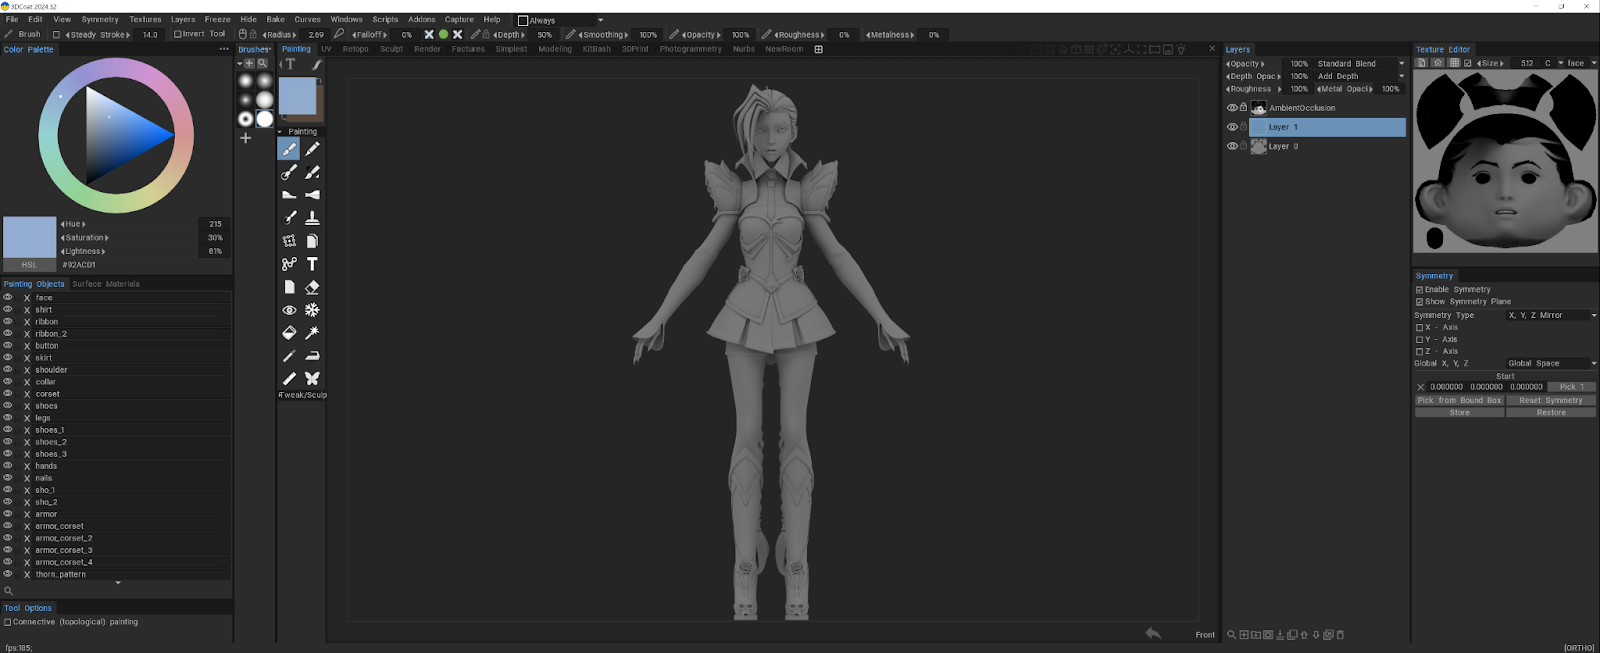
I did everything from scratch. I started with a sphere and blocked out the whole body using primitives and Dynamesh. First, I focused on the main shapes and proportions. Anatomy really helped me, especially the book Anatomy for Sculptors and various references. After blocking out the base forms, I projected them onto a clean topology using ZWrap and refined the sculpt.
When the body was ready, I started working on the clothing. Since I didn’t have a concept, I just sketched a bunch of things, as if I were making a rough sketch.
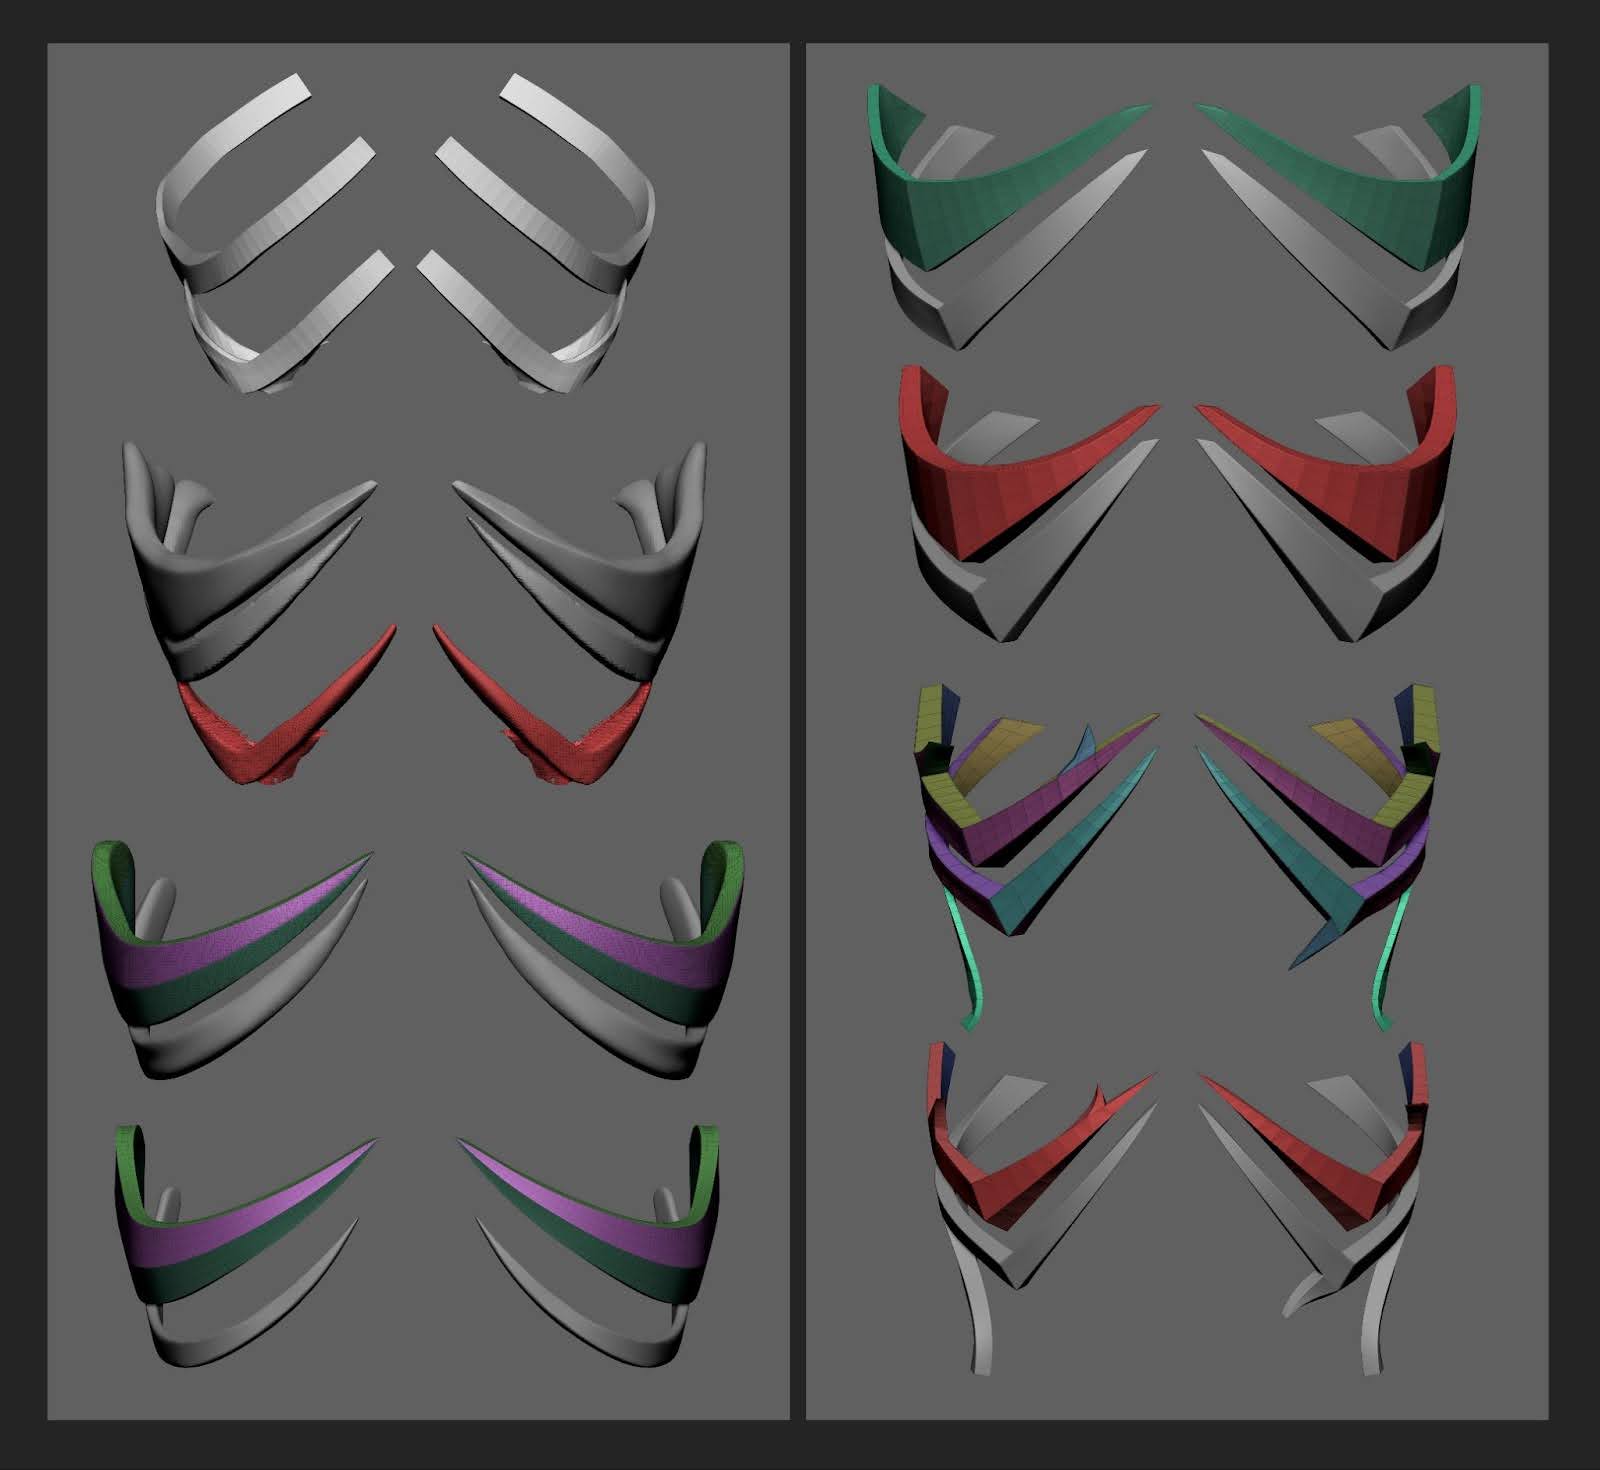
The first thing I decided in the design was the tall and massive shoulder pads. I wanted the silhouette to highlight that this character is dangerous. All other parts of the costume developed gradually. References were very helpful for ideas.
Also, during the costume sketching process for Jinx, I used different materials and added colors to visualize the design and see what I was doing. I also liked turning off the specular so I wouldn’t get distracted by shiny surfaces.
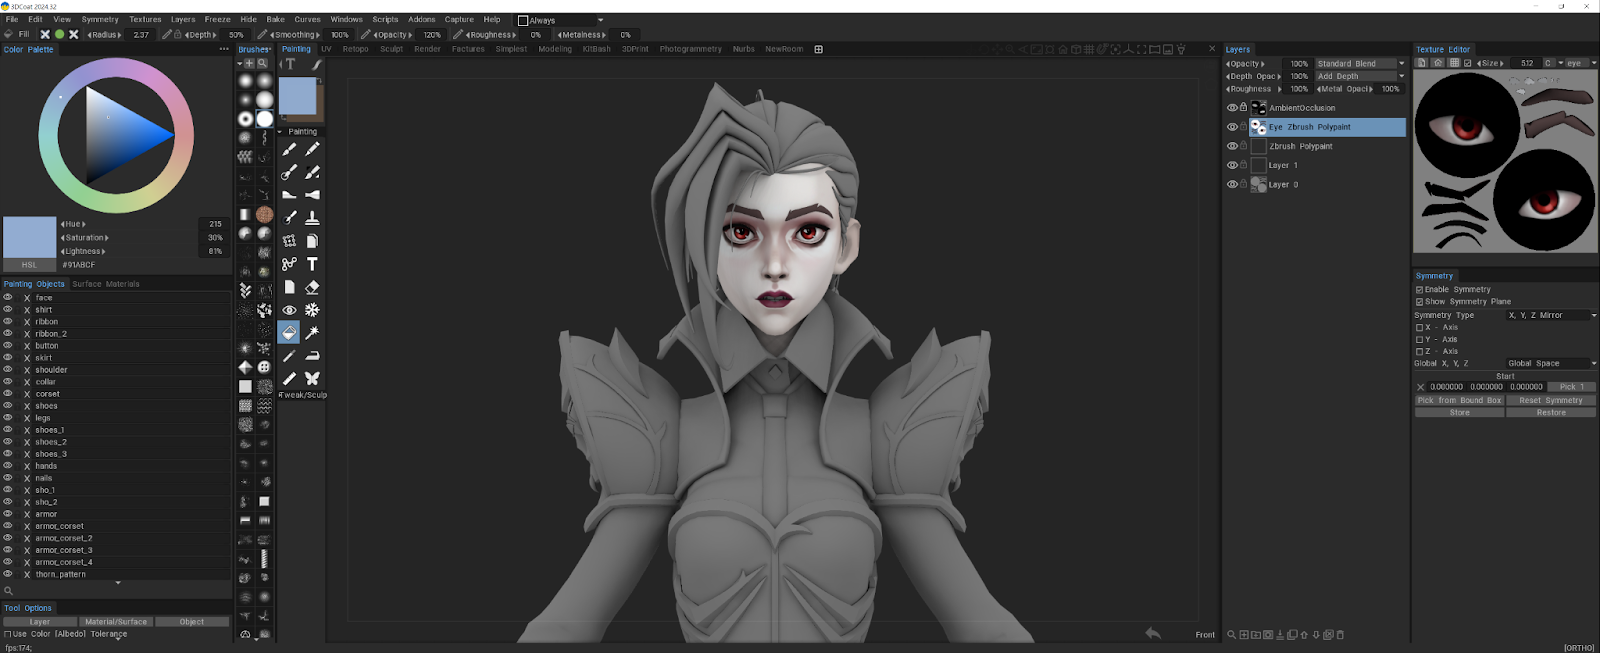
I wanted to create a likeness of Jinx because I had been practicing a lot with portraits.
I was curious to see what I had learned and to reinforce my skills through a finished piece. It took me some time to get the likeness right.
Every day, I noticed small details that I hadn’t seen before and corrected them.
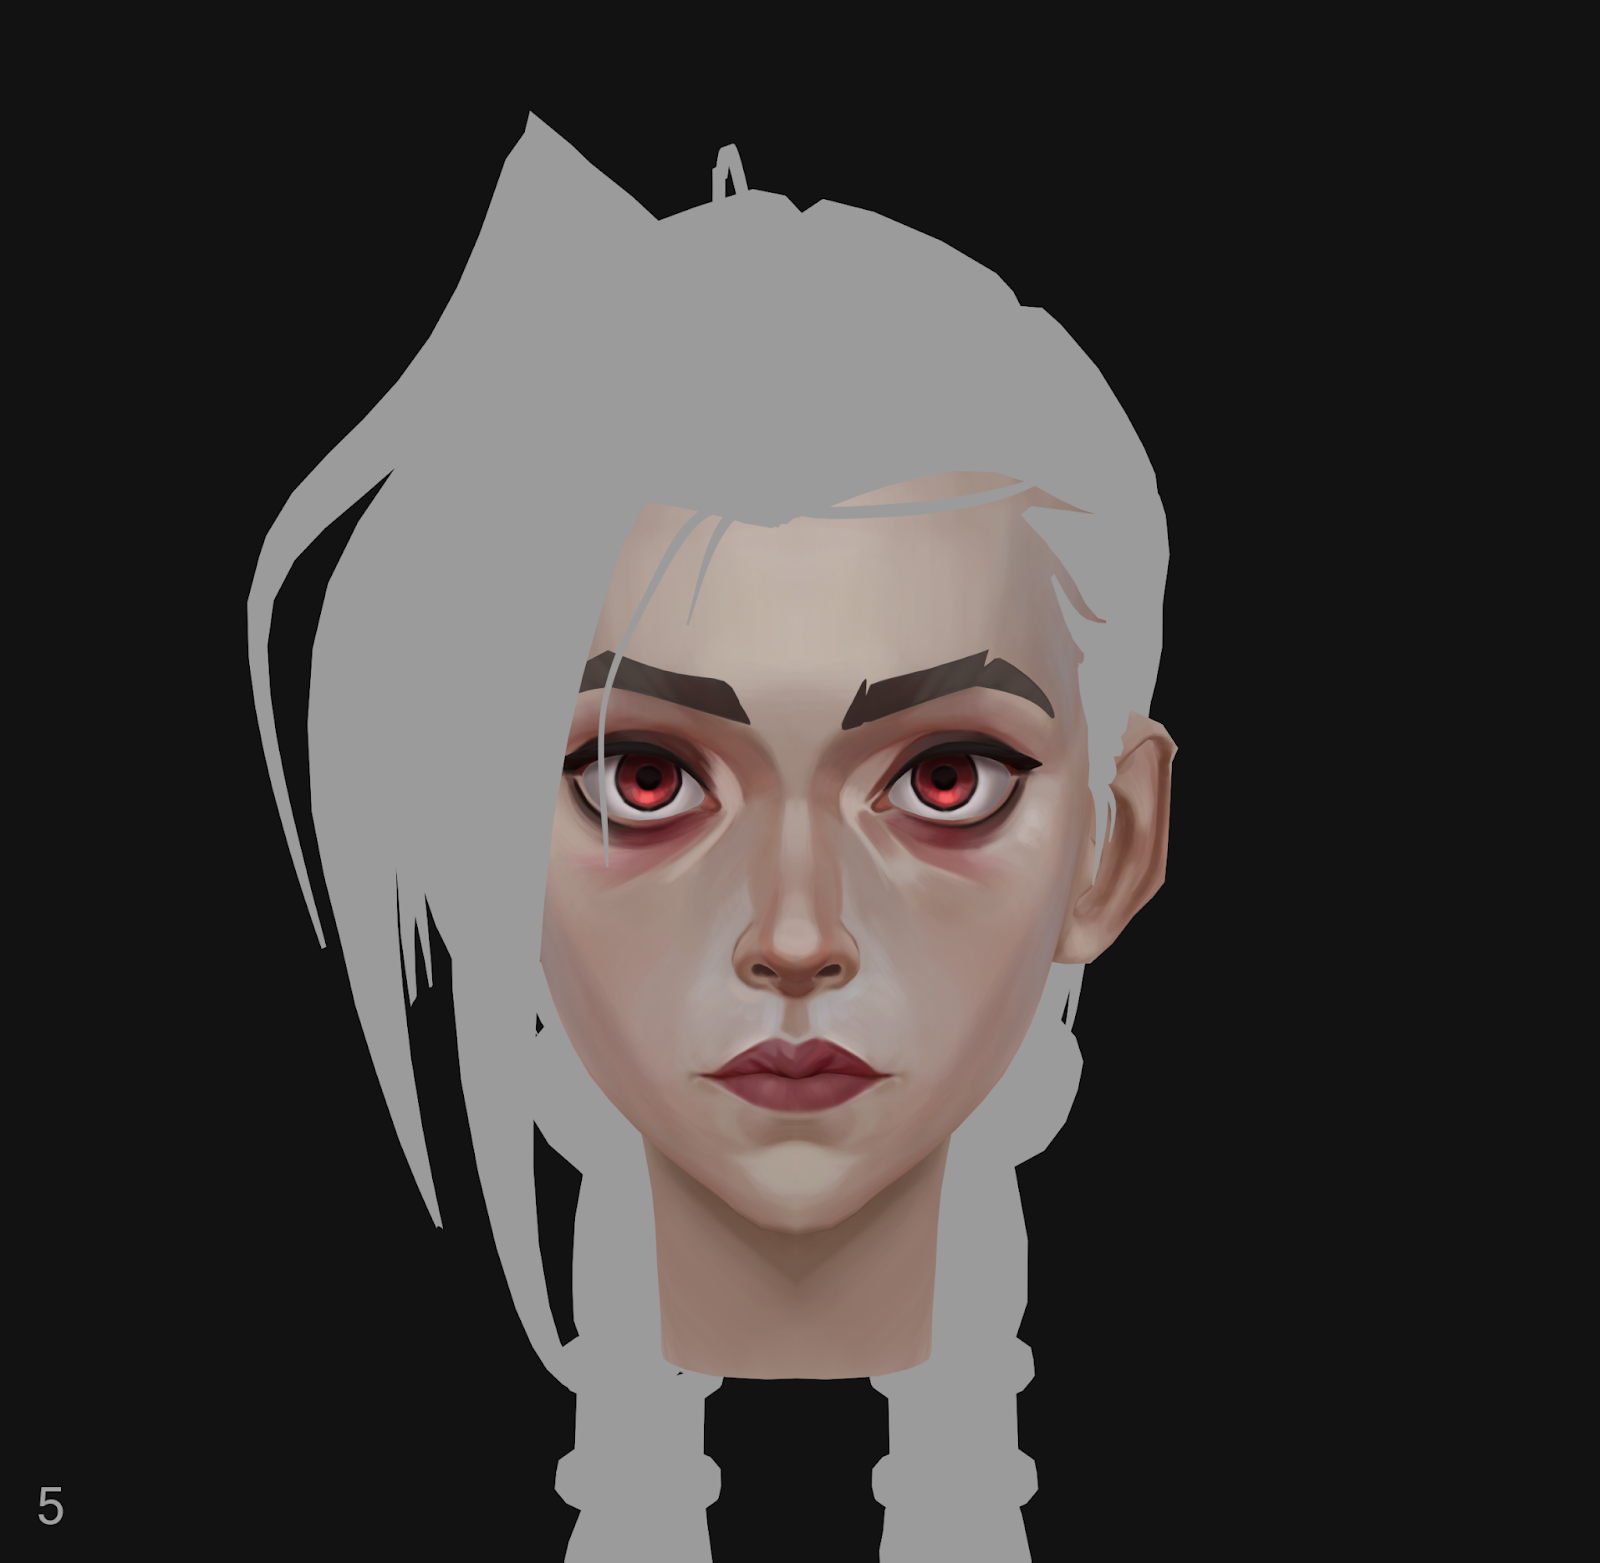
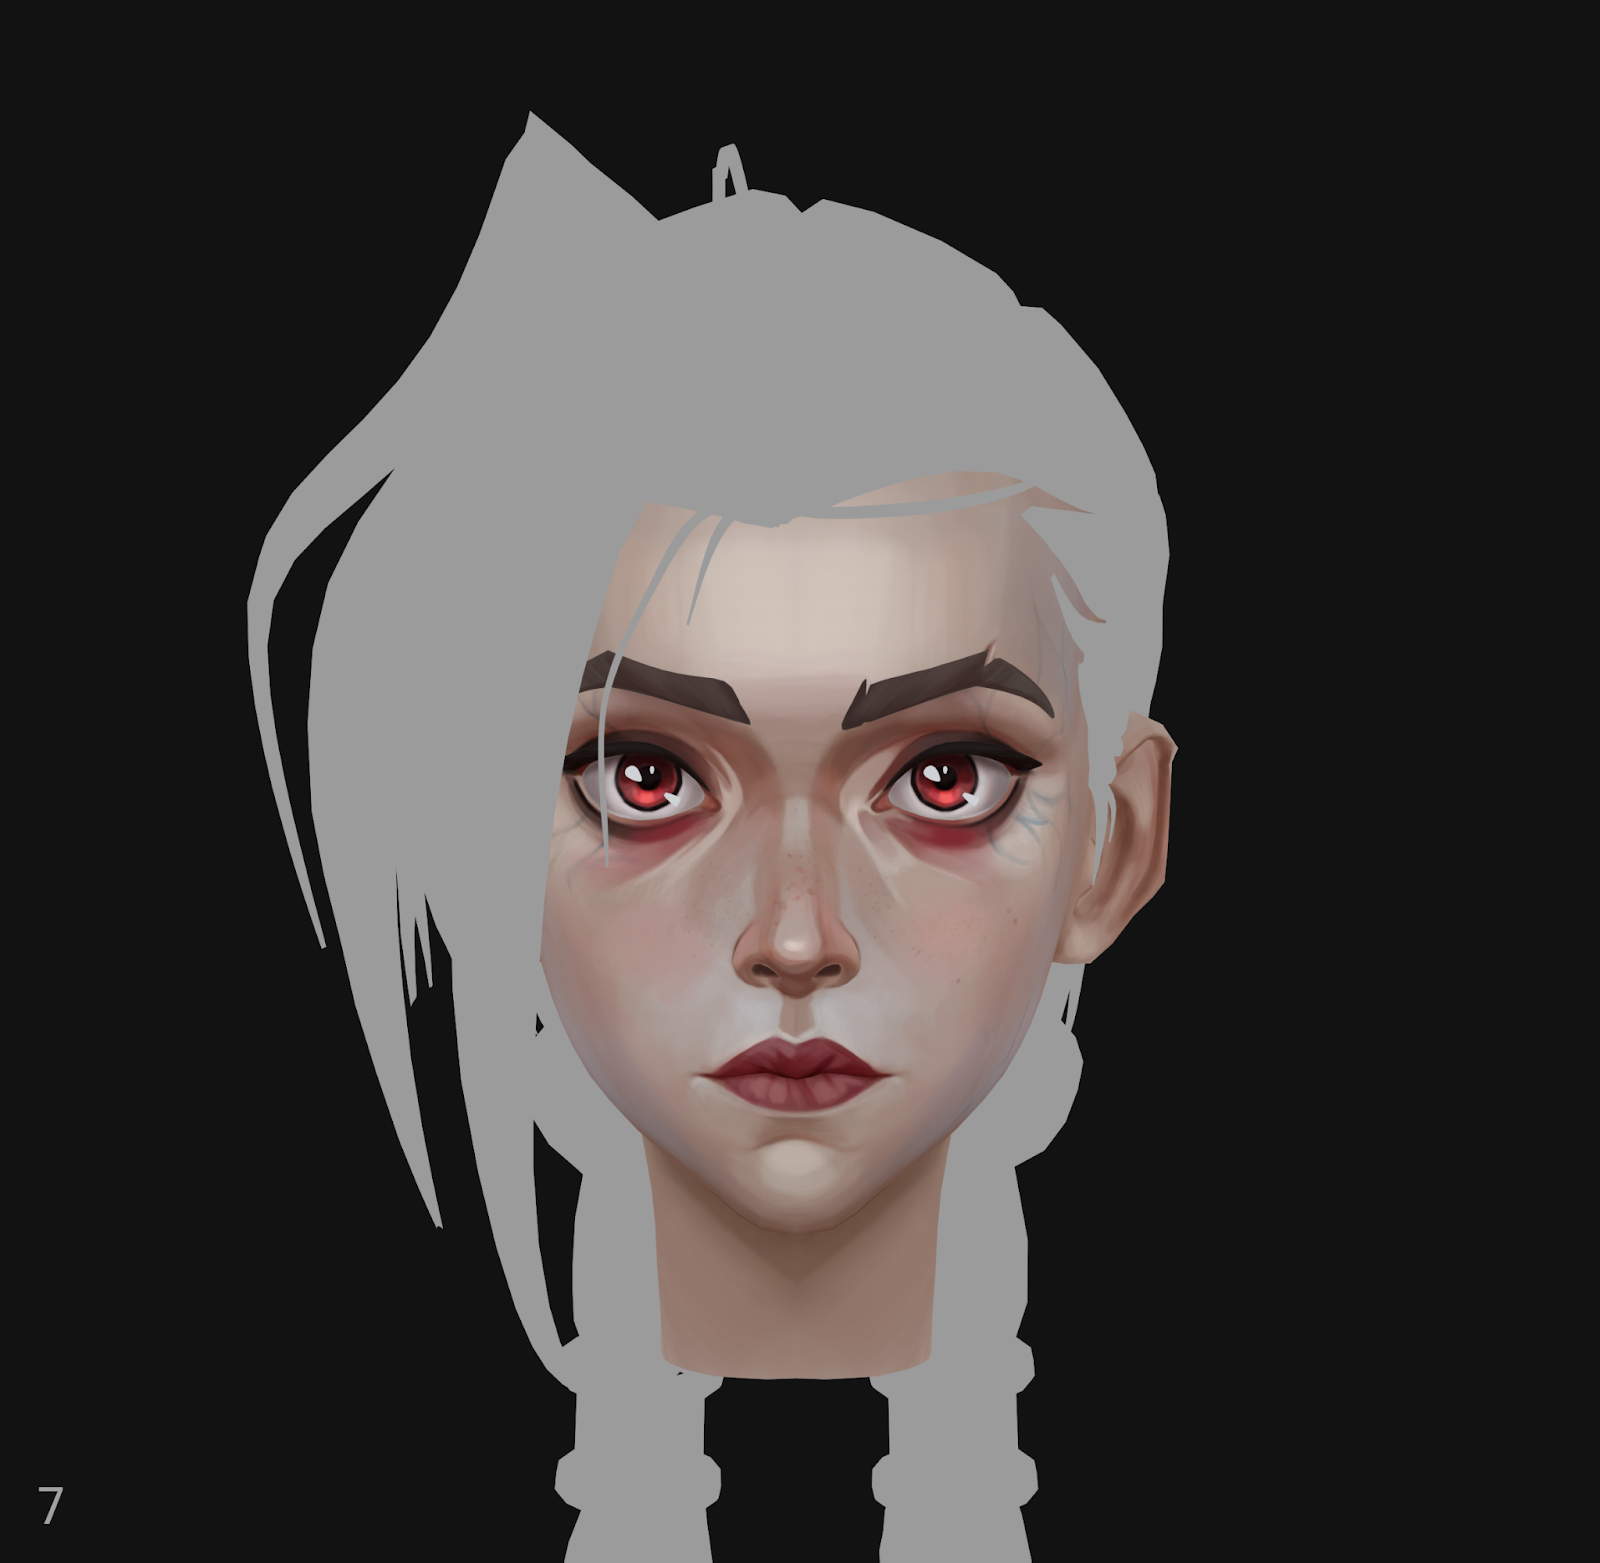
As soon as I sculpted the main proportions, I did a polypaint and painted the eyes. This helped me understand what her face looked like, which direction to move in next, and what to adjust in the proportions.
• Had you worked in a stylized art style before this?
The Jinx project was my first fully finished stylized piece. Before that, I had just been practicing to get ready for this project.
Modeling & Sculpting
• How did you approach modeling the armor and hair?
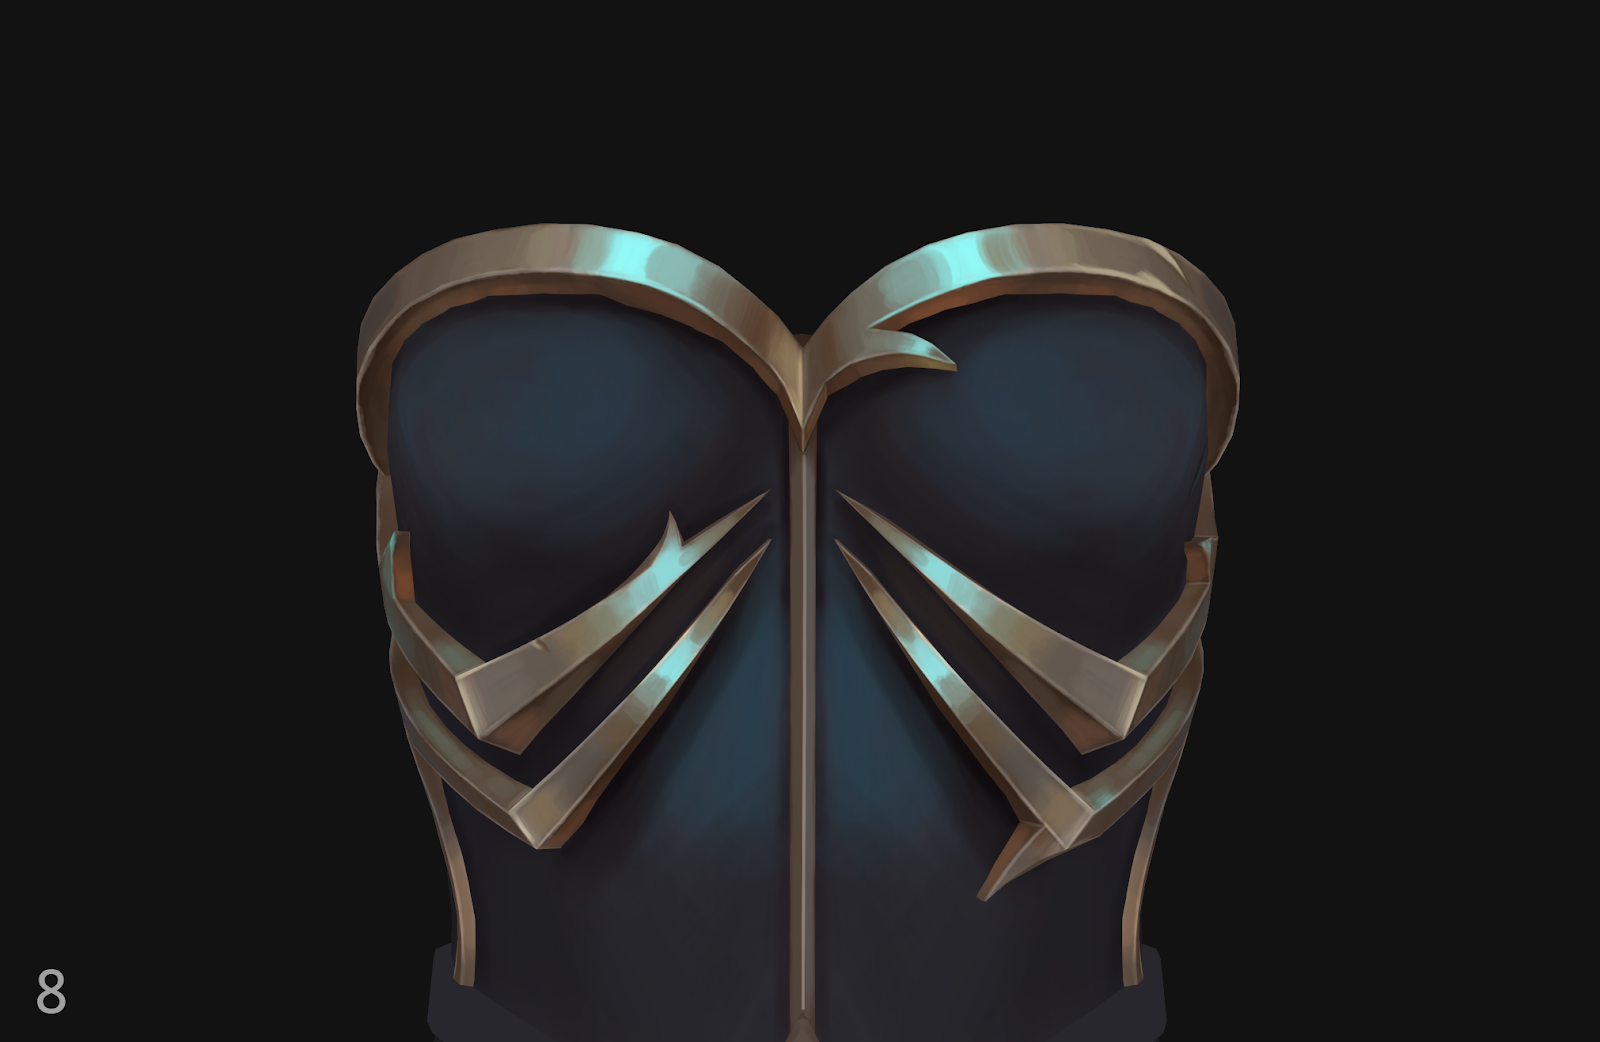
Armor.
It took me quite a while to learn the main hard-surface tools in ZBrush and figure out how they work. At first, the whole process was really built on trial and error and multiple iterations.
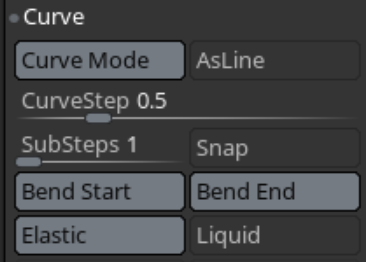
So, I started off by blocking out the basic shape of the corset and then began experimenting with the armor forms. During the sketching stage, I was using CurveStrapSnap. I used the Move brush to adjust the shapes, then applied Dynamesh and Backface Masking to handle the thickness. I kept sculpting until I was happy with the overall silhouette and form.
Throughout the sculpting process, I went through multiple iterations of ZRemesher, subdivisions, and Dynamesh. Once the shapes felt solid, I exported the mesh to Maya for a quick Quad Draw to improve topology flow, then brought it back into ZBrush for further work with ZModeler.
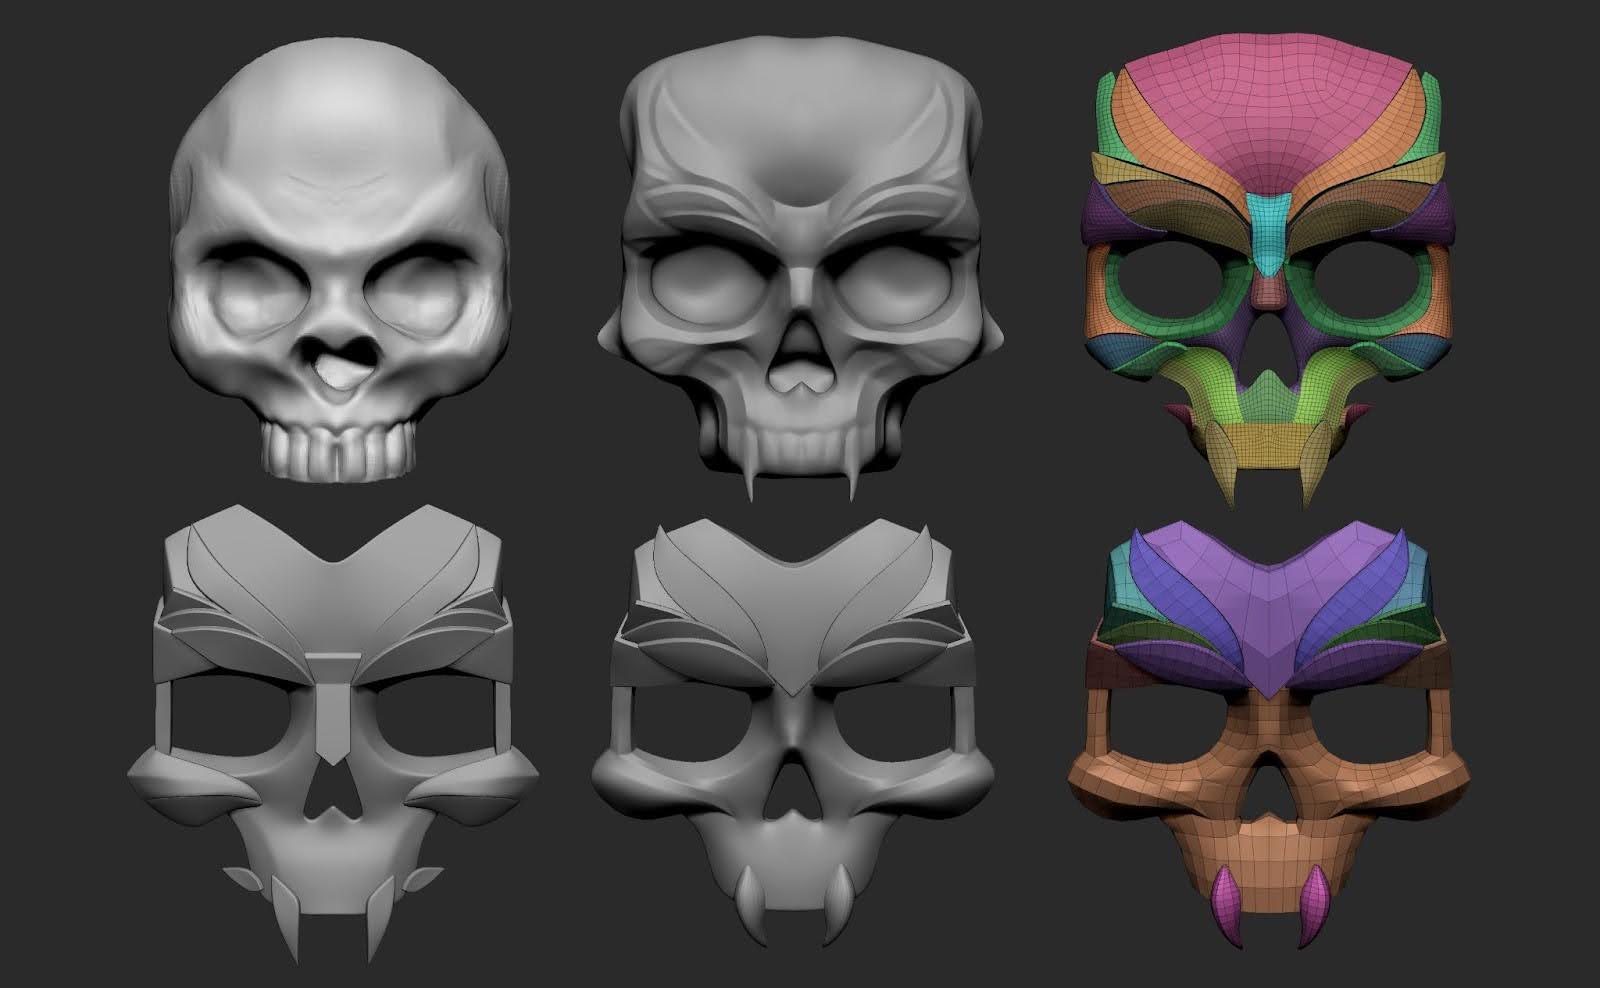
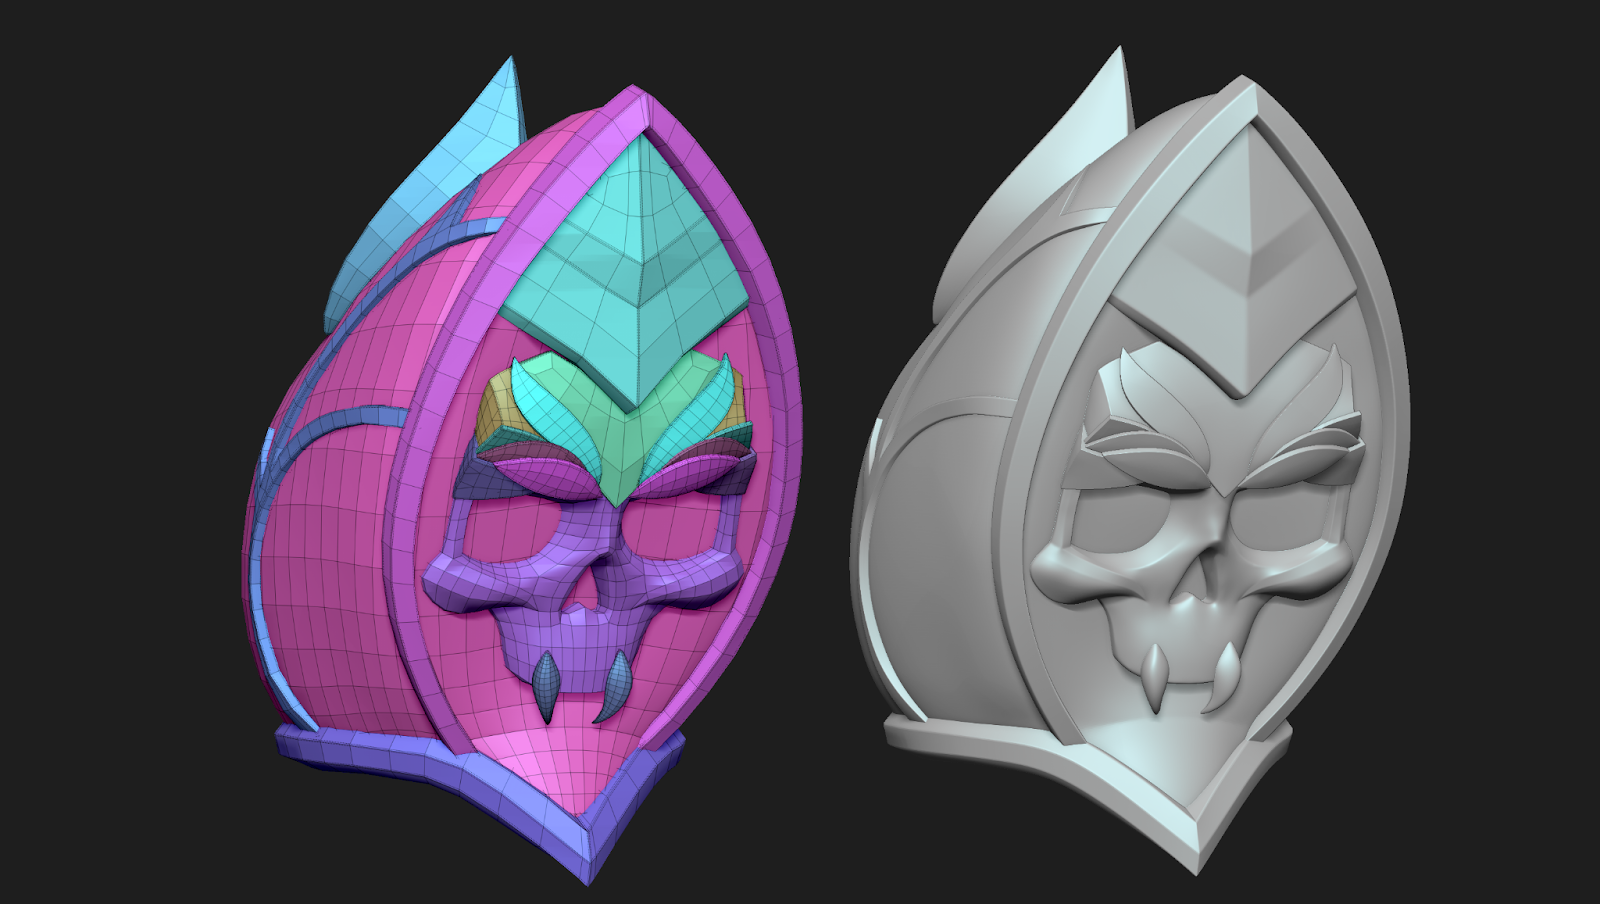
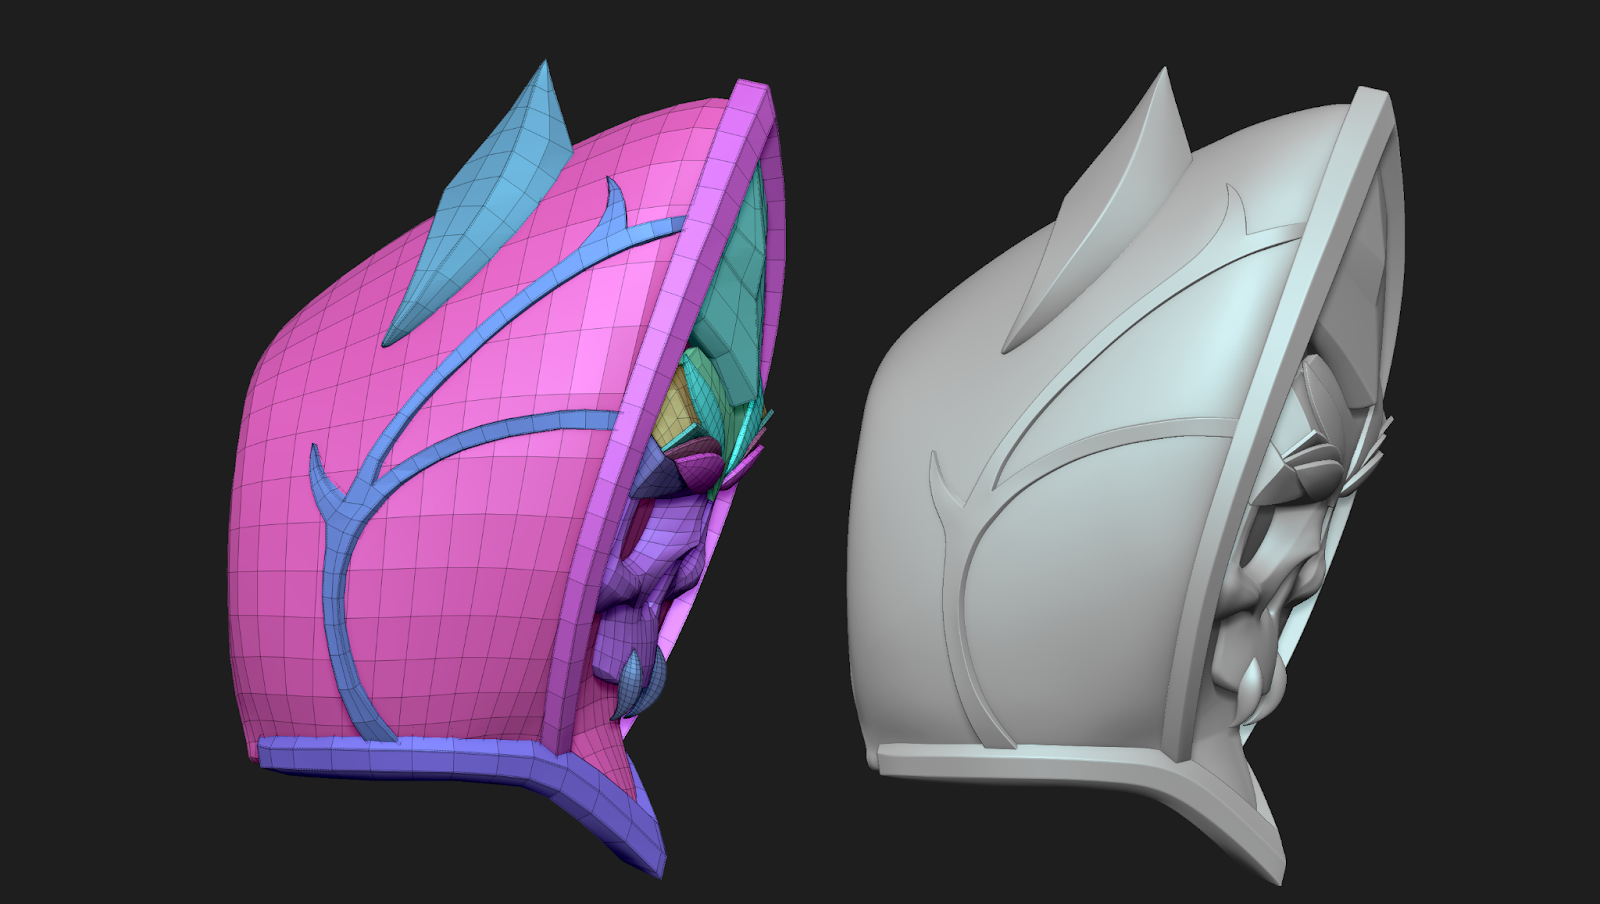
Skull.
I started by making a rough sketch of the skull, then refined the shape and drew the main contours using the Orb Cracks brush. My goal was to stylize the skull and break it down into separate elements: the brow ridges, cheekbones, fangs, and forehead.
Using masks, I created individual Polygroups for each part, separated them, applied Polish by Groups, ran ZRemesher with KeepGroups, and added thickness with Panel Loops.
This became the base for further work — I could freely adjust the size of the elements, remove anything unnecessary, and tweak the shapes. To create sharper edges, I used the AccuCurve brush and added creases where needed.
Once the forms were finalized, I exported the pieces to Maya for a quick Quad Draw to improve topology flow, then brought them back into ZBrush to add thickness, creases, and subdivs.
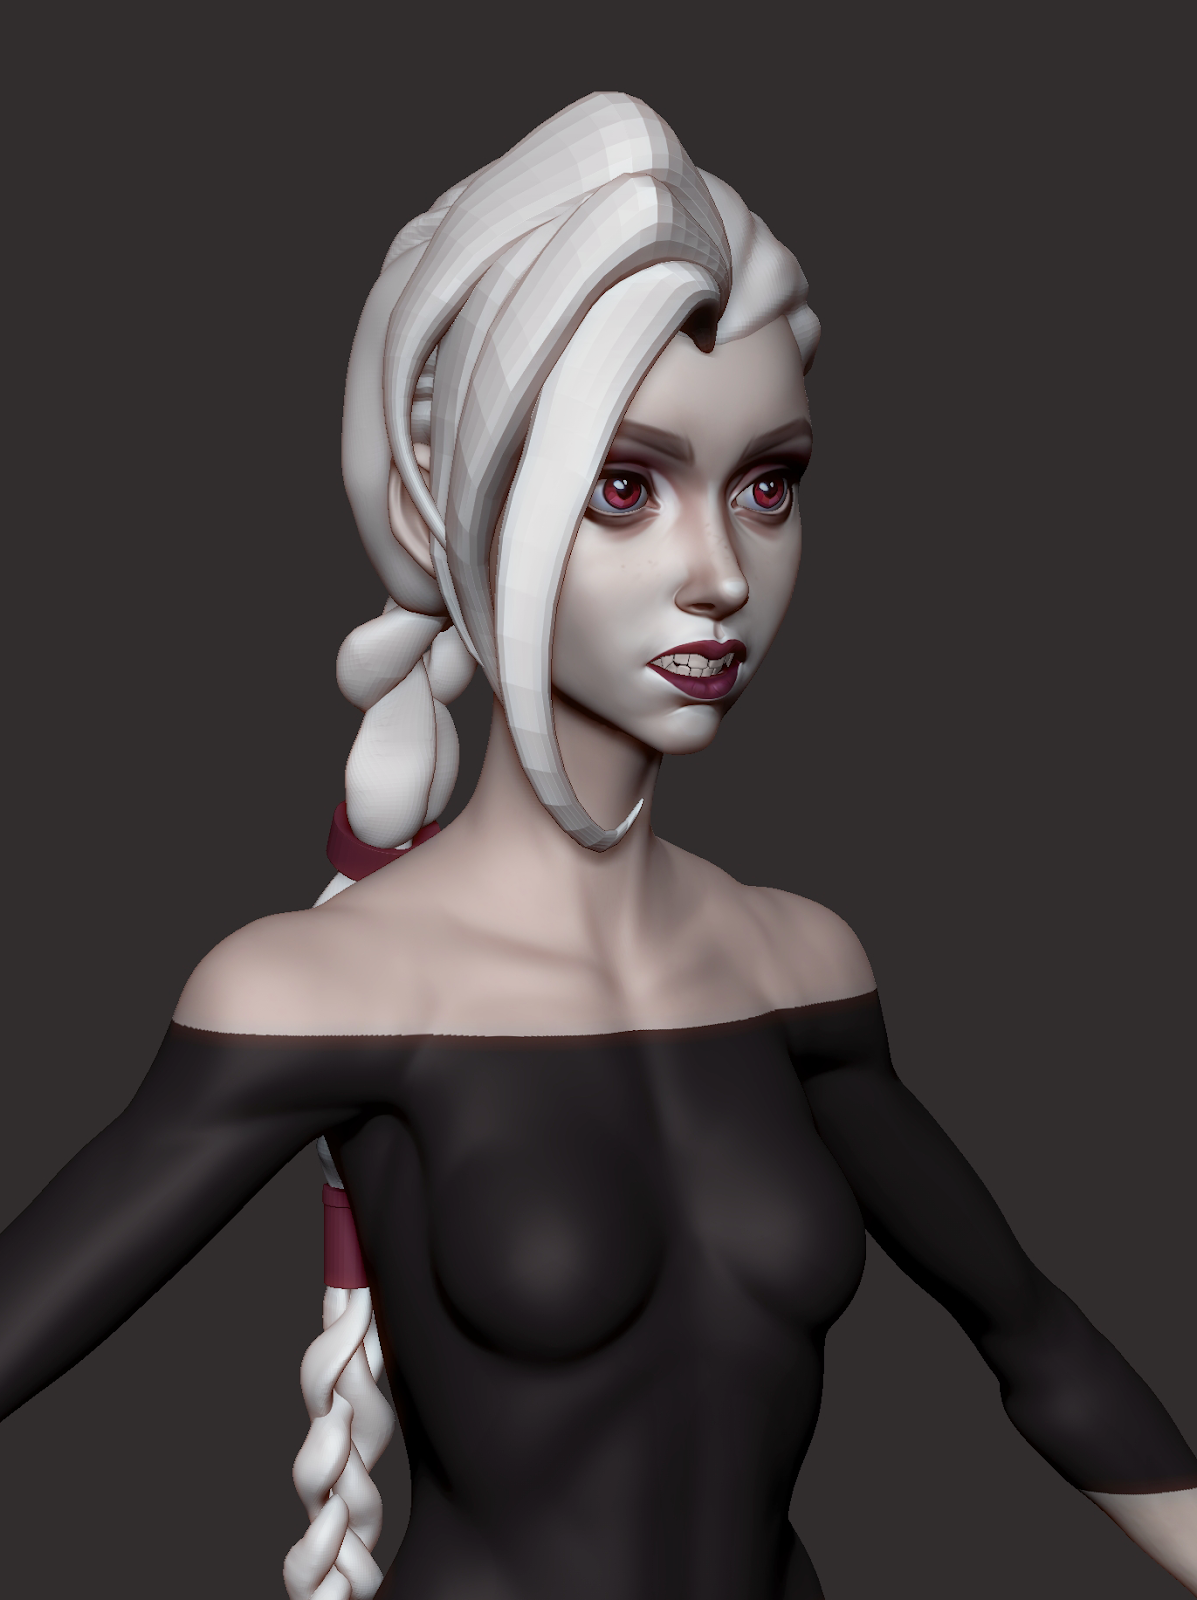
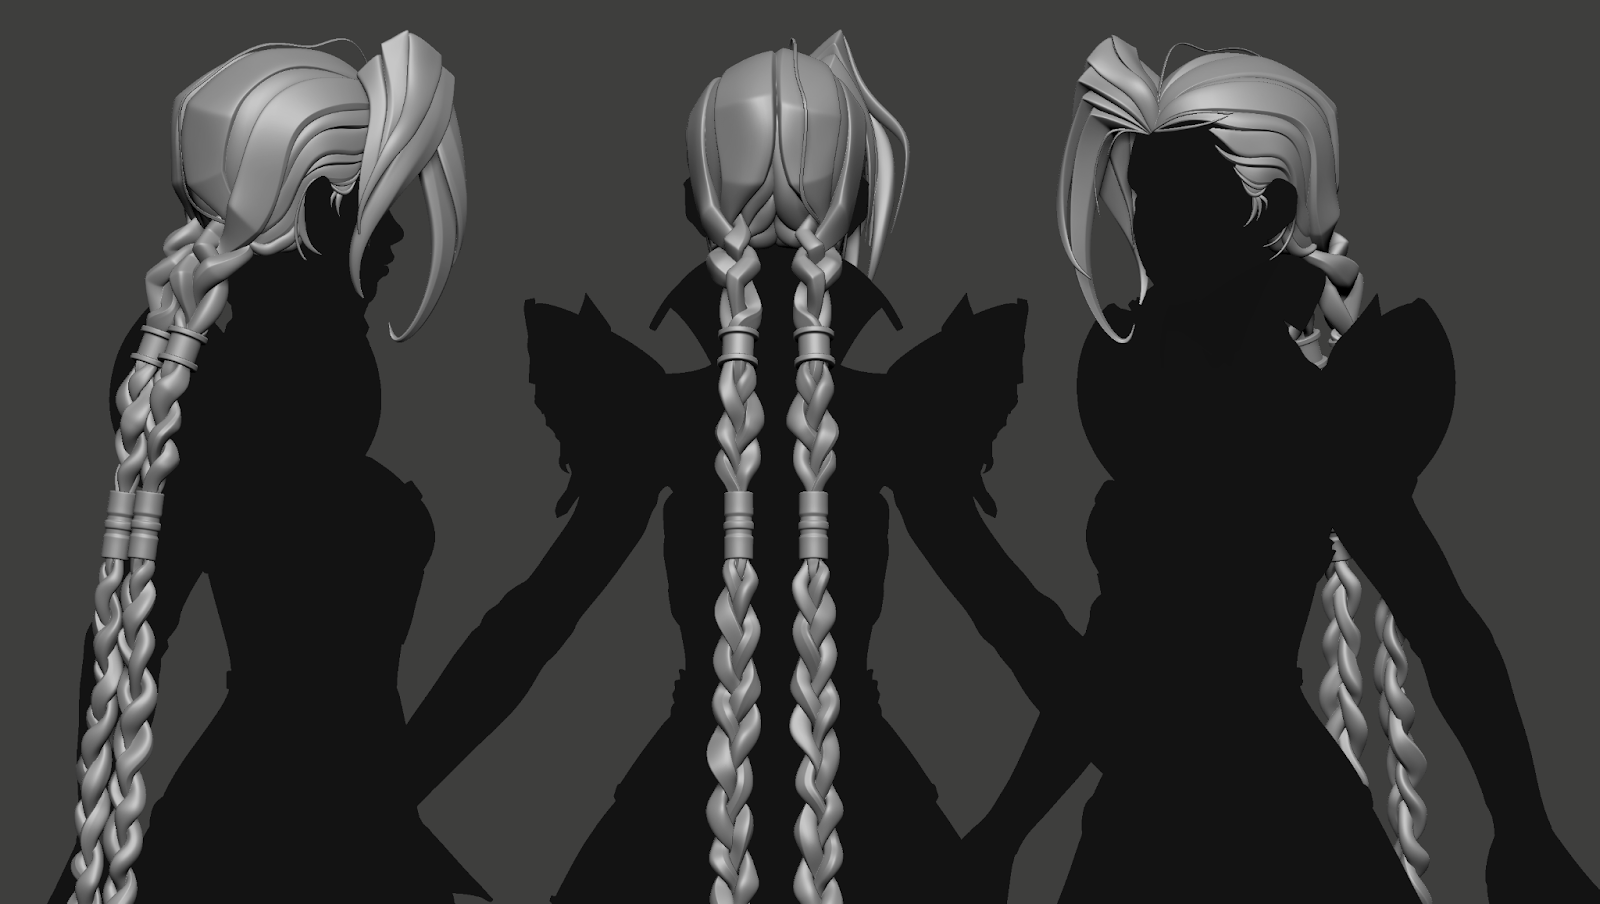
Hair.
For the hair, I wanted to get as close as possible to Jinx’s hairstyle, so I used references that clearly showed the clumps from the front, side, and back. While working, I drew different guidelines on the concept to define the main hair masses and overall silhouette.
I decided to make separate clumps, just like in the concept, because it looks nicer than a single solid mesh. Another goal was to practice stylized hair. I really like Jinx’s bangs and how one clumps overlaps another.
Blocking.
I started by splitting the hair into parts: head, bangs, and braids.
The main volume of the head was created from a sphere and Dynamesh. Then I used the DamStandard and ClayBuildup brushes to draw the lines and direction of the hair.
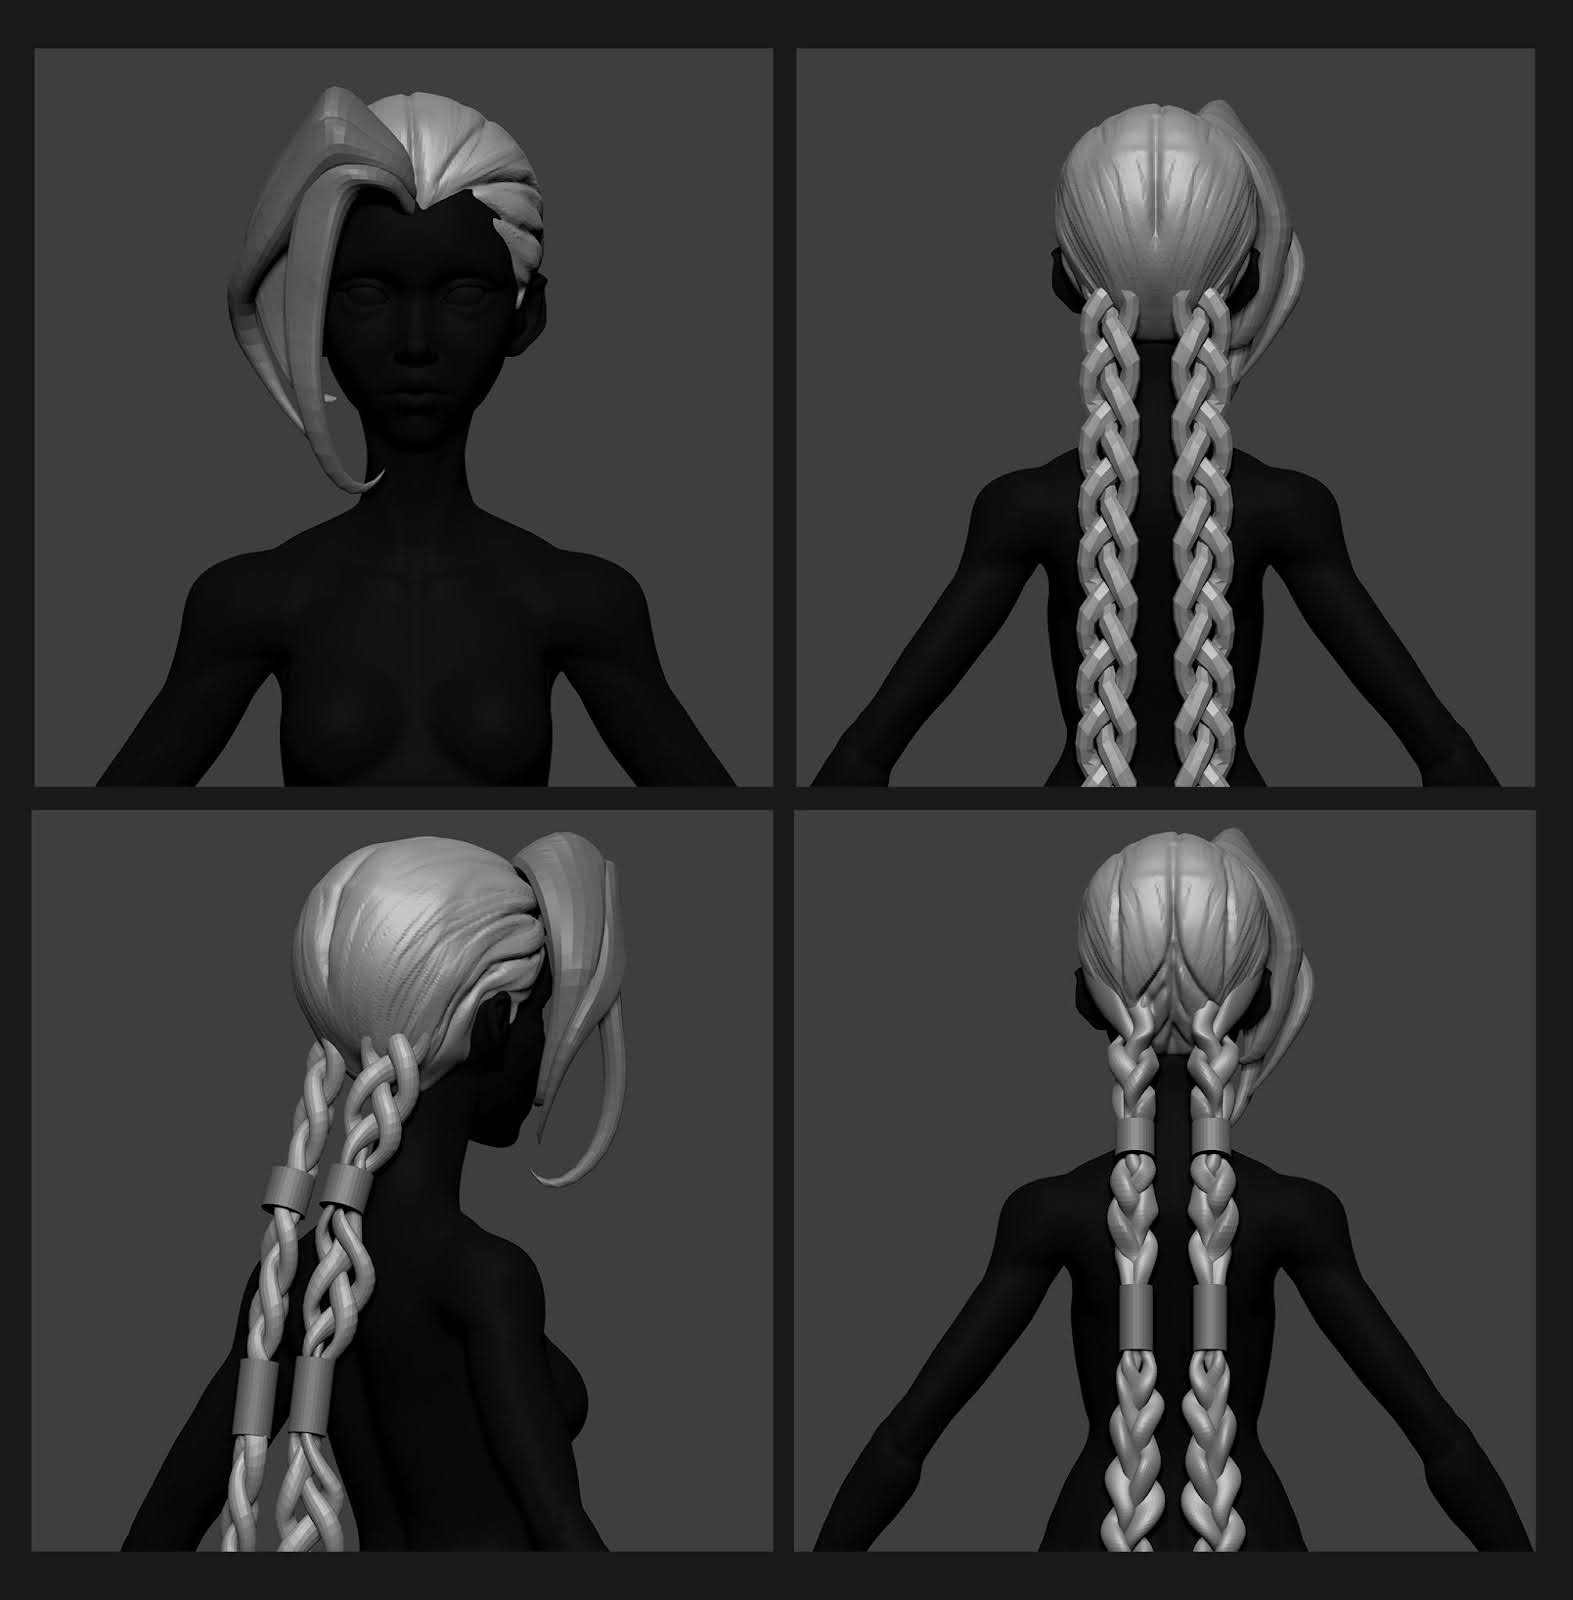
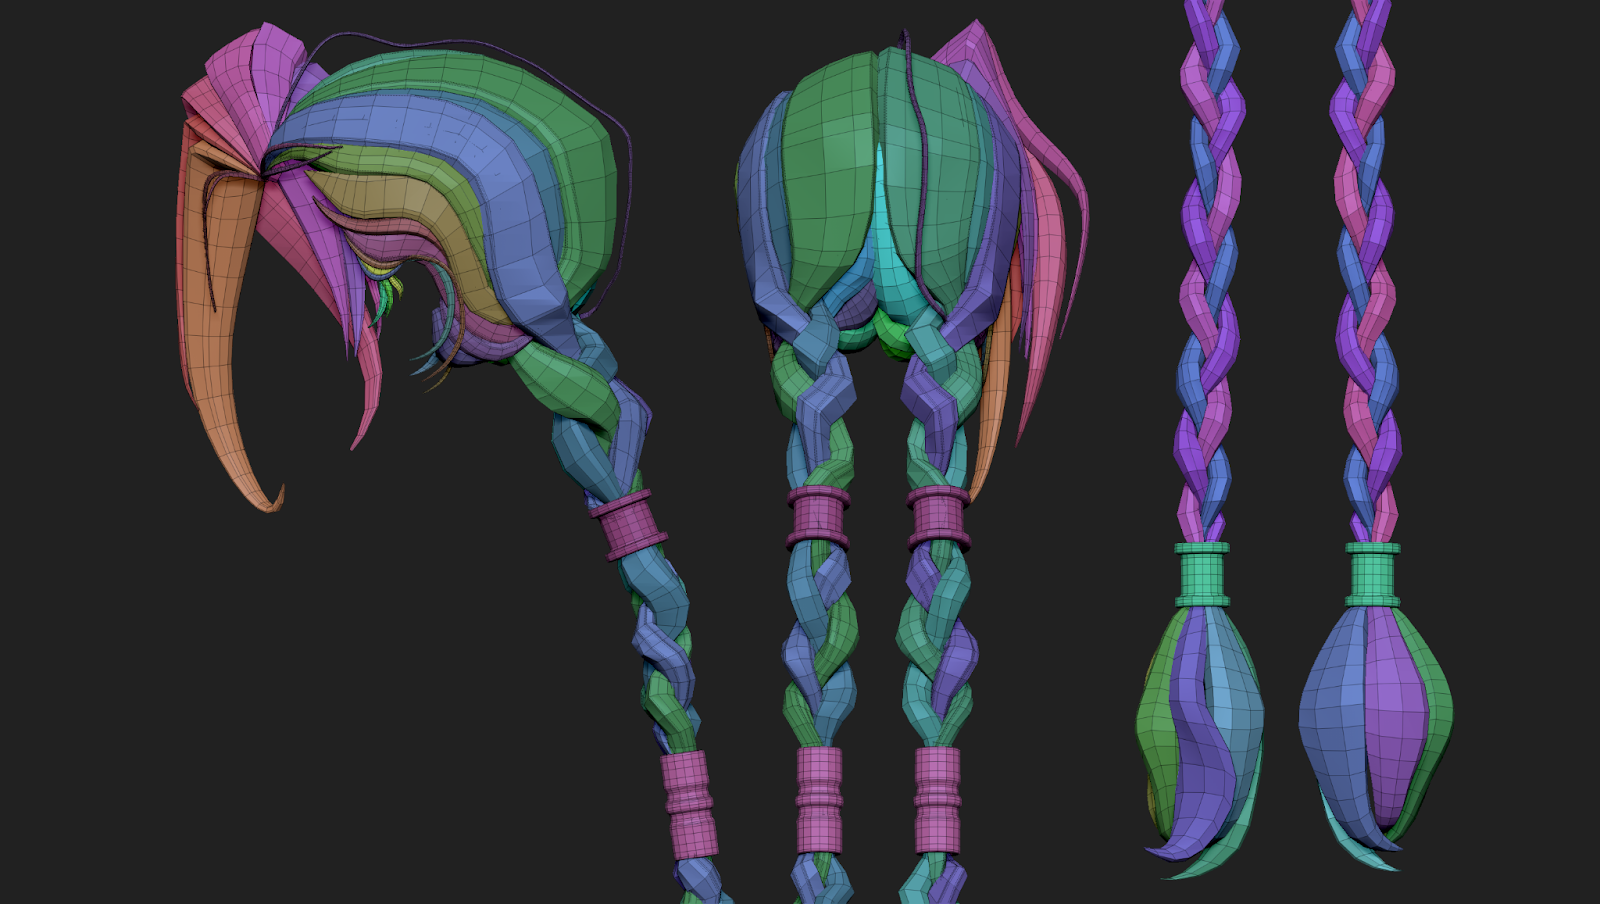
• Did you use any special brushes or techniques for the hair?
Yes! After blocking out the basic hair shape, I used CurveTube with custom settings.
To avoid doing a full retopo later, I kept the hair as geometry—each clump is its own separate mesh. My main brushes and techniques for this stage were:
Move – for shaping the forms
ZModeler – for tweaking topology
Smooth – at a low intensity to preserve the shapes
Pinch, Inflate, hPolish, and Polish By Features – for refining and polishing the hair.

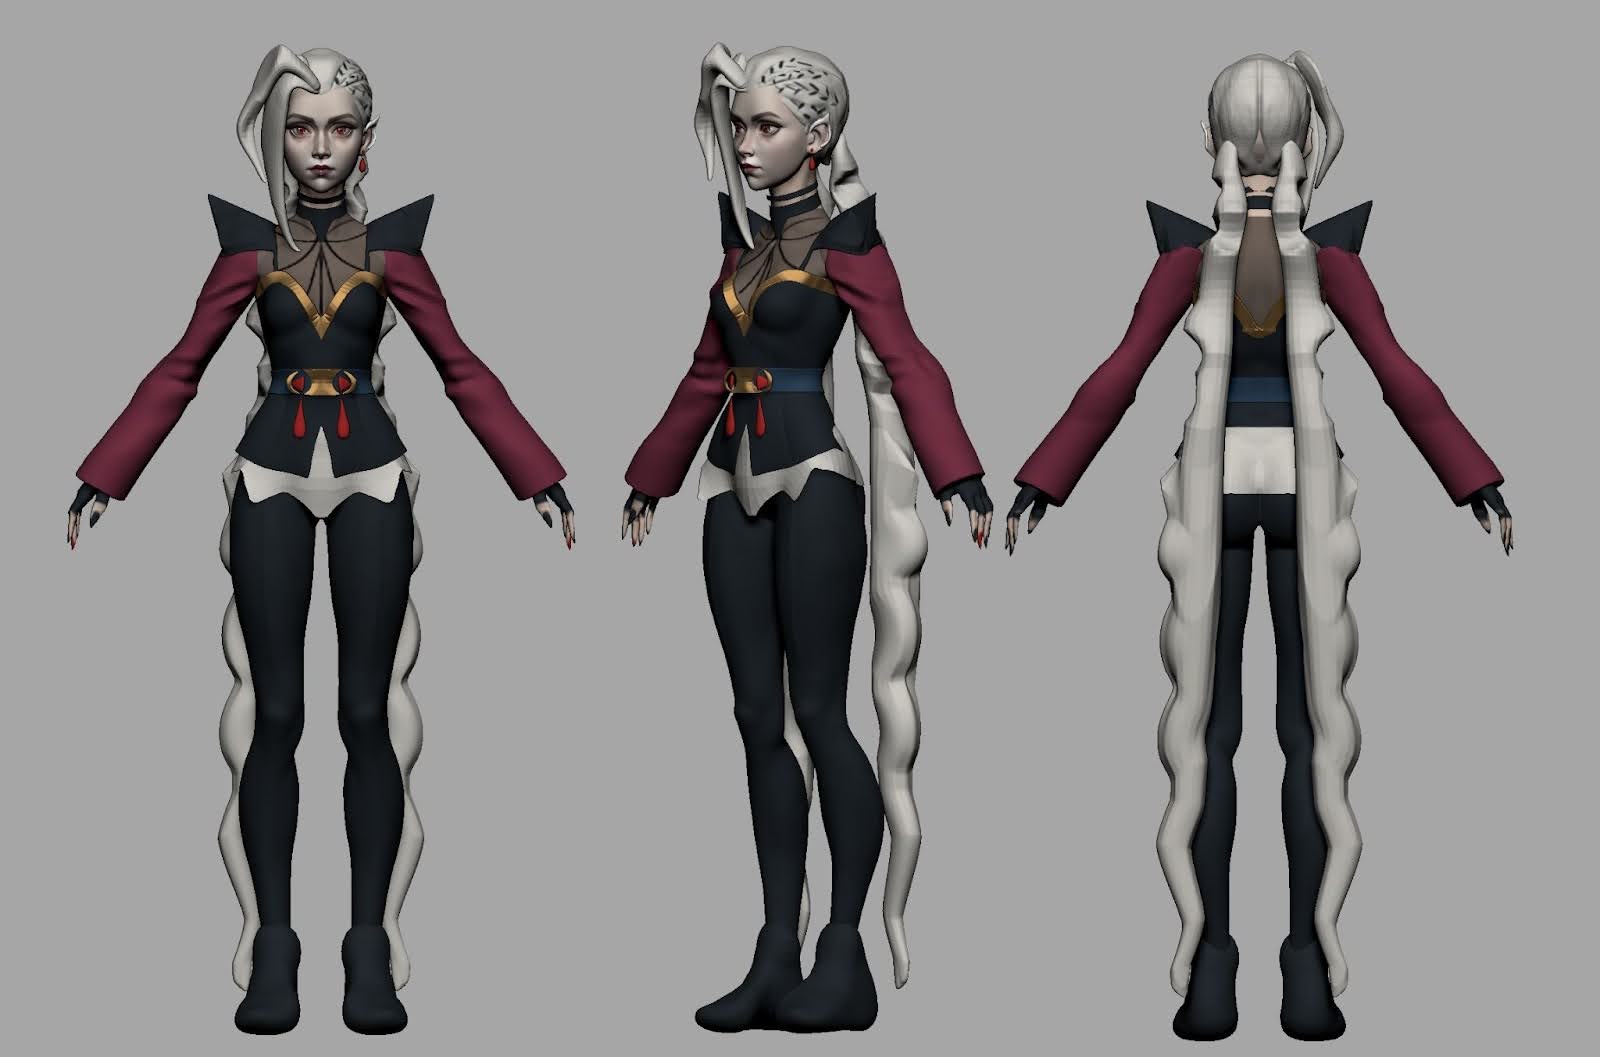
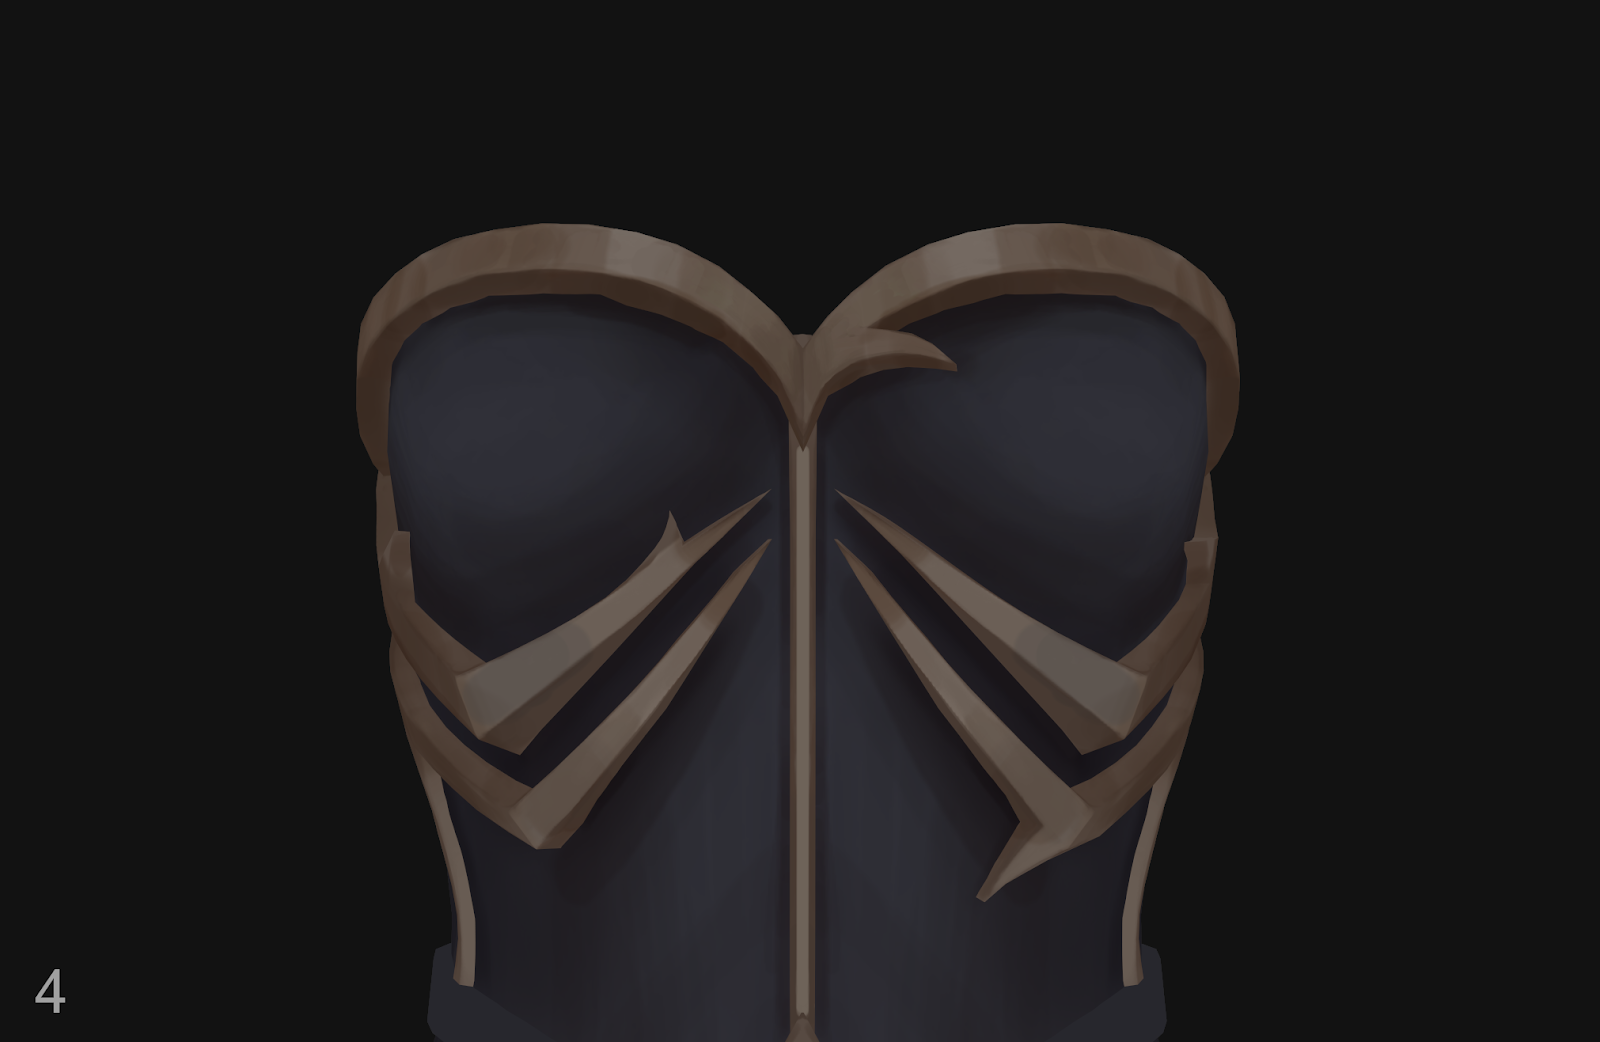
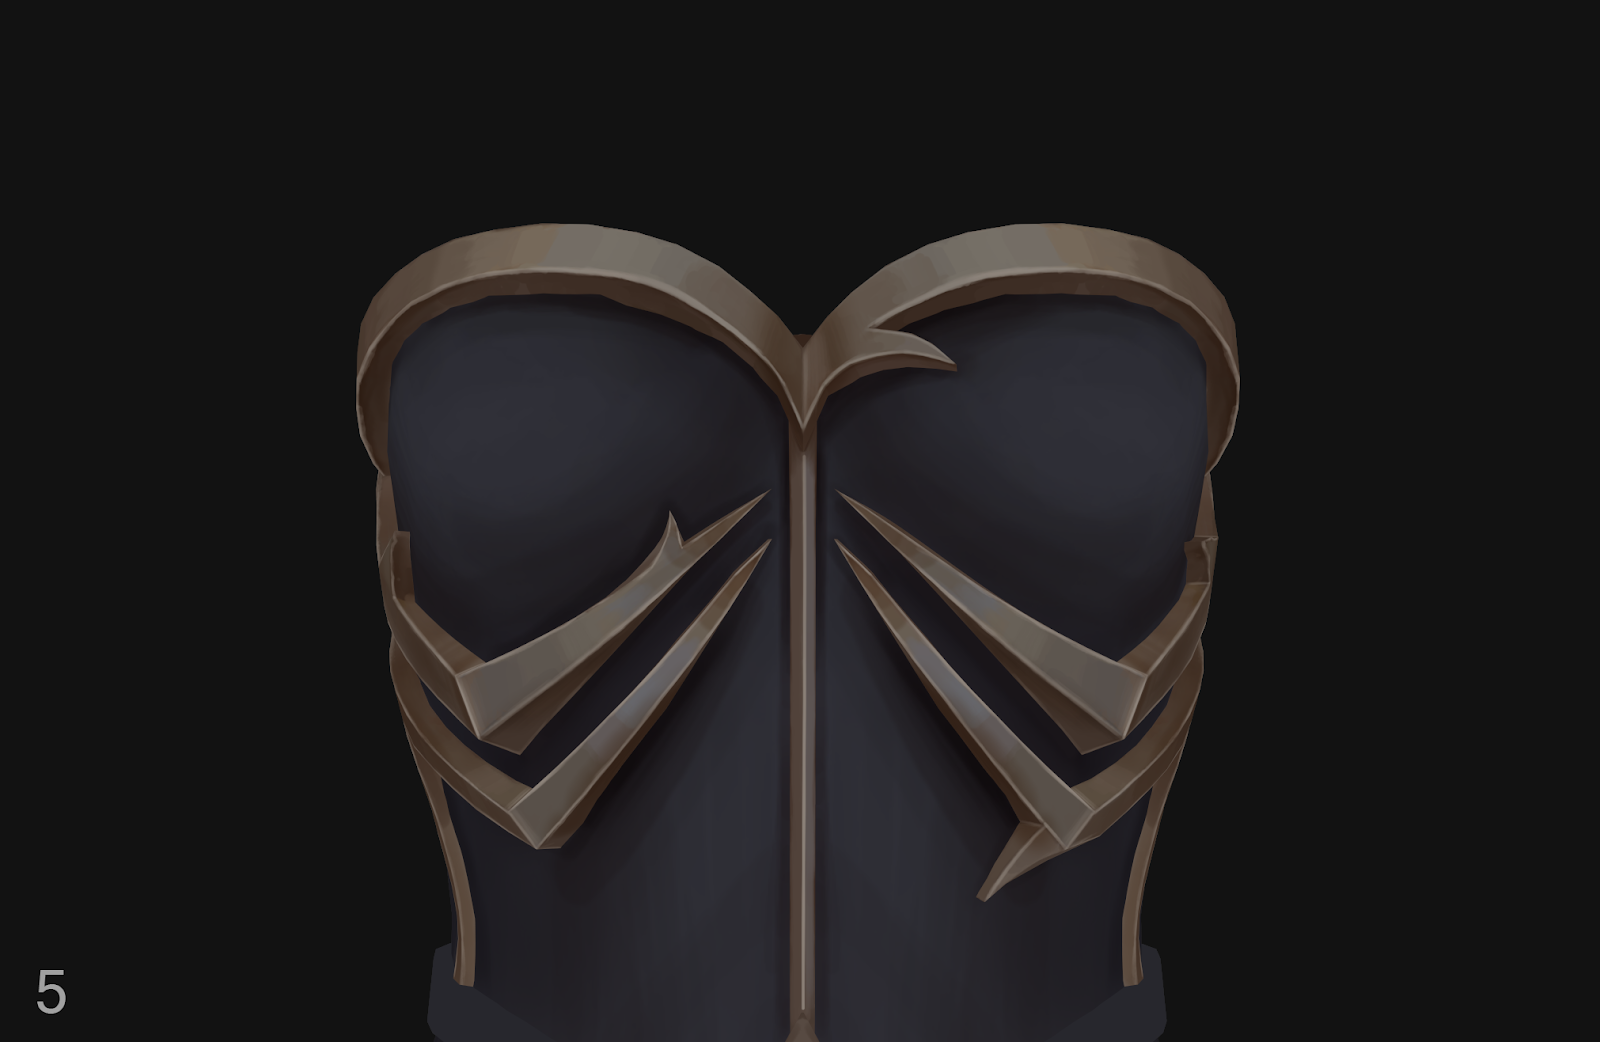
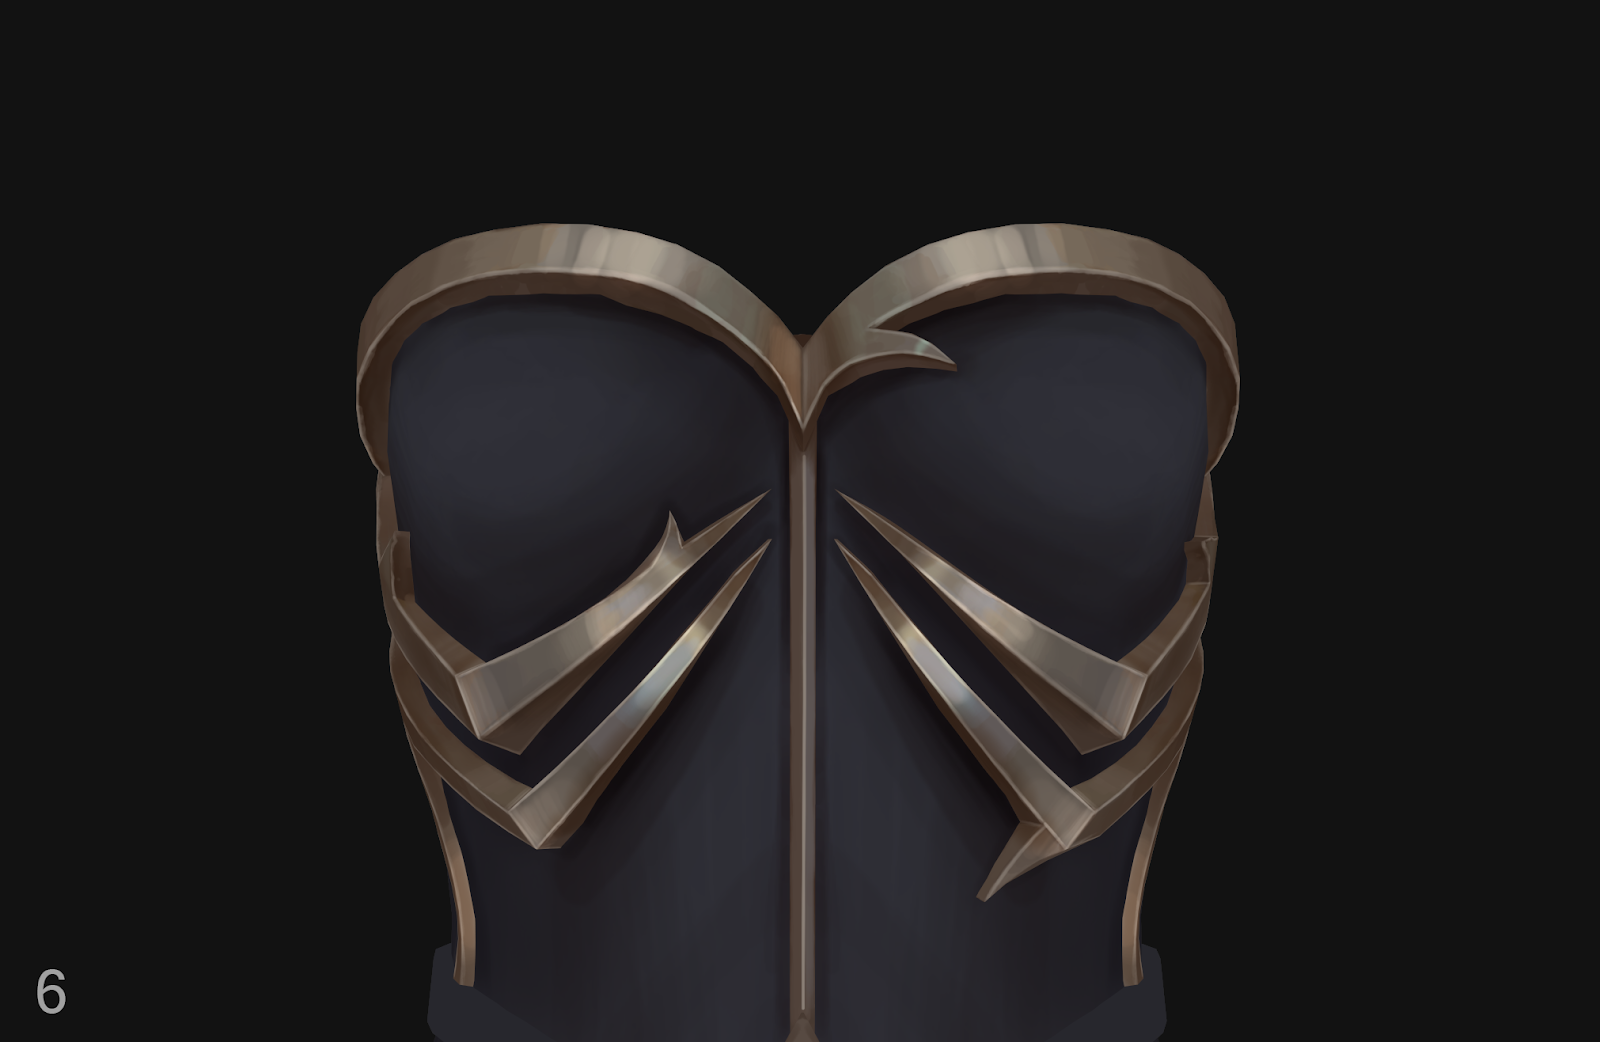
• I noticed you iterated on the armor design — what influenced those changes?
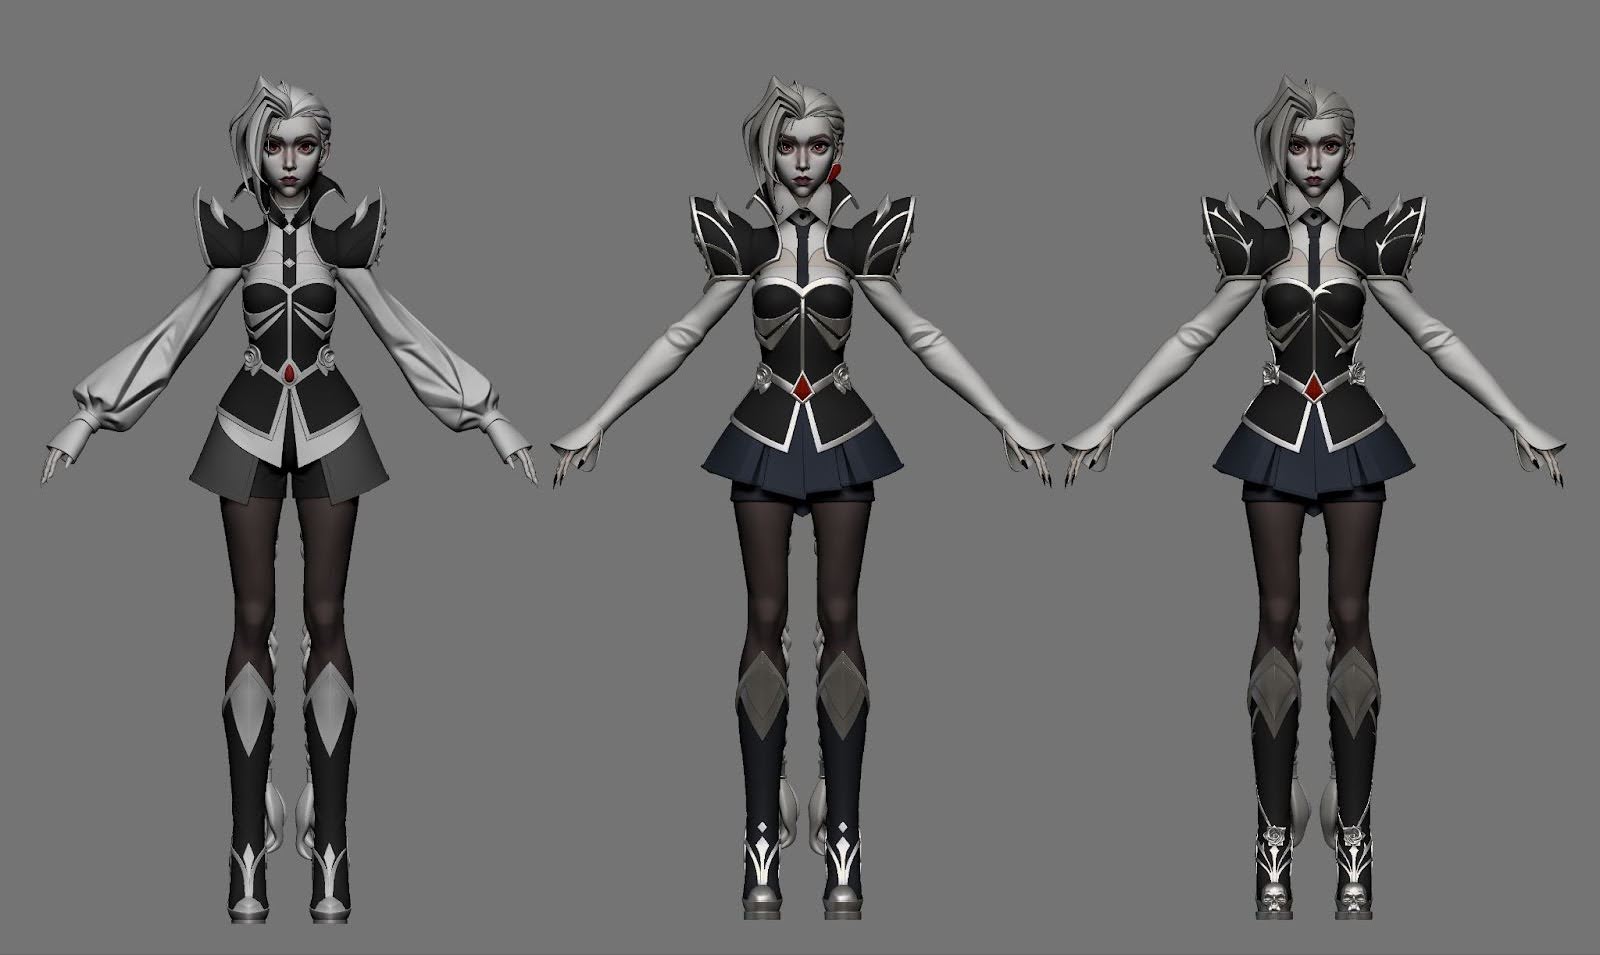
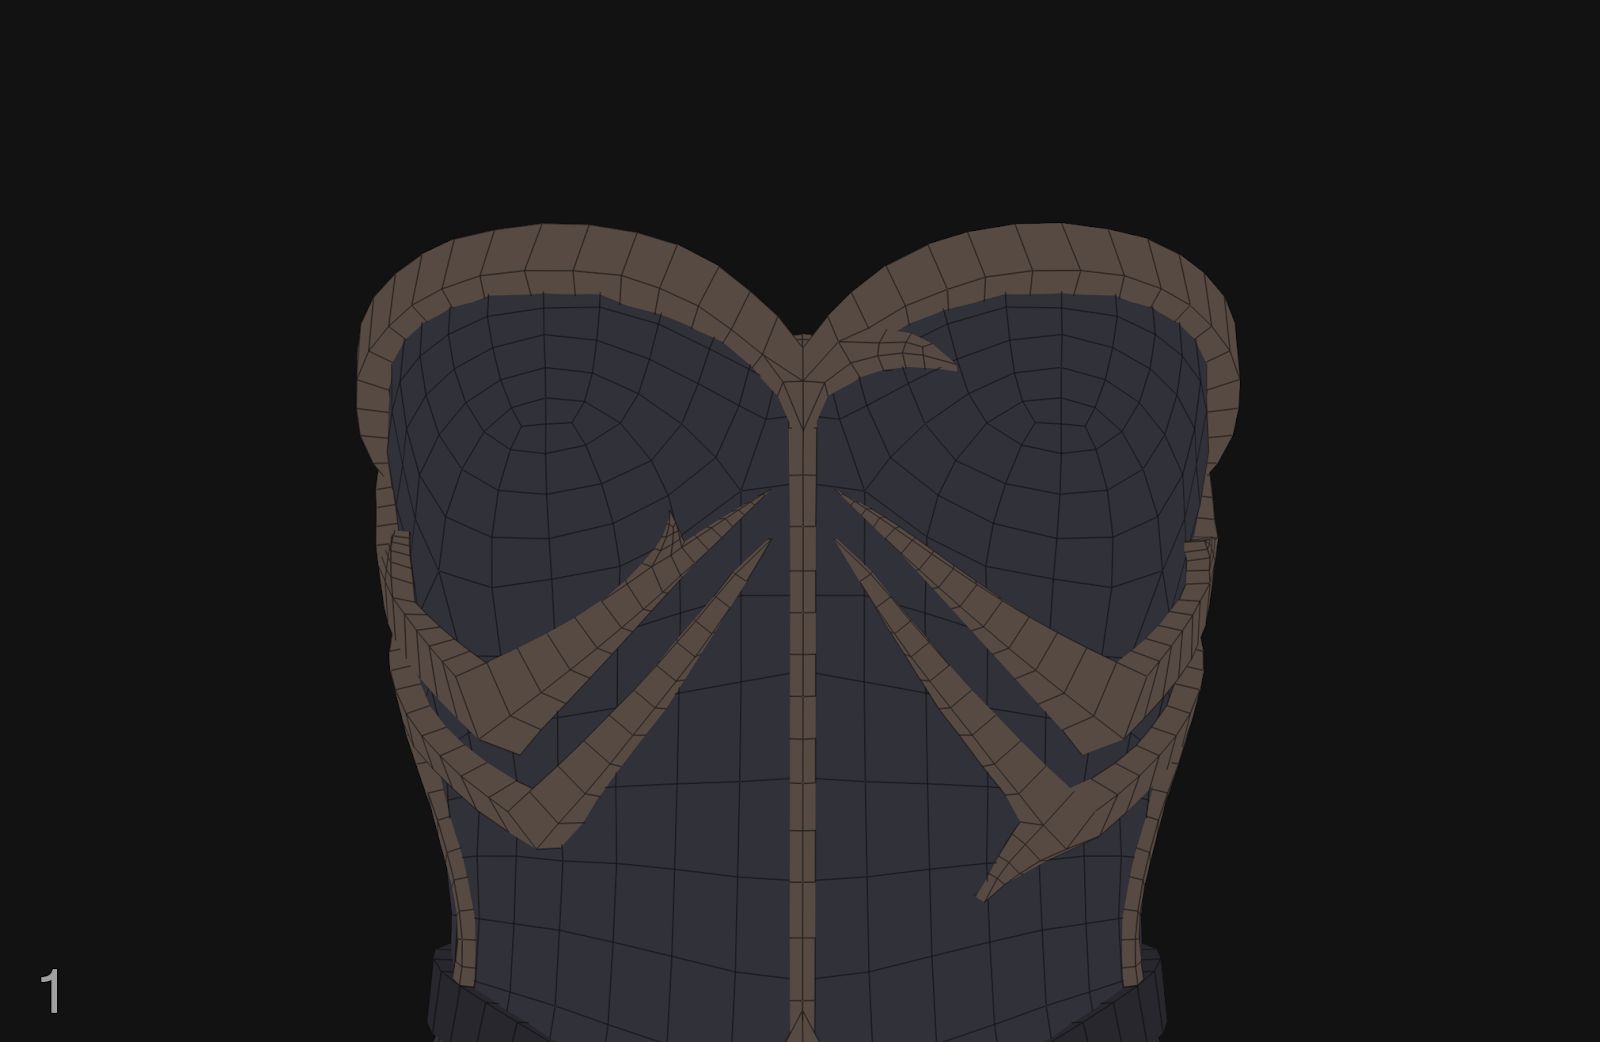
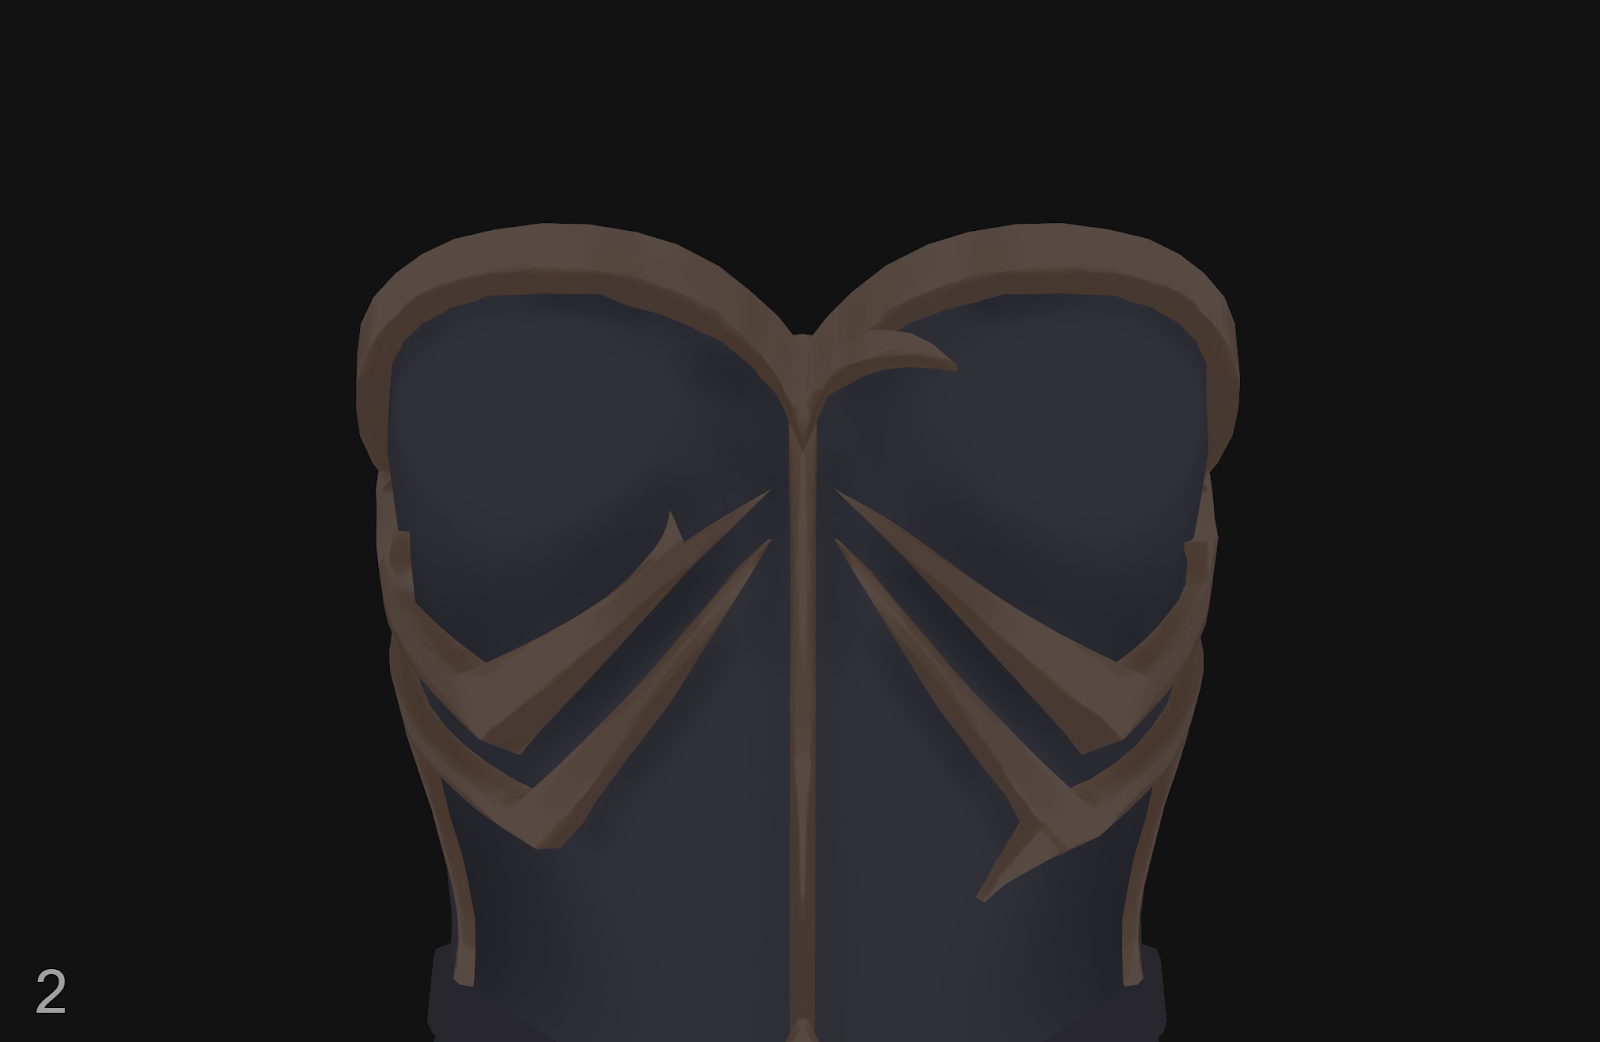
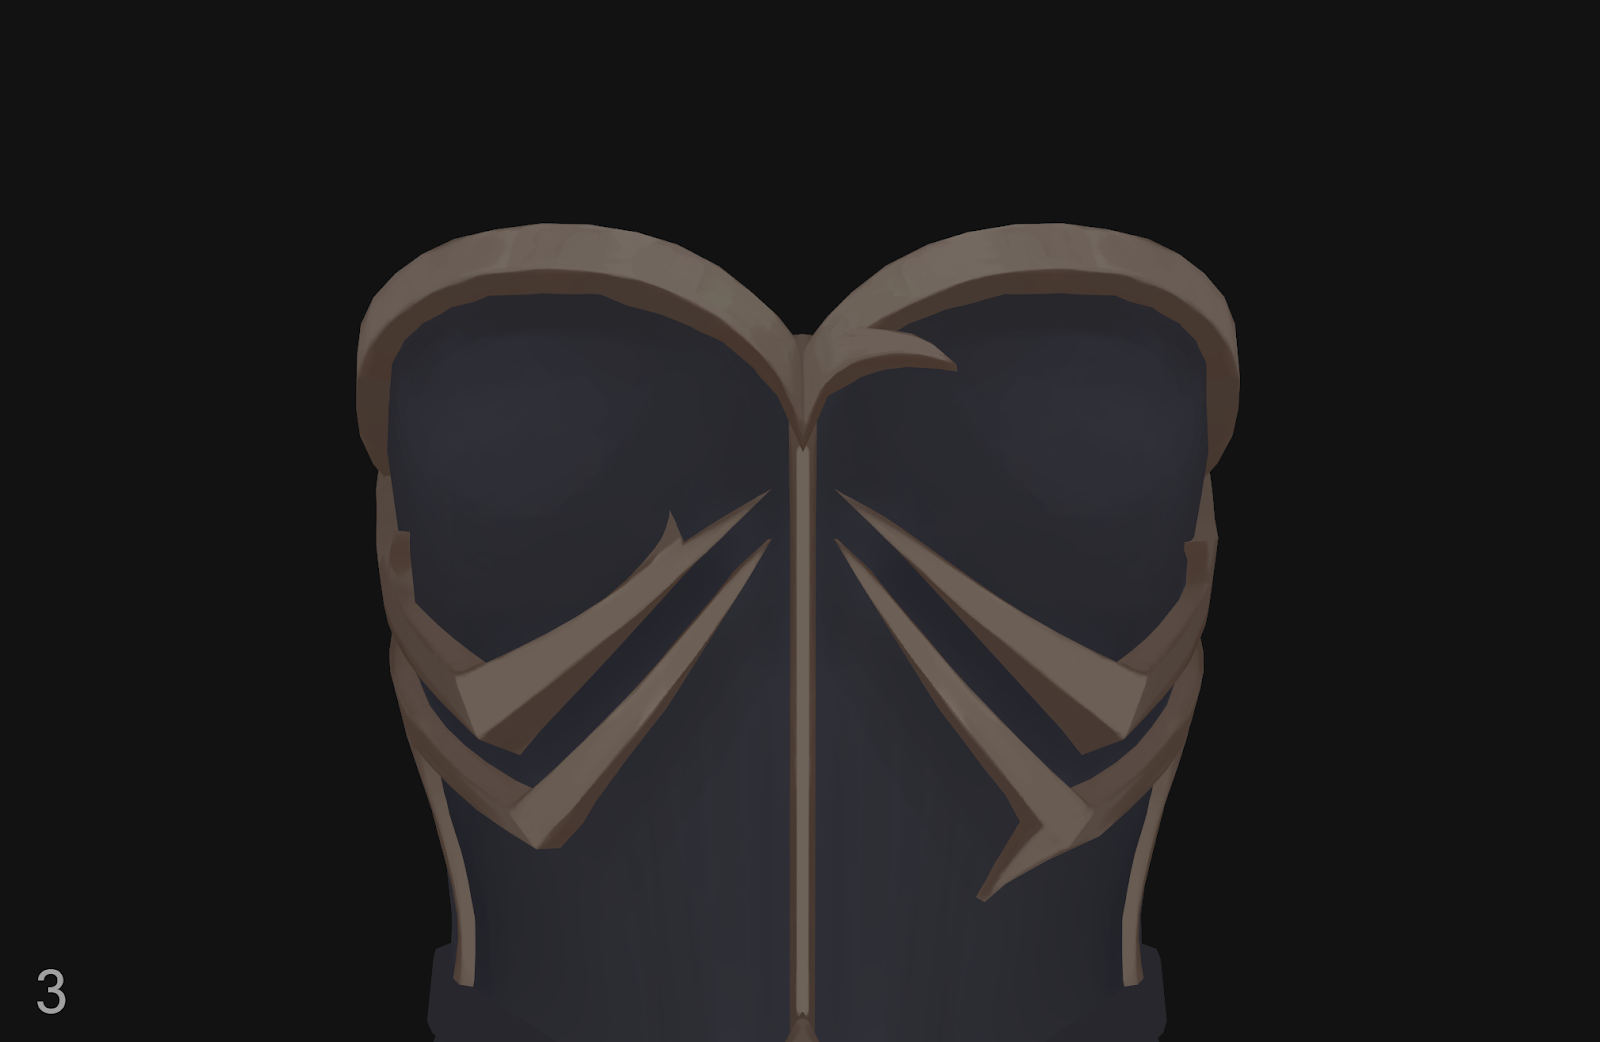
1. At first, I thought the high-poly was finished — it was the final sculpt I made for the challenge. But after a couple of days, I noticed the armor needed some improvements.
For example, the armor on the corset was too thin, so its shape wasn’t reading clearly.
The waist was too high, and some elements on the corset were placed too close together, which made the overall design feel crowded.
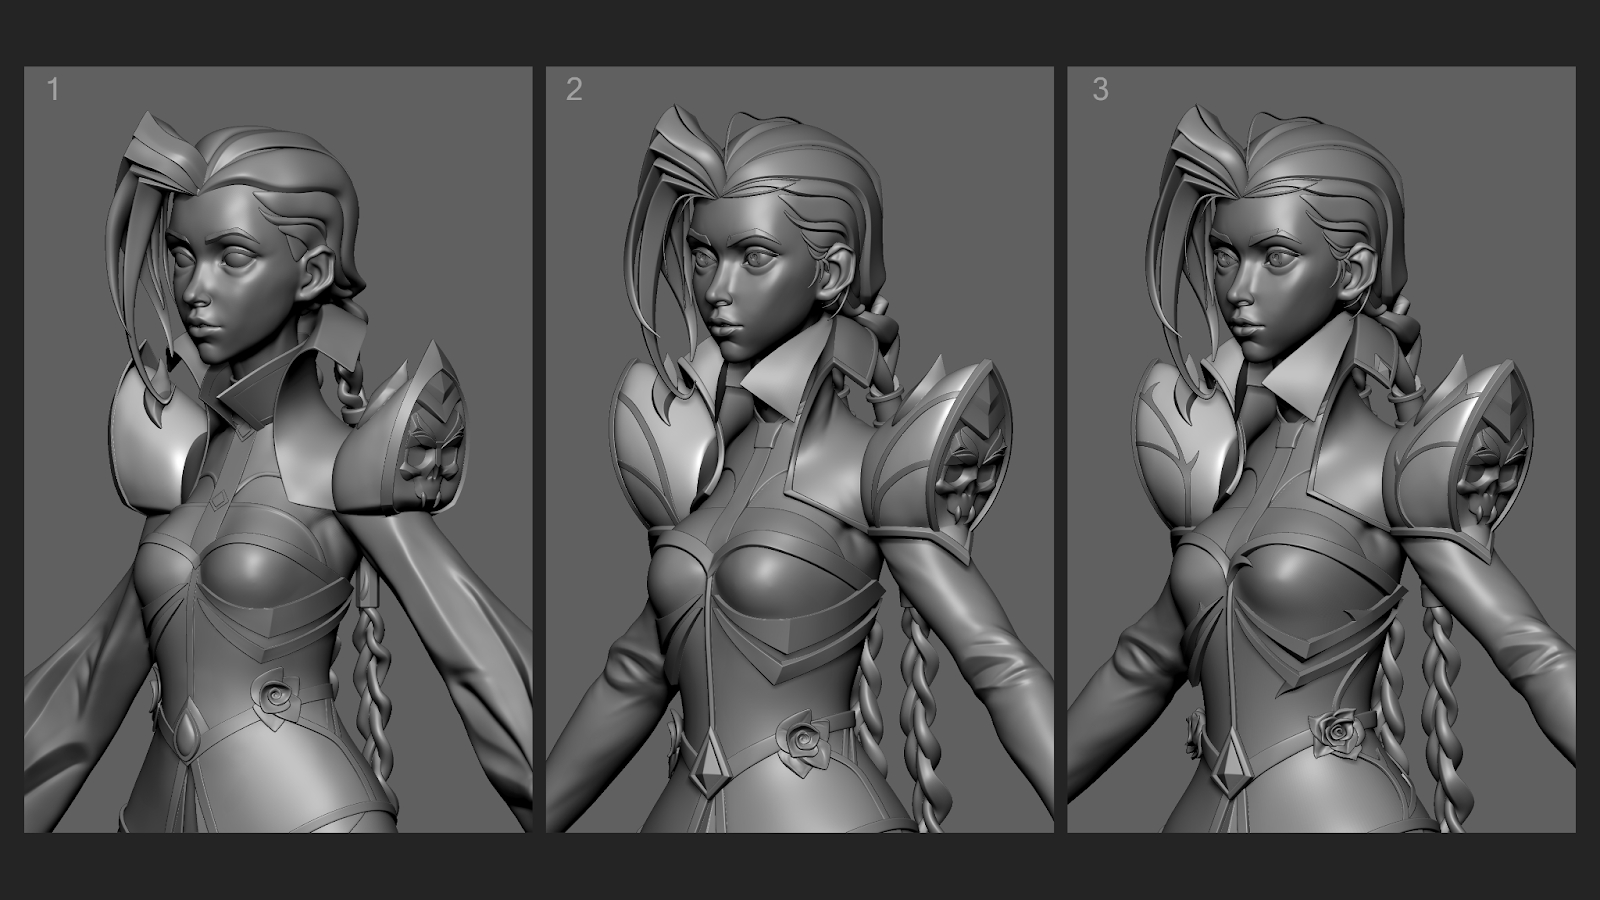
2. Because I was working with subdivisions, I made adjustments to the waist using the Transpose Master plugin. I simply lowered the waist and made it narrower. This instantly improved the silhouette.
The shoulder pads were a real challenge for me. They looked strange on the shoulder. I studied references with similar shapes, and after several iterations, playing with the form, I improved their appearance and changed the design.
3. In the third image, I made changes after feedback.
• Was the armor modeled entirely in ZBrush, or did you move parts of it into Maya?
I started modeling in ZBrush, but for clean topology I moved some parts into Maya. ZRemesher didn’t always give perfect results, and some areas were hard to fix directly in ZBrush. So I used the bridge between ZBrush and Maya (GN/Import/Export) and sent the mesh for a quick Quad Draw.
I like this workflow because it saves time later on low-poly creation and makes sculpting easier.
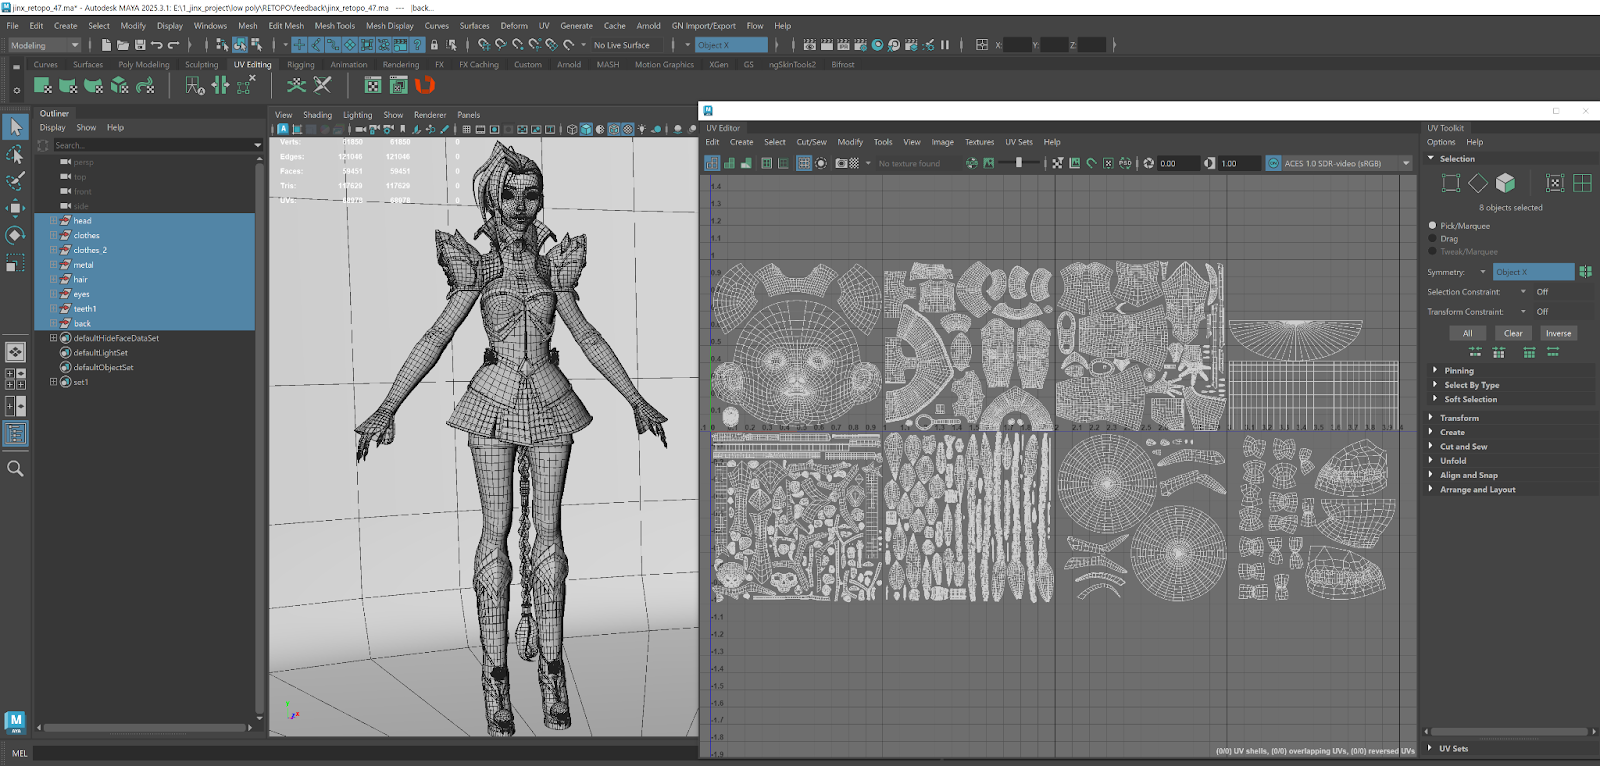
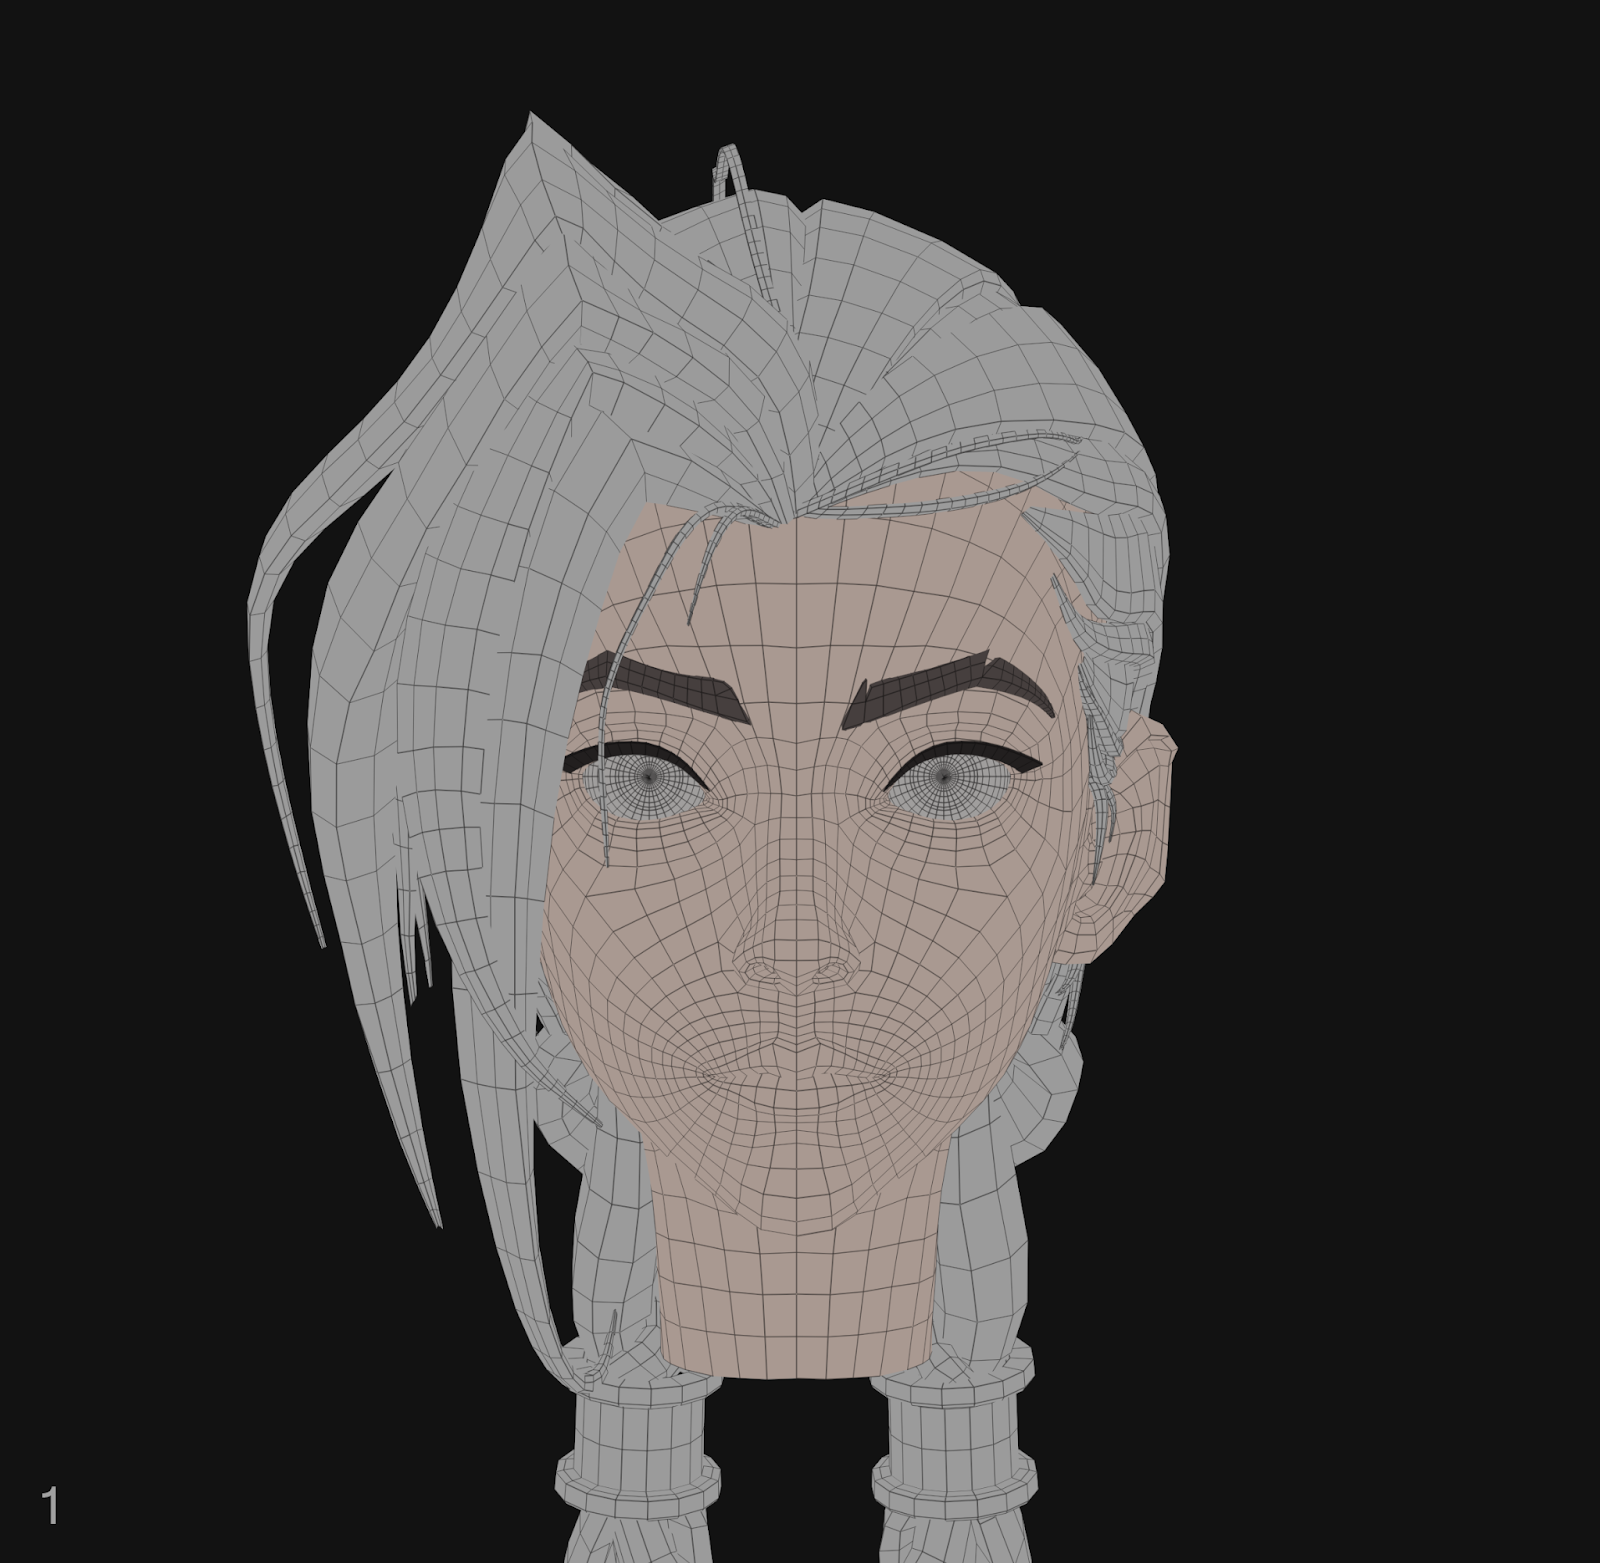
• For the low poly version, how did you handle retopology? (By hand or more automated?)
I did all retopology by hand in Maya using Quad Draw. Some parts were already prepared during the high-poly stage, like the corset and armor pieces.
I retopologized the face, arms, and legs manually, merging the legs with the shorts into one mesh.
The shirt was retopologized as a single piece. The skirt was modeled in ZBrush with ZModeler, so it didn’t need retopology.
Hair already had geometry. All UVs were done in Maya.
 |
Texturing & Materials
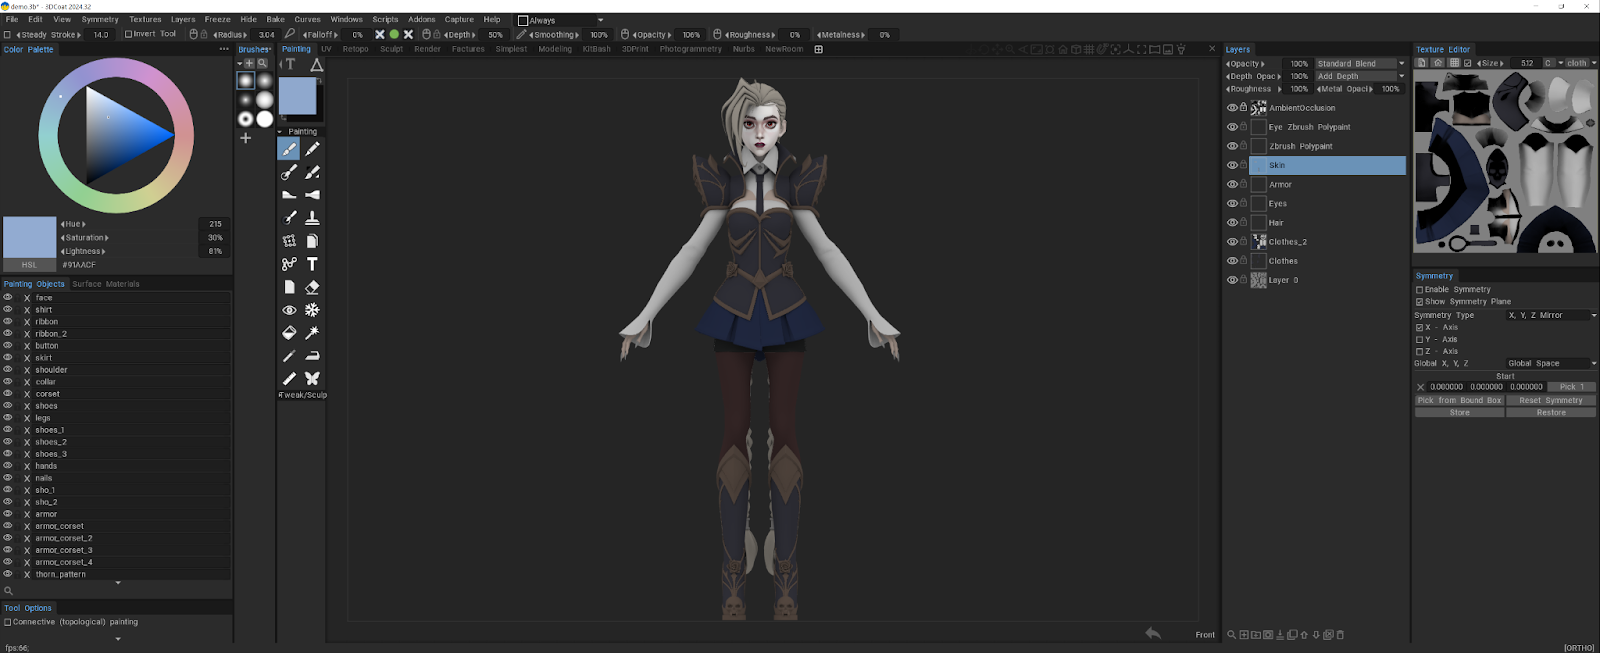
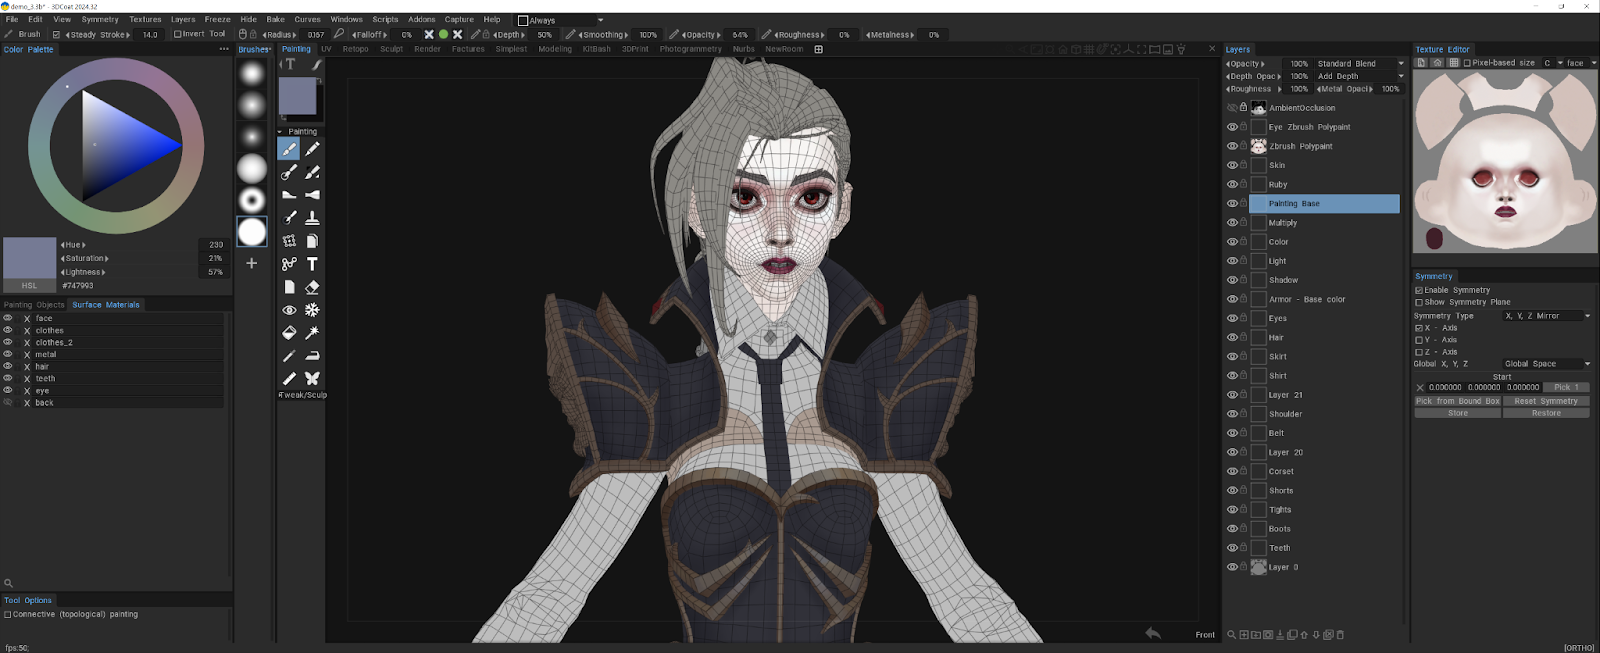
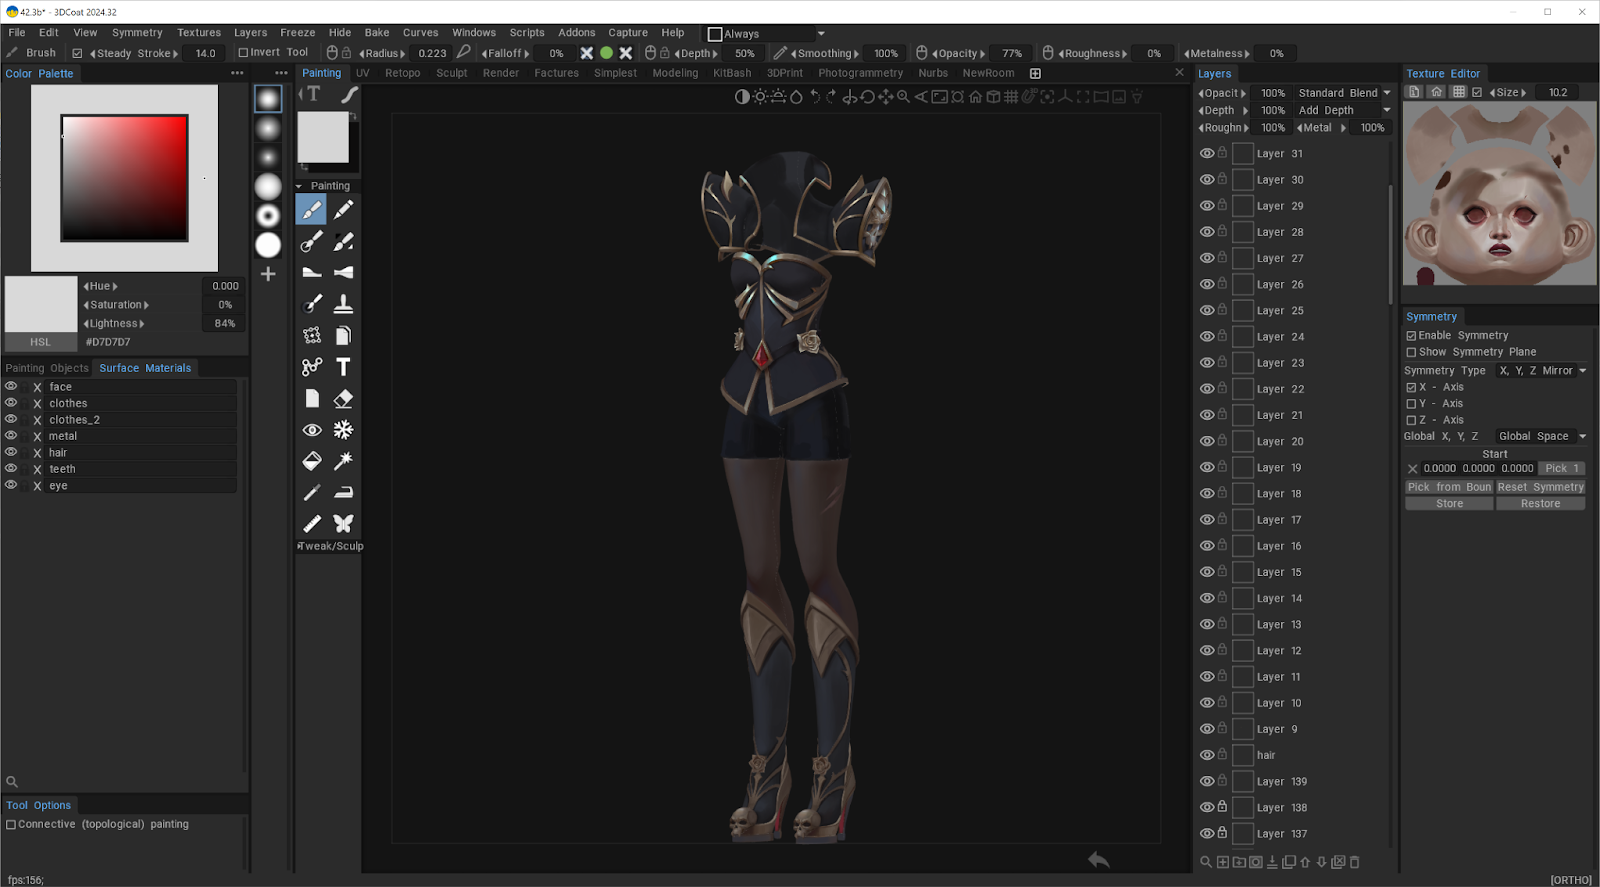
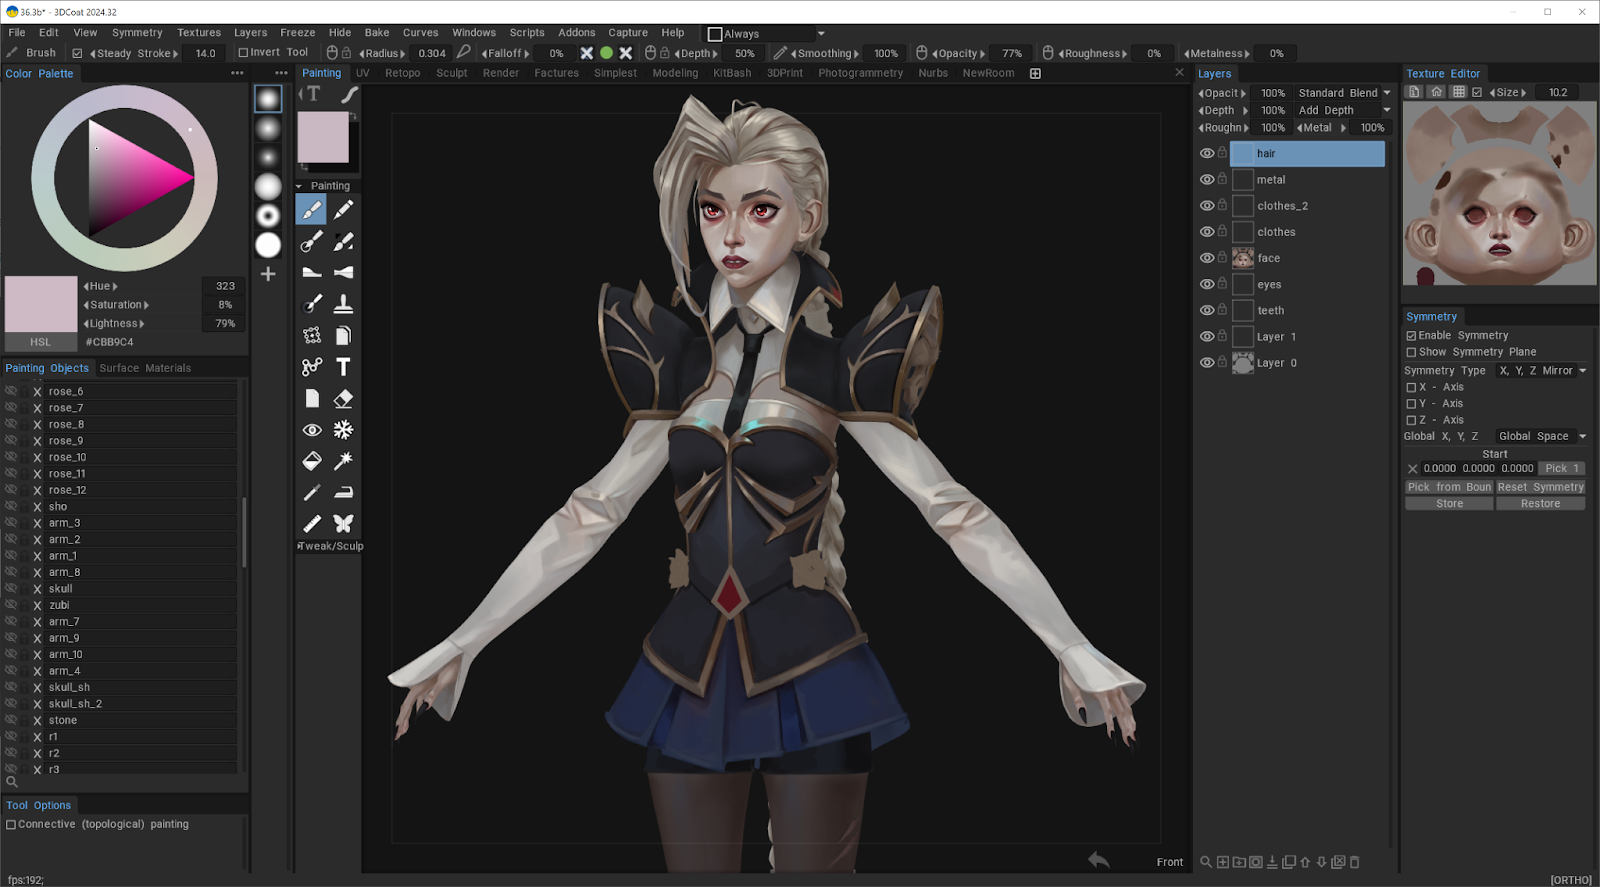
• You mentioned using 3D-Coat — what was your workflow there?
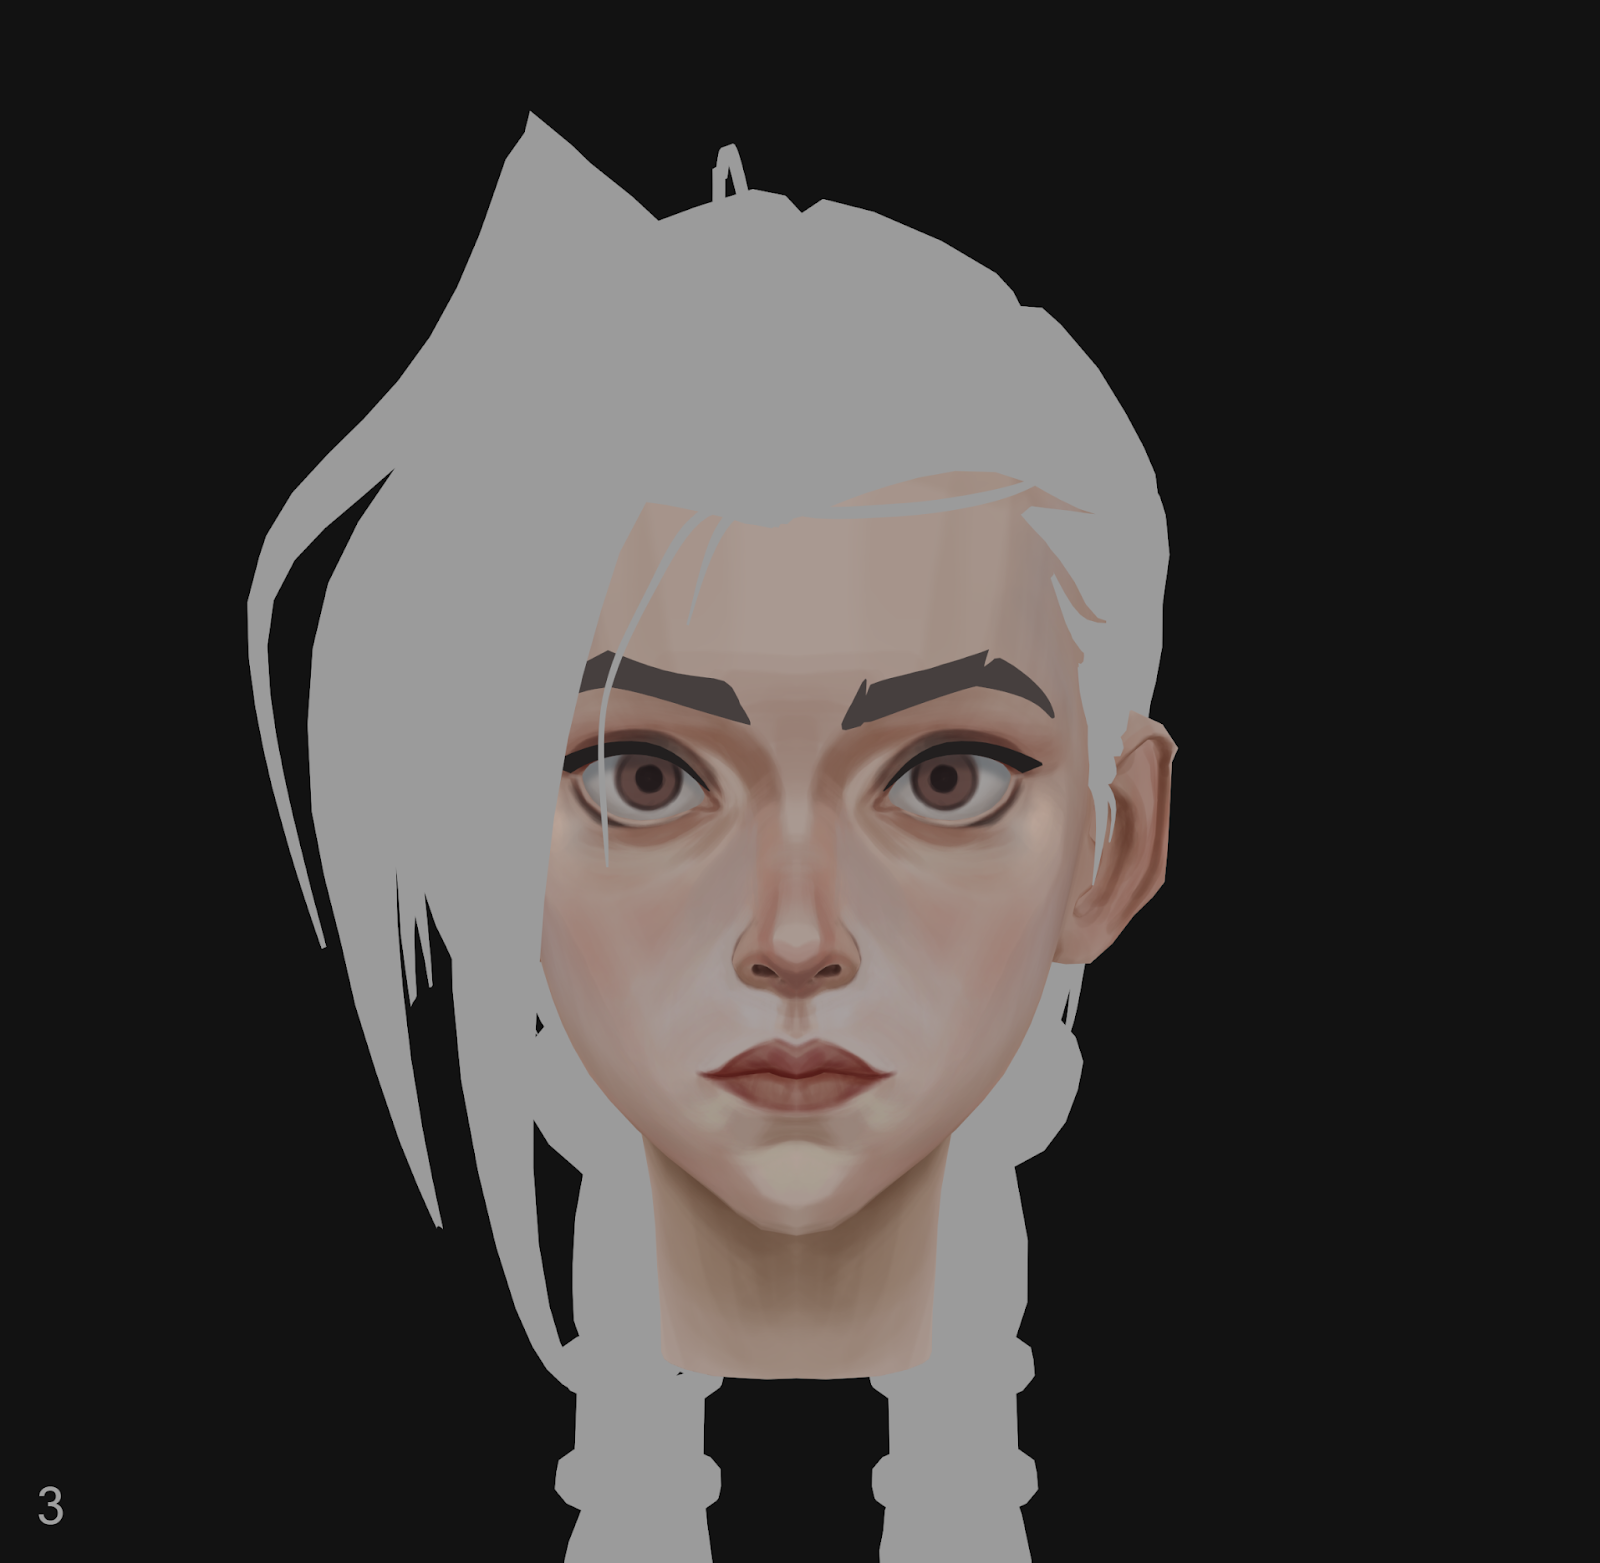
For this project, I worked with just a low-poly model, so my workflow was pretty simple. I didn’t use any complex techniques, procedural stuff, or BPR. No baking either—my texturing was flat color.
I really wanted to focus on painting textures: skin, metal, hair, clothes—making each material feel like it’s actually that material.
I used only two brushes: a soft one and a rough one.
I was using 4K resolution because I wanted to paint a lot of details on this model.
I painted 90% in 3D-Coat and finished 10% in Photoshop.
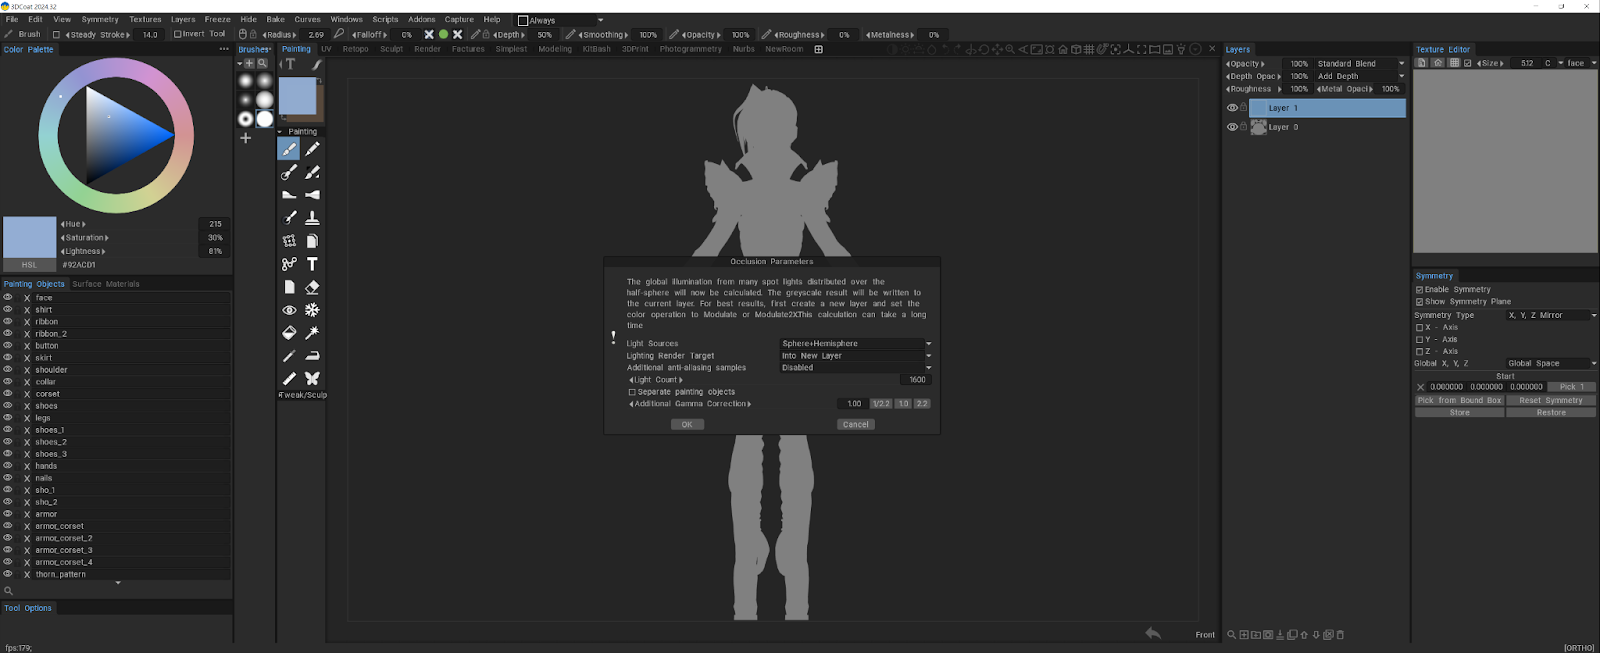
Before I started, I set up my interface, turned off panels I didn’t need, just to make it easier to work. Then I loaded the low-poly model, turned on flat lighting, and applied AO.
I split layers by material: skin, armor, hair, clothes. I imported polypaint from ZBrush for the face and eyes as a base. Then I filled everything with base color.
I started painting without AO, just to see the pure colors. AO was only for checking light and shadow, not for the final render.
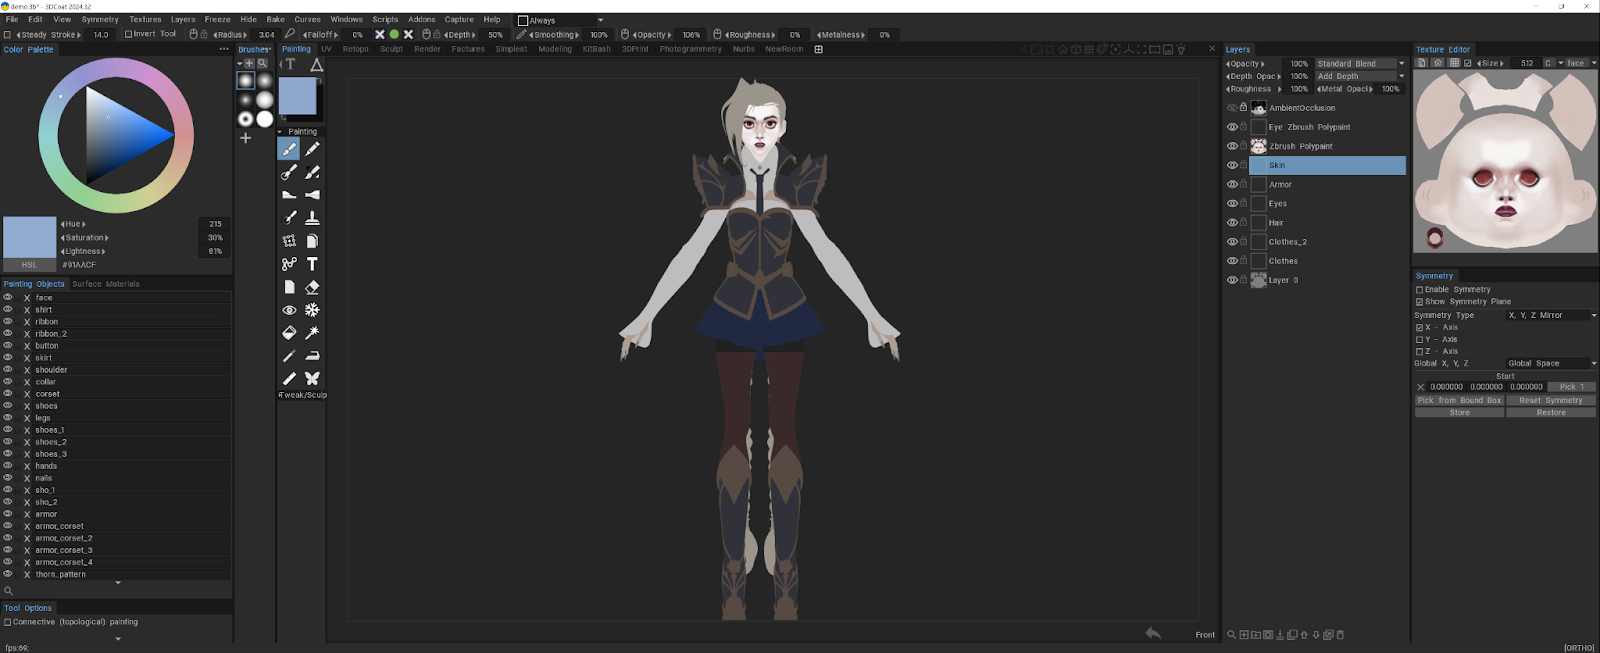
I often turned on the wireframe so I could see all the edges clearly.
In Arcane, every frame is a masterpiece. I took a lot of screenshots to better understand shape, texture, and color. I really wanted to replicate that style and study the technique.
Many artists start with a grayscale base and then add color.
This way lets them focus on lighting, shading, and form without getting distracted by color.
I like starting with color because it lets me add different color spots and mix shades freely. This approach makes the result more painterly and interesting, imitating traditional painting. For me, it’s a more natural way to work, since my focus is always on experimenting and playing with color.
Throughout the process, I tried to keep my layers merged as much as possible. If I ended up with too many layers, I would export all the color maps, reload the low-poly model, and bring the maps back in. This helped me keep the scene clean and focus on painting with fewer layers.
Painting the light hair was challenging. A few times I had to redo it because it came out too dark. The metal was hard to get right. I spent some time just testing different colors to find the right shades. It reminded me not to be afraid of experimenting or making mistakes. They’re just part of the process.

The idea for the background came to me when I saw this piece:
https://www.artstation.com/artwork/29o03K
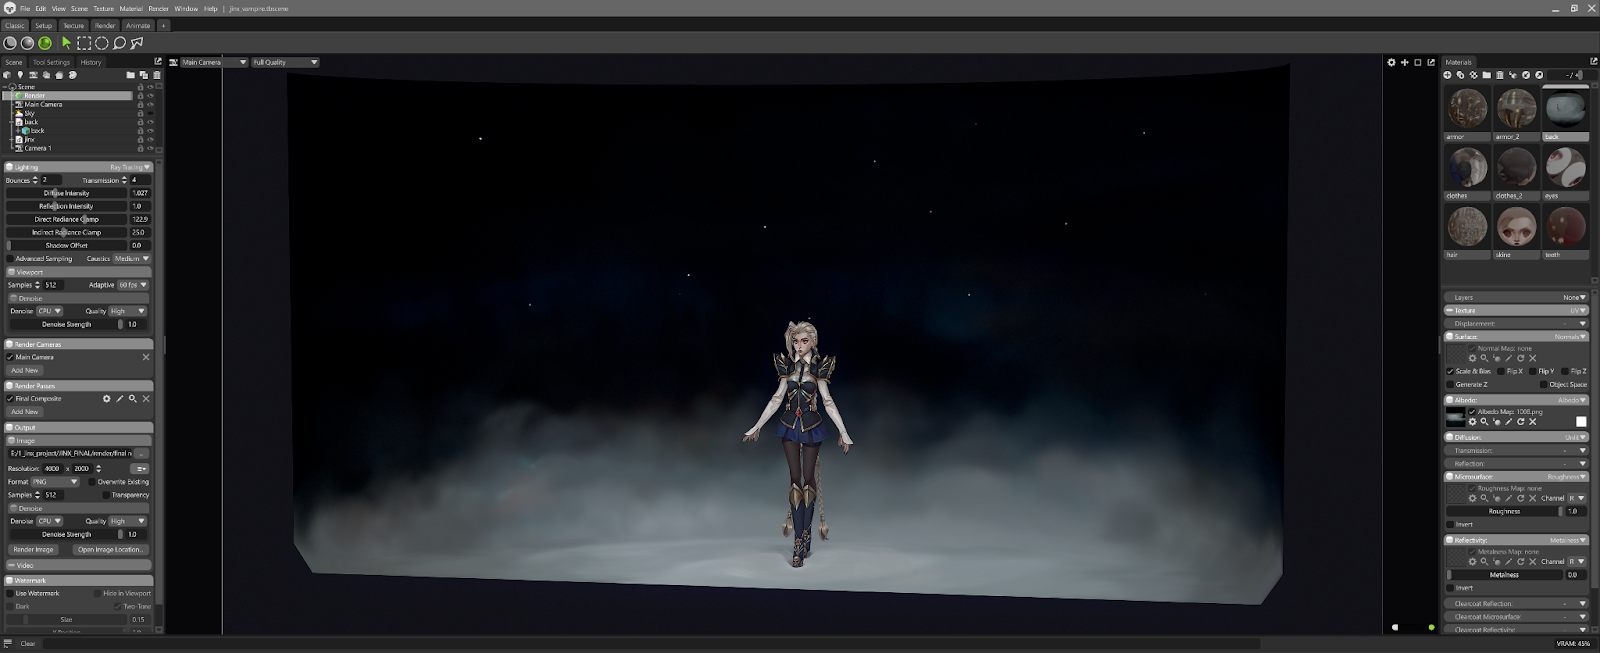
I painted a simple background to help convey the character’s story, adding fog to create a vampiric vibe, as if she’s emerging from the darkness.
I used a big soft brush for the background, and it didn’t take much time.
I want to share some thoughts on my workflow in 3D-Coat, especially how I approached painting metal and skin. My process was a bit chaotic at times, so for this interview, I decided to repaint the metal and skin to explain my thought process and how I arrived at this approach.
I’m not a professional painter, but I hope this might be useful :)
Metal Painting Process
1. I start with a base color.
2. Then I work out the light and shadow, establishing the main light–shadow foundation.
3. At this stage, I work with neutral colors that stay closer to a gray value. As the piece becomes more detailed and complex, I increase the saturation and start adding gold, silver, and other metal tones.
4. I just keep painting and strengthening the contrasts whenever needed. It’s also important not to make the shadows too dark. A shadow may look dark and gray by itself, but it should always contain subtle color variations.
To create volume, I break the form into planes and compare those planes to each other. They need to have slightly different values and colors.
5. At the next stage, I start painting edge lines to bring out the shape and volume of the metal.
6. On a new layer, I start gradually adding highlights that are characteristic of metal.
I use light pen pressure to keep the brushstrokes softer and leave room for further detailing.
The painterly look is built up layer by layer through opacity, not with hard 100% strokes. If you paint with a fully opaque brush right away, the result will look flat.
7. Here I start adding cool and warm colors that contrast with each other. I add a cool highlight that works nicely with the warm shadows.
8. Finally, I move on to detailed refinement and polishing, adding dents and scratches.
Skin Texturing
Skin Painting Process + video demo - https://www.youtube.com/watch?v=FJ18n4YFKag
|

When I was painting the skin, I often used Multiply mode, but I chose a very light and unsaturated shade to avoid creating a muddy color. My goal was to build the volume gradually, layer by layer.
1. I start with the base color.
2. I use this same base color and slightly change the tone and saturation so that the shadows are not dark. I add a new layer and, in Multiply mode, use a soft brush to paint shadows on the eye sockets, cheekbones, nose, and under the lips. I slightly refine the eyelids and add shadows in the nostrils.

Then I add a reddish color to the areas where the skin shows blood (cheeks, nose, ears) and paint the lips.
With a flat brush, I paint the areas where the planes transition, such as the cheekbones, temples, and nose.
I always try to paint along the form, as if I were sculpting the face. It helps give the piece more volume and makes it feel more realistic.
3. Next, I gradually paint the eyes, lips, and philtrum, creating a clearer contour for the eyelid fold and lash line.
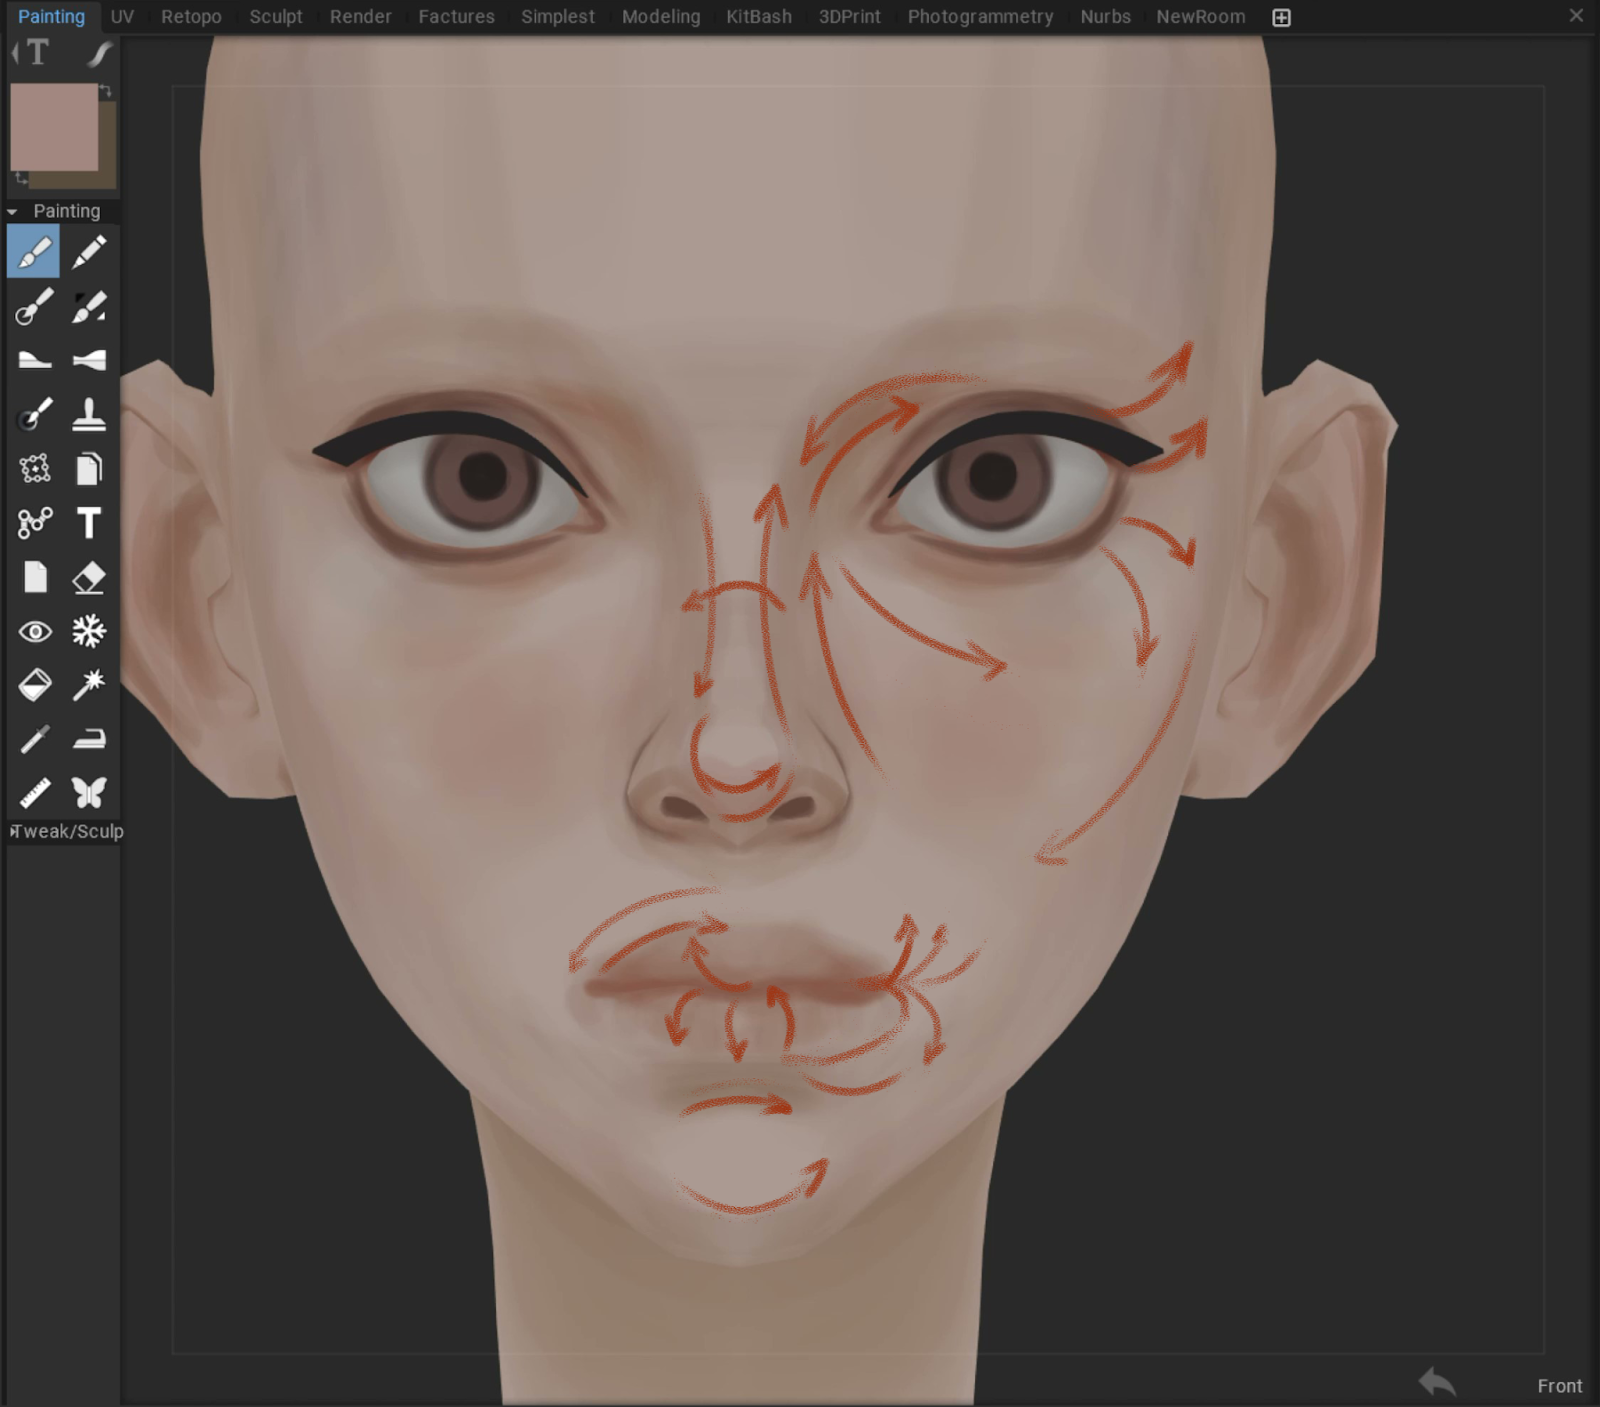
I slightly boost the saturation of the red tones and add hints of cool blue.
I also add bluish and slightly purplish tones to the temples, cheekbones, and under the eyes. I keep the warm and cool areas separate.
4. At this stage, I paint without symmetry to convey Jinx’s individual features, as in the concept.

I add clearer edges to the eyes, nose, and lips to focus attention on the center of the face.
I add a red tint to the iris and a less saturated red under the eyes. I don’t use pure black for the eyelashes or the pupil.
5. Next, I blended the skin tones and smoothed transitions where needed. For example, I smoothed under the eye so the red tint gradually transitions into the skin tone.
I also refined the shapes of the eye areas (tear trough) and the nose, making them more graphic, like in Arcane.
Around the nose and lips, I started applying denser strokes with a cool tone.
When I painted the cool tones, I used gray and slightly shifted it toward blue. Then I applied this color with a transparent brush (65%). This way, the tone turned out clean and beautiful.
6. Next, I move on to more detailed painting and add the veins. I also add light golden tones to the forehead and chin.

For the cast shadows, such as where the lips meet, I added a darker and more saturated red tone.
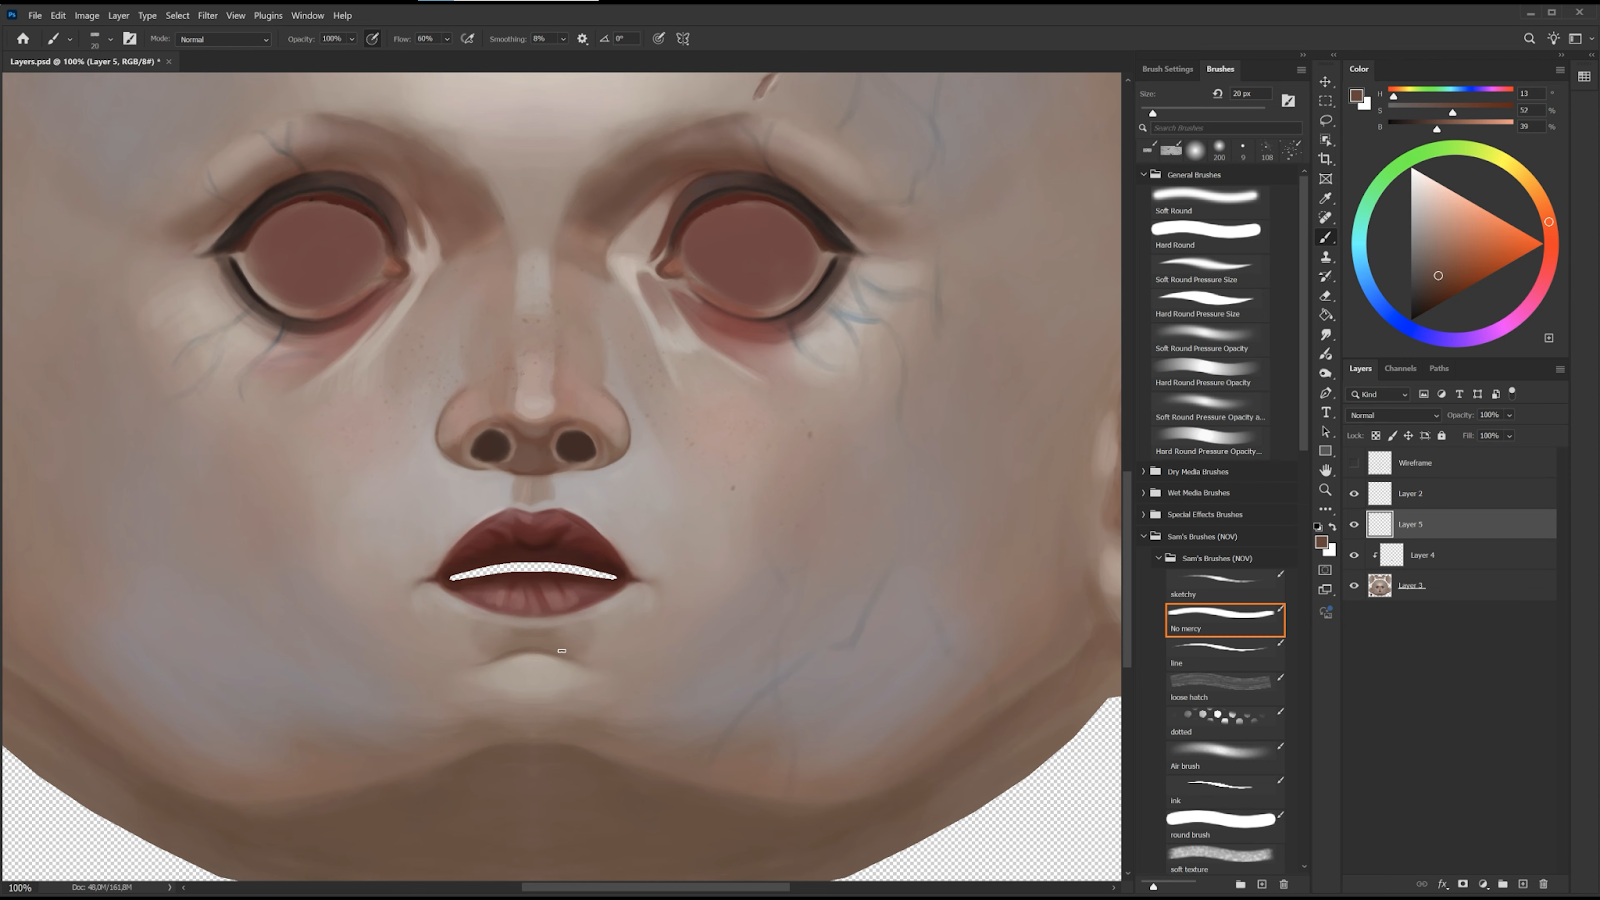
7. I export the color map to Photoshop to paint details and do some blending. I use a textured brush to add moles and freckles.
I refine the veins, painting them in more detail using blue and green tones, while using multiply mode and adjusting layer opacity to make them feel like they are inside the skin.
Next, I returned to 3D-Coat to continue refining the details and polishing.
I add an orange tone where I want to create a subsurface scattering effect, such as on the wings and the tip of the nose. I also apply a bit of orange tone on the eyelids and near the bridge of the nose.
Next, I add highlights, and it’s done!
• Why is 3D-Coat your preferred tool for hand-painted textures?
I like using 3D-Coat because I needed something simple and focused, without a huge setup. It took me very little time to understand the essential tools and start painting right away. The workflow feels very direct, almost like working in Photoshop, so it was easy to get comfortable and focus on painting.
• Why do you think 3D-Coat is so popular for hand-painting compared to Substance Painter?
I don’t have experience with Substance Painter, but I’ve seen some amazing work by artists using it, and I’m really excited to try it on a project with PBR materials.
From what I’ve learned, 3D-Coat is often preferred for hand-painted textures because it’s more intuitive and streamlined for that workflow. It lets artists focus on painting directly without getting slowed down by technical setups, which makes the process feel much smoother.
• How long have you been painting in 3D, and what helped you develop your painting skills?
I’ve been painting in 3D for the first time with this project, so it’s pretty new for me, and I’m still learning and exploring this technique.
I started my journey as a 2D artist, so I developed my painting skills through regular practice in Photoshop. I used photos as references and simply drew a lot. I’ve always enjoyed painting people and clothing, which let me study different materials, textures, and colors.
For example, when I painted a texture, I took time to study the surface I wanted to capture, its color, tone, and how smooth or rough it was. I just played with settings, layers, and blending modes in Photoshop to achieve a realistic look.
I also watched tutorials on YouTube and learned from artists who inspired me. For me, it really came down to consistent practice and repetition. But I still don’t know a lot and keep learning from my own mistakes and past experiences.
• Was there a specific tutorial, artist, or resource that helped you during the project?
I received visual feedback from the amazing artist Phillip Zhang.
He did an overpaint of my piece and gave me valuable notes on design and color, which really helped me push the piece toward an Arcane style.
I also used his helpful color tutorial in this project:
https://www.artstation.com/artwork/kQ0Enn
Thanks to this feedback, I became more conscious about choosing hues and values on the color wheel, which I’m sure helped take the piece to a next level.
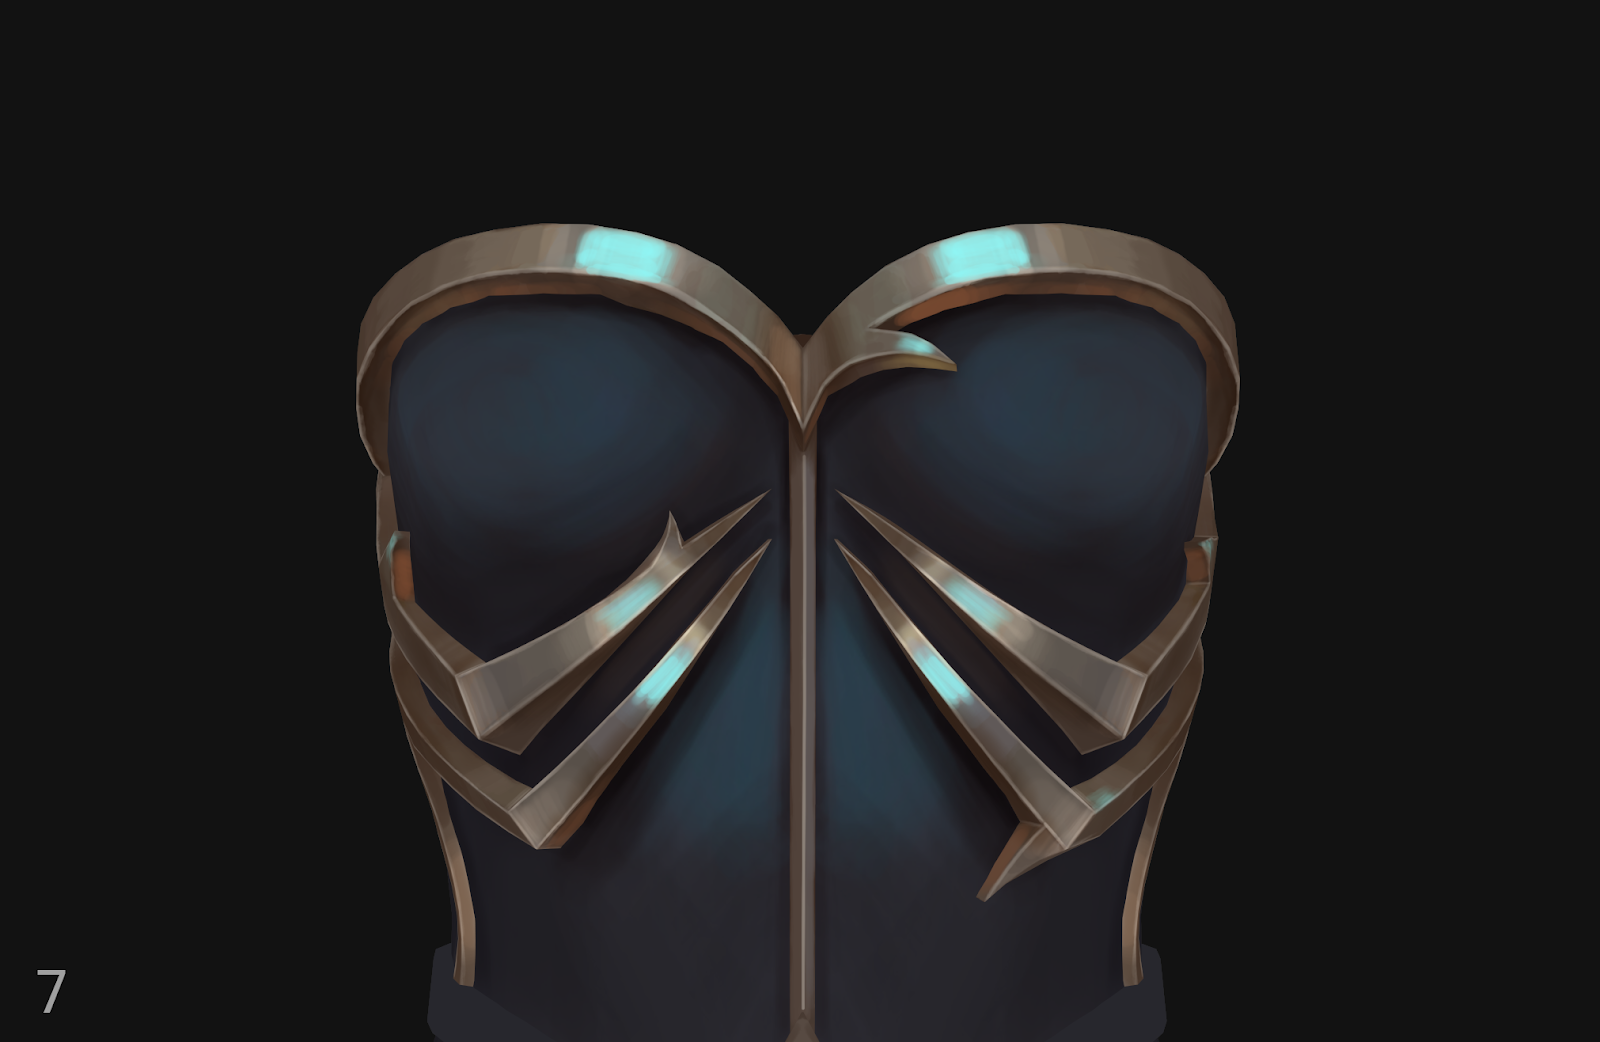
The armor on the corset feels more refined and gothic. The thorn-like pattern running across the outfit ties the design together, giving it better harmony.
The armor elements now feature asymmetry, typical of Arcane’s costume design. Geometric shapes have been replaced with more organic forms, bringing flow to the silhouette.
Getting feedback was incredibly valuable. It’s very inspiring and motivates me to work harder on my future characters.
Feedback from ZugZug Studio discord (before and after feedback)
Rendering & Presentation
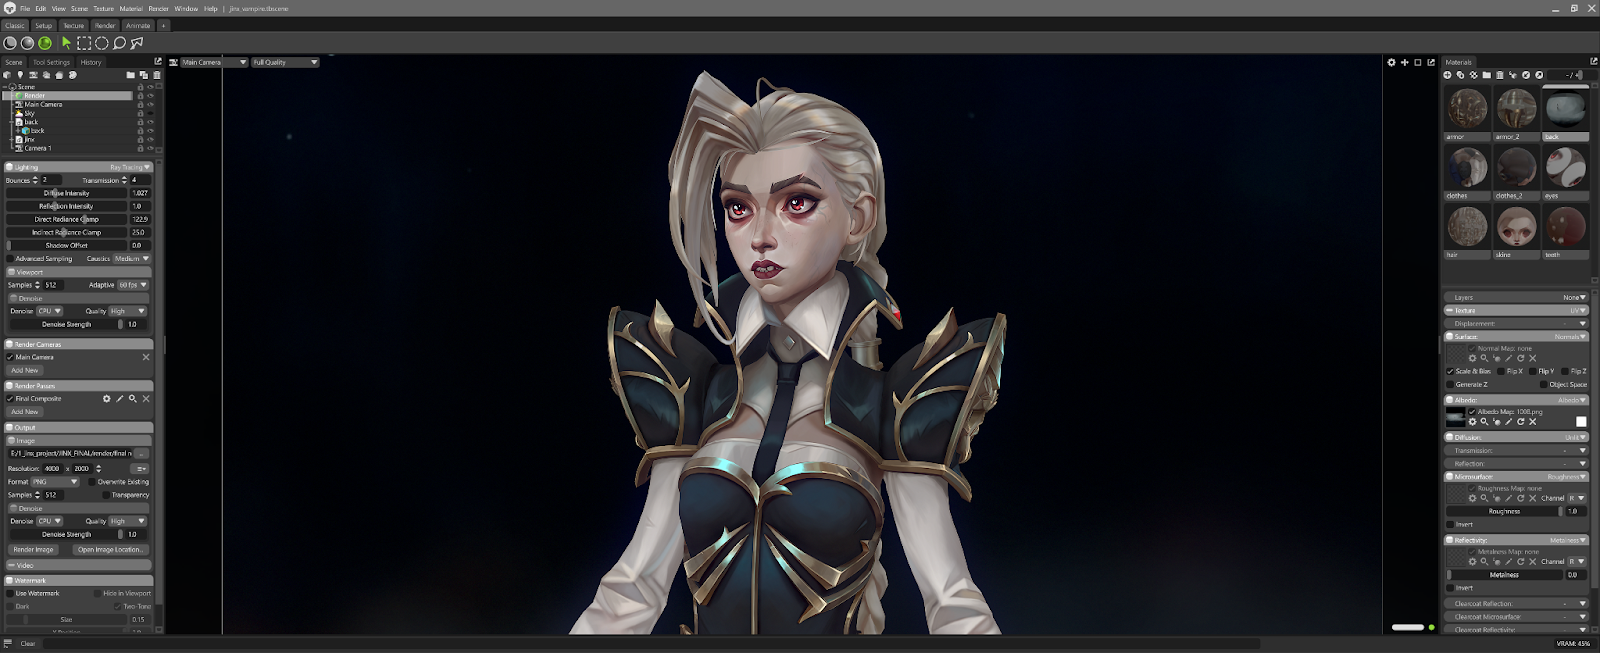
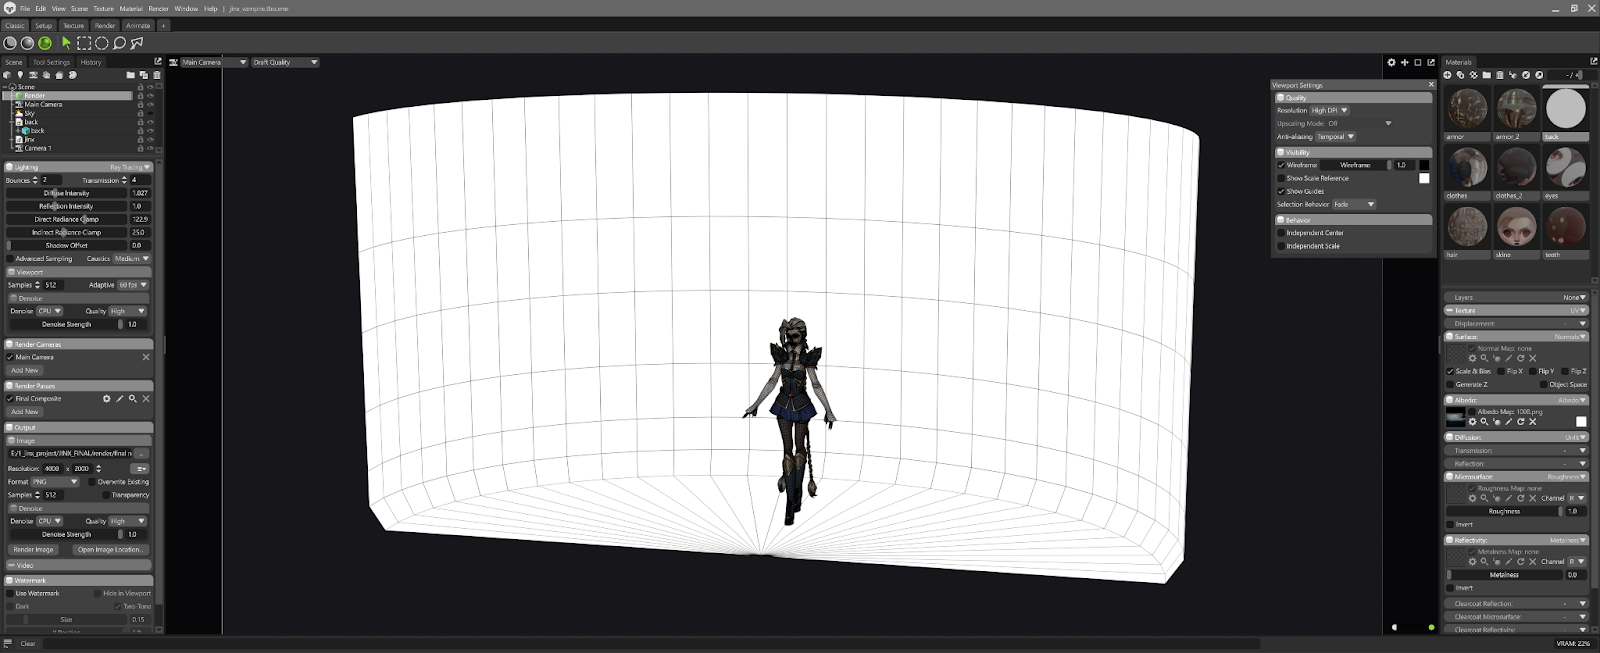
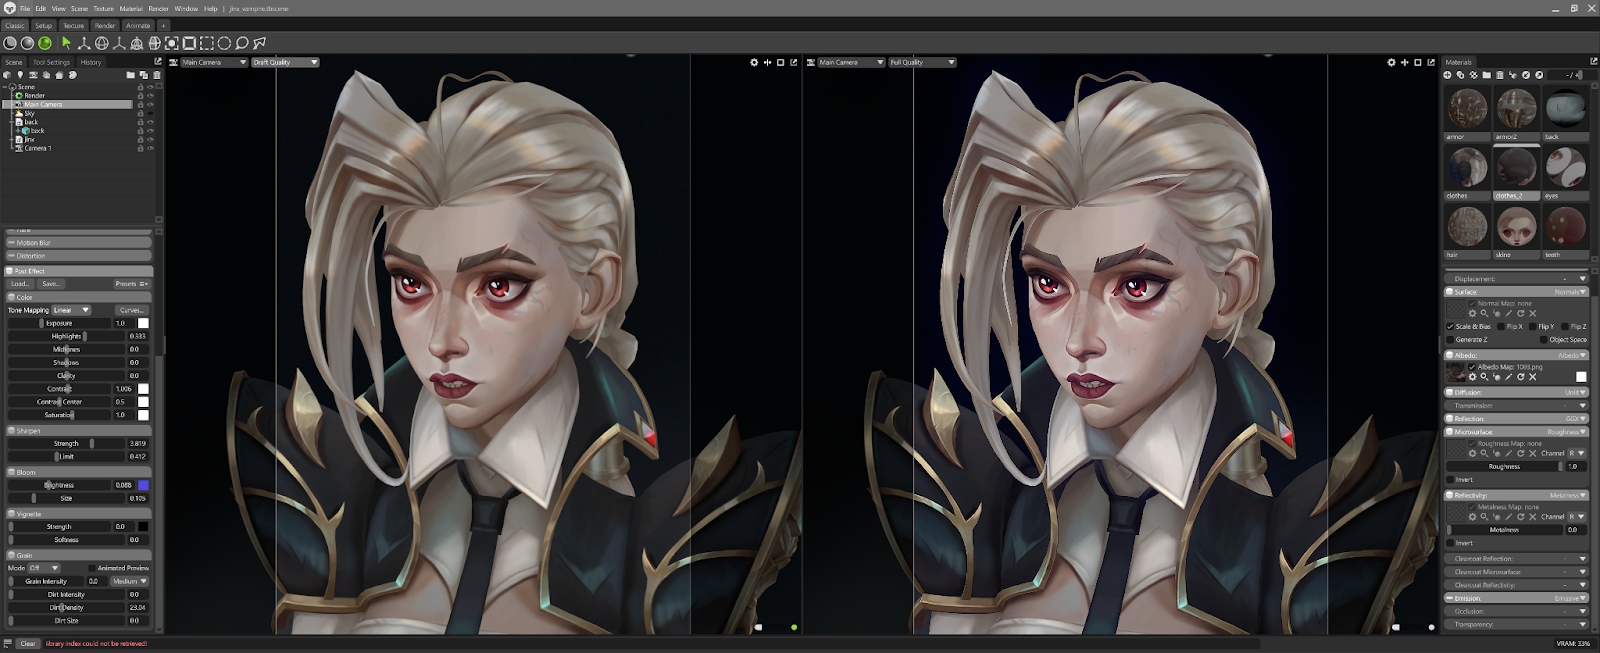
• You rendered the project in Marmoset Toolbag — love that!
Yes, I really enjoy using Marmoset Toolbag because it allows me to see the results immediately. I could load my work at any moment to check what still needed refinement and how my textures looked on the render.
• Was your final presentation fully unlit, or did you use lights?
The final presentation is fully unlit. There is no physical lighting in the scene.
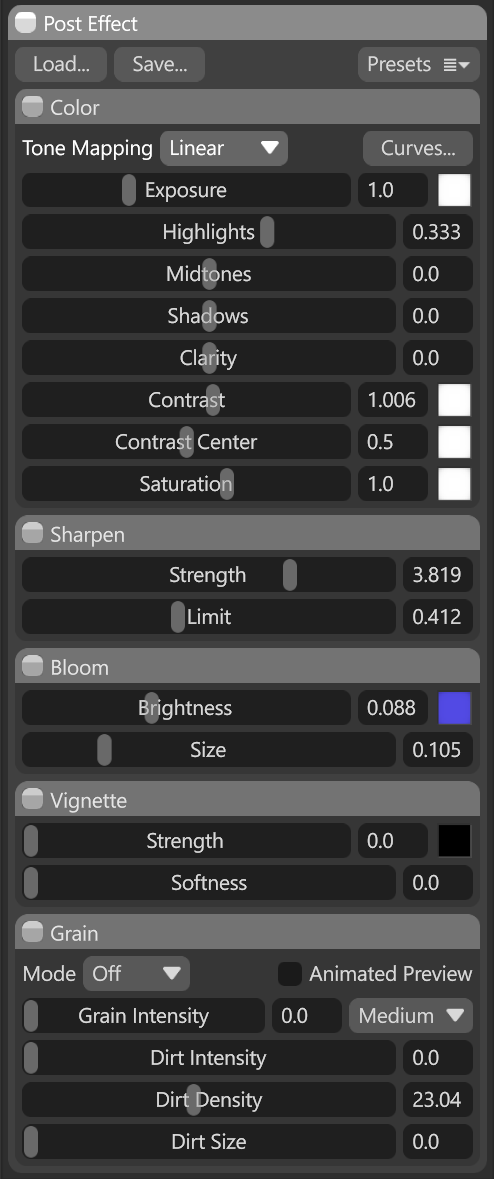
• Did you do any compositing or post-work for the foggy background or beauty shots?
I did not do any complex compositing. I modeled a simple box in Maya and fully hand-painted it in 3D-Coat.
In Marmoset, I only used minimal post effects — tone mapping (linear), bloom, sharpen for clarity, and a small amount of grain/dirt density — to subtly enhance the render without affecting the hand-painted textures. I also made slight color adjustments in Photoshop.
Reflection & Growth
• Roughly how long did the project take from start to finish?
The entire project took about 10 months. Most of that time was spent on learning, researching, and iterating.
• How long have you been doing 3D character art overall?
I’ve been working on 3D character art since 2023. I started with study portraits and speed sculpts, and by the end of 2024, I decided to create my first personal project for my portfolio, which I finished in 2025. I’m self-taught and have learned a lot by watching YouTube tutorials where amazing artists share their processes. Working in ZBrush and sculpting has been both exciting and challenging, and I’m absolutely obsessed with the process.
• What was the most challenging part of this project?
Actually, there were a lot of challenging things for me because I was doing many of them for the first time. For example, in ZBrush, I used only a few sculpting tools and didn’t fully understand how to work with mesh thickness, dynamic and subdivisions, how to work with polygroups and clean up the mesh for hard surface or clothing, as well as how to work with creases and bevels. During this project, I also started learning Maya and doing retopology. I learned how to bake maps, though in the end I only used low-poly. It’s hard to say exactly, but probably creating the concept and technical parts.
• If you had to do it all over again, what would you do differently?
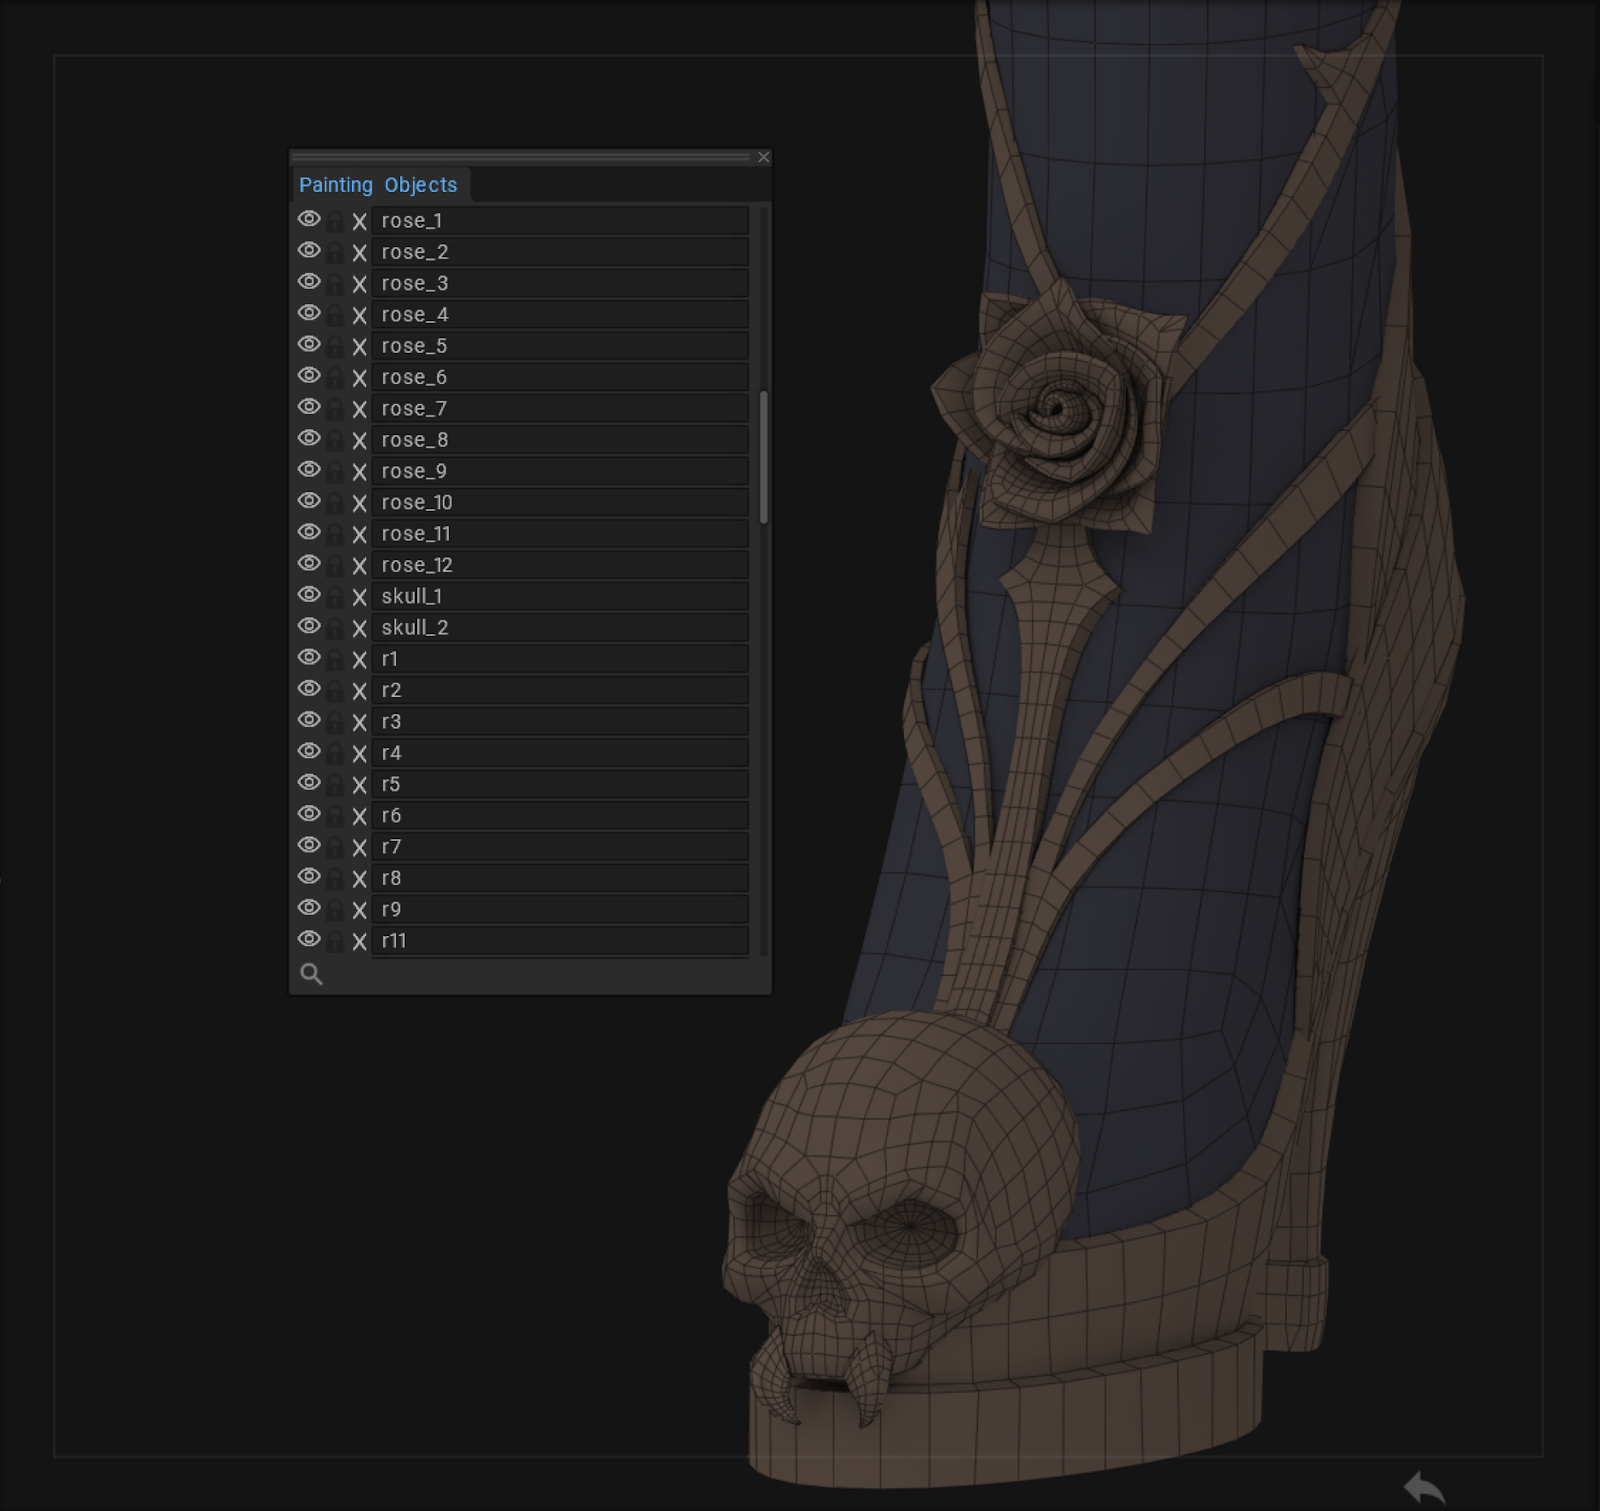
I would focus more on optimization.
Even though I tried to keep my workflow organized, I ended up with a lot of separate objects in the Painting Objects list. Finding each small piece was really painful.
I would make the skull a single mesh, combine the hands and nails, and merge other parts like the teeth, roses and head.
This would give me more control over the layers, make them fewer, and make merging faster. I wouldn’t have to scroll through the list all the time. The UVs would be cleaner, and the shells bigger, which is much better for hand-painting.

Advice & Closing
• What’s one key takeaway or lesson from this project that you’ll carry forward?
I started my creative journey in 2D, but moving into 3D took time, patience, and motivation. I used to wait for the “perfect moment” when I had enough sculpts, sketches, and skills to start a serious portfolio piece, but that turned out to be an illusion when I began working on my first project and learning as I went. Focusing on the work itself, iterating as I go, and accepting imperfection along the way is what actually allowed me to finish the project.
• If you could give your younger self any advice about learning 3D art, what would it be?
I would say: start learning 3D as early as possible. Get familiar with the essential programs and cover all the technical basics, so you can then focus more on the creative side.
• What advice would you give to artists who want to create stylized 3D characters like this?
Everyone talks about practice, and I won’t be an exception: practice is everything. Whenever possible, work on your 2D skills. It helps a lot to understand form and composition, which is essential for stylized 3D characters. Don’t be afraid to start without a full idea or a perfect plan—you’ll learn along the way. Don’t wait until you’re “good enough” at sculpting or texturing. The faster you find your weak spots, the faster you’ll know what to improve. Keep working no matter the result. Nobody learns without going through their own experience. And don’t forget to rest and enjoy life—balance is just as important as practice.
|